For a busy home, conventional wisdom about using durable paint is flawed; it merely postpones inevitable scuffs and stains. Textured vinyl wallpaper is the only solution engineered for the high-friction reality of family life.
- It offers superior visual forgiveness, actively hiding wall imperfections and daily wear-and-tear where paint highlights them.
- Its lifecycle cost is significantly lower, lasting up to 20 years compared to the 2-3 year touch-up cycle of even the most durable paints.
Recommendation: Move beyond the temporary fix of repainting and invest in a wall covering designed for durability, cleanability, and long-term peace of mind.
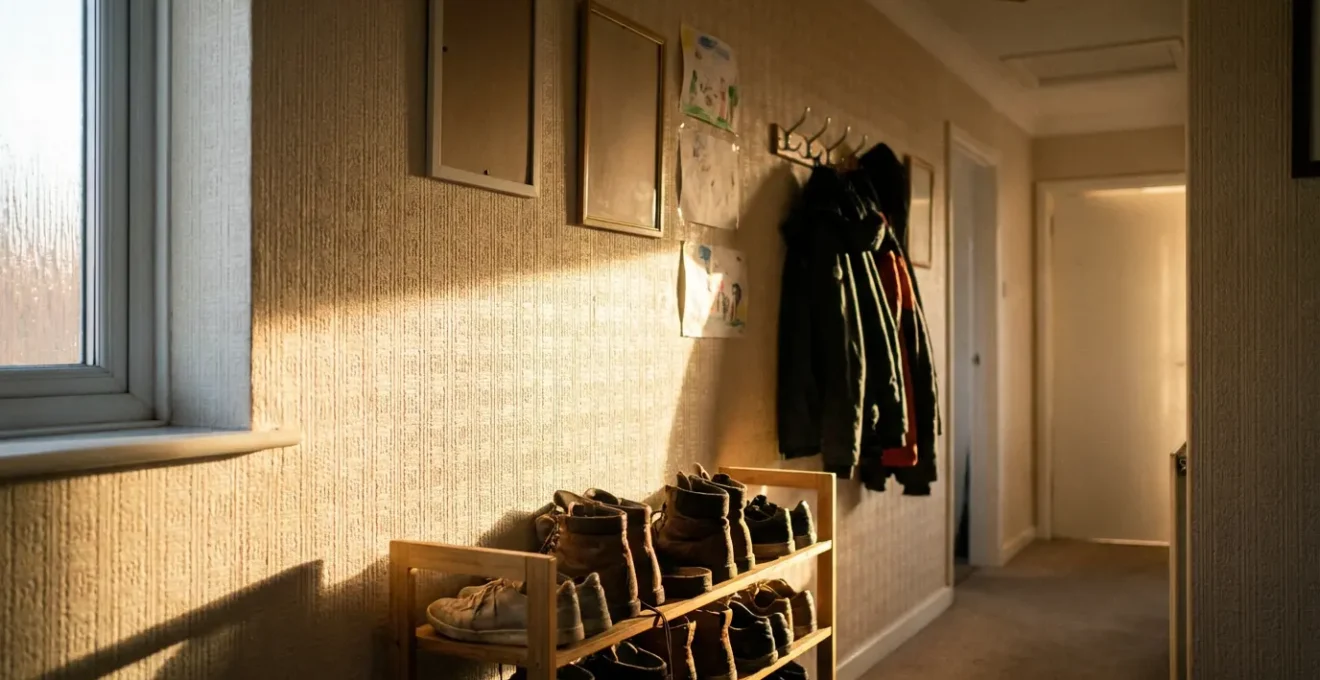
The hallway is the most demanding space in any home. It’s the raceway for kids, the scratching post for pets, and the drop zone for bags, coats, and shoes. As a pragmatic interior decorator, I see the same story unfold repeatedly: a freshly painted hallway looks pristine for a few months, only to be scarred by scuffs, dings, and fingerprints. The common advice is to use a durable satin or semi-gloss paint, but let’s be realistic—this is a temporary patch, not a permanent solution. You’re simply choosing a surface that’s slightly easier to clean before it needs repainting again.
This cycle of touch-ups and full repaints is exhausting and, over time, expensive. The conversation needs to shift from mere surface decoration to long-term surface engineering. We need to address the core friction points of a busy hallway: imperfect walls, constant physical contact, and the eventual need for a change. While matte paints offer depth and other finishes promise washability, they all fail under the sustained pressure of a high-traffic environment.
But what if the solution wasn’t about finding a better paint, but a better material altogether? The true, lasting answer lies in embracing a solution that is built for this reality from the ground up. This article will deconstruct the practical failures of paint and demonstrate, step-by-step, why textured vinyl wallpaper is not just an alternative, but the only truly viable strategic choice for maintaining beautiful, resilient walls in the busiest corridors of your home.
For those facing unique installation challenges, seeing a professional tackle a difficult surface can provide valuable insight. The following video demonstrates the process of applying wallpaper over wood paneling, offering a practical look at the versatility of modern wall coverings.
To fully understand this strategic choice, we will explore the key performance aspects that set textured vinyl apart. This guide breaks down the practical advantages, from initial application to long-term maintenance and eventual removal, providing a clear framework for your decision.
Summary: A Pragmatic Guide to Wall Coverings for Busy Homes
- Why Texture Hides Uneven Plaster Better Than Flat Paint?
- How to Hang Heavy Vinyl Wallpaper Without Visible Seams?
- Paste-the-Wall vs Paste-the-Paper: Which Is Easier for Beginners?
- The Ventilation Error That Causes Mold Behind Vinyl in Bathrooms
- How to Choose Strippable Vinyl to Save Yourself Hours in the Future?
- Why Matte Paint Makes Dark Colors Look Richer and deeper?
- The Ventilation Oversight That Causes Mold Behind New Insulation Layers
- Matte vs Satin Paint: Which Finish Hides Drywall Imperfections Best?
Why Texture Hides Uneven Plaster Better Than Flat Paint?
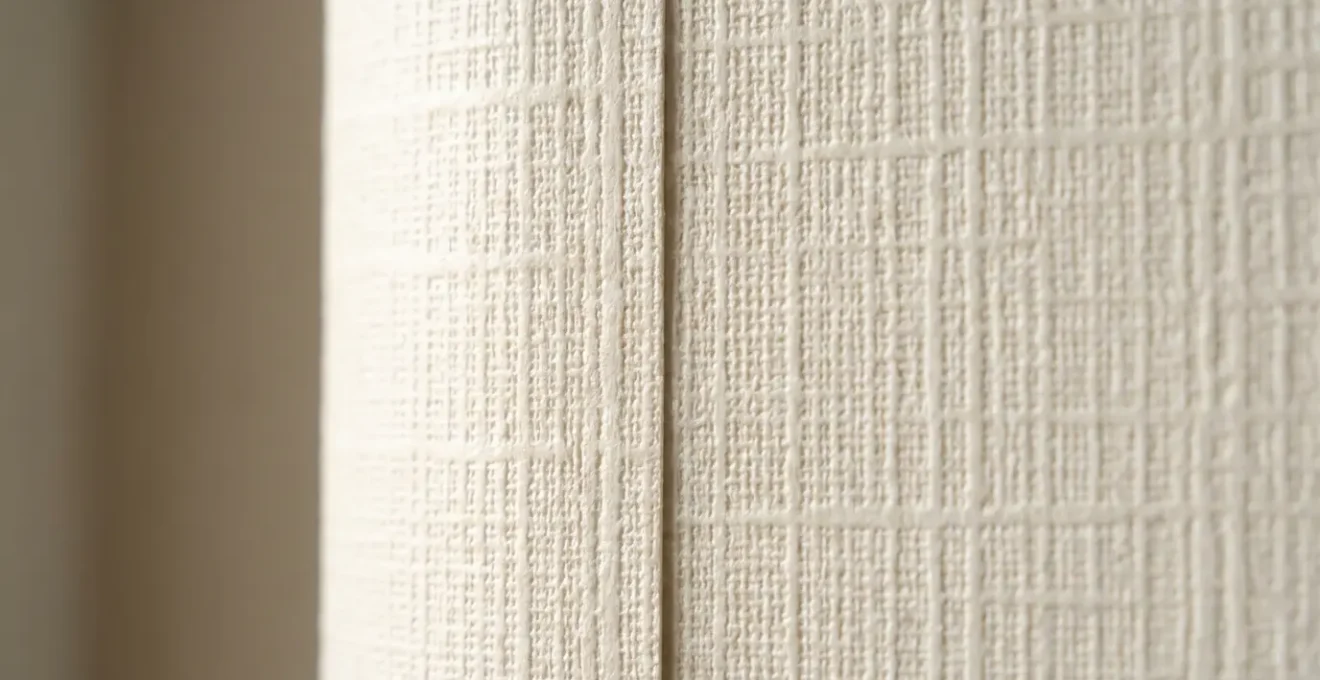
Flat or matte paint has a significant flaw in real-world homes: it’s brutally honest. Every minor bump, hairline crack, or subtle undulation in the plaster is highlighted by the way light hits the uniform surface. A smooth wall acts like a mirror for light, making imperfections starkly visible. This is where textured vinyl wallpaper introduces a principle I call “visual forgiveness.” It doesn’t just cover the wall; it fundamentally changes how light interacts with it.
The magic is in its three-dimensionality. The raised patterns of the wallpaper are a form of surface engineering designed to manipulate light and shadow. An analysis of wall coverings explains how the inherent texture effectively conceals cracks and dents through micro-shadow creation and light diffusion. Instead of a single, flat plane, you have thousands of tiny surfaces angled in different directions. This breaks up the light, creating subtle shadowing that masks the underlying imperfections rather than exposing them.
This is why textured vinyl or embossed wallpaper works best for concealing uneven surfaces. A flat coat of paint, no matter how high-quality, can only ever be as perfect as the wall beneath it. Textured vinyl, by its very nature, imposes its own perfect, patterned surface over the flawed one, offering a practical and immediate upgrade that paint simply cannot replicate without costly and time-consuming plasterwork.
How to Hang Heavy Vinyl Wallpaper Without Visible Seams?
The fear of visible seams is a major deterrent for many considering wallpaper. With heavy, textured vinyl, this concern is amplified. A poorly matched seam can ruin the entire effect, creating a distracting vertical line that breaks the illusion of a continuous surface. However, achieving a professional, invisible seam isn’t about magic; it’s about a precise, methodical process that controls the material at every step.
The key is to manage the adhesive and the paper’s expansion and contraction. When paper is soaked with paste, it expands. As it dries on the wall, it shrinks. This movement is what causes seams to open up. The professional technique involves several critical steps. First, “booking” the wallpaper—folding it paste-to-paste—for the exact time recommended by the manufacturer is essential. This allows the paper to expand fully before it even reaches the wall. Second, you must use a seam roller to gently flatten the edges, but only *before* brushing out the rest of the paper. Applying pressure after the paper is smoothed can stretch the material and force out the adhesive, weakening the bond.
As the image above demonstrates, a perfectly executed seam makes the join disappear, allowing the texture to flow uninterrupted. Any paste that squeezes out must be wiped away immediately with a clean, damp sponge. This prevents a shiny, visible residue on the finished surface. By controlling the booking time, using the right tools in the right order, and maintaining meticulous cleanliness, you can ensure the seams on even the heaviest vinyl wallpaper become completely invisible.
Paste-the-Wall vs Paste-the-Paper: Which Is Easier for Beginners?
The traditional image of wallpaper installation involves a messy, glue-soaked sheet of paper that is heavy, floppy, and difficult to manage. This is the “paste-the-paper” method, and for a heavy vinyl material, it can be particularly challenging for a DIYer. You’re fighting gravity with a slippery, cumbersome object. Fortunately, modern wallpaper technology has provided a vastly superior alternative for beginners: the “paste-the-wall” method.
With paste-the-wall products, the adhesive is applied directly to the wall, not the wallpaper. You then hang the wallpaper dry, straight from the roll. This single change revolutionizes the process. It eliminates the need for a pasting table, reduces mess, and gives you far greater control. You are no longer wrestling with wet paper; you’re simply applying a dry sheet to a prepared surface, making it significantly easier to handle, position, and trim.
This method is particularly advantageous for heavy vinyl wallpapers, which often come with a “non-woven” backing specifically designed for this application. The table below outlines the practical differences, highlighting why paste-the-wall is the clear winner for anyone who isn’t a seasoned professional.
| Aspect | Paste-the-Wall | Paste-the-Paper |
|---|---|---|
| Control for beginners | Superior – no handling of wet, heavy paper | Challenging – requires managing glue-soaked vinyl |
| Risk of paste on textured front | Minimal – paste never touches wallpaper face | High – paste can transfer during handling |
| Repositioning ability | Easy – paper stays dry and moveable | Limited – wet paper can stretch or tear |
| Booking time required | None needed | 5-10 minutes for vinyl |
| Best for non-woven backing | Yes – specifically designed for this | Not recommended |
For parents or busy homeowners, the efficiency and ease of the paste-the-wall method means a weekend project is far more achievable and less stressful. It lowers the barrier to entry, making a professional-looking result accessible to amateurs.
The Ventilation Error That Causes Mold Behind Vinyl in Bathrooms
A common myth is that vinyl wallpaper “suffocates” walls and inevitably leads to mold. This is a misunderstanding of moisture dynamics. Mold isn’t caused by the wallpaper itself, but by trapped moisture. While this is a known concern in bathrooms, the same principle applies to hallways that are poorly ventilated or have walls adjoining a cold exterior, leading to condensation. The critical error is not choosing vinyl; it’s choosing the *wrong* vinyl and failing to ensure proper wall preparation and ventilation.
Standard, old-fashioned vinyl wallpaper was indeed a non-permeable vapor barrier. However, modern “breathable” or “micro-vented” vinyls are engineered to solve this problem. These products are designed to be permeable, allowing water vapor to pass through instead of getting trapped. Commercial wallcovering specifications show that wallcovering can be made permeable (minimum 8+ perms) through an optional micro-venting process. This “perm” rating is a measure of a material’s breathability, and choosing a wallpaper with an adequate rating is crucial for any area with potential moisture.
Furthermore, preventing mold is about a systems-based approach, not just the final wall covering. The wall must be completely dry and treated before application. Using a high-quality, mold-inhibiting primer creates an active barrier against fungal growth. Proper ventilation in the space—even a hallway—ensures that ambient humidity is kept in check. Ignoring any one of these steps is what leads to problems, not the vinyl itself.
Your Action Plan: Preventing Moisture Issues in Hallways
- Primer is Non-Negotiable: Use a specialized primer like Zinsser Shieldz for new drywall or Zinsser Gardz for renovated walls. Standard paint primers are not sufficient.
- Select for Breathability: For any wall on an exterior-facing line or in a humid climate, actively seek out micro-vented vinyl wallpaper with a specified perm rating.
- Ensure a Dry Canvas: Before installation, confirm the wall is completely dry and shows no signs of existing mildew or moisture. Address any leaks or dampness at the source.
- Promote Airflow: Maintain good ventilation in the home to reduce overall humidity levels, which discourages condensation on colder exterior walls.
- Monitor Post-Installation: Periodically check for any signs of moisture infiltration, especially during season changes, and address them promptly to prevent problems from developing.
How to Choose Strippable Vinyl to Save Yourself Hours in the Future?
The long-term lifecycle of a wall covering is just as important as its appearance and durability. The nightmare scenario for any homeowner is spending days scraping off tiny, stubborn pieces of old wallpaper. This is why understanding the terminology around removal is a critical part of the selection process. Not all vinyl wallpapers are created equal when it comes to removal, and choosing the right one from the start is an investment in your future sanity.
The gold standard is “strippable” wallpaper. This term has a specific meaning: the entire sheet, from the vinyl face to the backing, can be pulled off the wall dry, without the need for steamers or chemical solvents. It peels away cleanly, leaving the wall ready for its next treatment. This is often confused with “peelable” wallpaper, where only the top vinyl layer comes off, leaving the paper backing adhered to the wall. This backing then needs to be soaked and scraped off—the very job you wanted to avoid.
The key to strippability lies in the backing material. Vinyl with a non-woven or fabric backing has superior structural integrity. This backing holds the wallpaper together as you pull, allowing it to come off in large, satisfying sheets. Cheaper, paper-backed vinyls lack this strength and are prone to tearing. Equally important is proper wall preparation before the initial installation. Applying a wallpaper “sizer” or primer creates a barrier that prevents the adhesive from forming a permanent bond with the drywall, ensuring a clean release years down the line.
Why Matte Paint Makes Dark Colors Look Richer and deeper?
There’s an undeniable appeal to the deep, velvety finish of matte paint, especially for dark and dramatic colors. Its non-reflective surface absorbs light, which gives the color a sense of profound depth and richness. A satin or gloss finish, by contrast, reflects light, which can make dark colors appear less intense and can highlight imperfections. For pure aesthetic depth, matte paint seems like the obvious winner. However, this aesthetic comes at a steep practical cost in a high-traffic area.
Matte paint is notoriously difficult to clean. Its porous texture traps dirt and oils, and any attempt to scrub a mark often results in “burnishing,” leaving a shiny, permanent patch that looks worse than the original scuff. This is a critical failure in a hallway. Textured vinyl, on the other hand, offers a more sophisticated solution. As one Interior Design Specialist notes, “Textured vinyl achieves a ‘dynamic richness’ by interacting with light and shadow, creating depth that changes throughout the day, unlike the static depth of matte paint.” It provides visual complexity without sacrificing durability.
Case Study: Durability in High-Traffic Hallways
A long-term analysis of wall coverings in busy family homes reveals a stark contrast in performance. A hallway painted with high-end matte paint required significant touch-ups within two years due to scuffs and unremovable marks. A similar hallway covered with a quality textured vinyl showed virtually no wear after five years and was easily cleaned. A study on wall coverings confirms that textured vinyl can last up to 20 years in busy hallways, a massive increase over the typical 2-3 year repaint cycle for paint, making its lifecycle cost far lower.
Ultimately, textured vinyl delivers the best of both worlds: it provides a rich, dynamic visual depth that rivals matte paint while offering the superior, fully scrubbable durability that a busy hallway absolutely demands. It’s a pragmatic choice that doesn’t compromise on sophisticated aesthetics.
The Ventilation Oversight That Causes Mold Behind New Insulation Layers
When homeowners upgrade their homes with new insulation, they are often focused on thermal efficiency, not moisture management. This can lead to a critical oversight. Modern insulation, often paired with a vapor barrier, is designed to make the building envelope tighter. While this is great for energy bills, it also means that any moisture generated inside the home has fewer ways to escape. If a non-breathable wall covering is applied over these newly insulated exterior walls, you can create a perfect storm for mold.
The physics are simple: warm, moist indoor air comes into contact with a wall that is colder due to the exterior temperature. The moisture in the air condenses into liquid water on the back of the wall covering. If the wallpaper is a solid vinyl sheet with no permeability, that water is trapped. This creates a dark, damp environment where mold can thrive, hidden from view until it becomes a serious problem. This is why blindly applying any wallpaper over a newly insulated wall is a significant risk.
The solution, once again, is material science. It is essential to choose a wall covering with a specified vapor permeability. As outlined in commercial installation guidelines, a rating of 8+ perms is recommended for wallcoverings in humid climates or on walls prone to condensation. This ensures that the wall can “breathe,” allowing trapped water vapor to pass through the material and evaporate, rather than condensing into liquid. Applying a mold-inhibiting primer rated for vapor barrier applications provides an additional layer of critical protection in these high-risk scenarios.
Key Takeaways
- Imperfection Hiding: Textured vinyl uses light and shadow to actively conceal flaws, whereas paint highlights them.
- Superior Durability: Engineered for high-traffic zones, vinyl is fully scrubbable and resistant to scuffs that permanently damage matte and satin paints.
- Long-Term Value: With a lifespan of 15-20 years, the lifecycle cost of vinyl is significantly lower than the constant 2-3 year repaint cycle required for paint in a busy hallway.
Matte vs Satin Paint: Which Finish Hides Drywall Imperfections Best?
The classic debate for high-traffic areas is between matte and satin paint. Matte is better at hiding imperfections due to its low sheen, but it has zero durability and can’t be cleaned. Satin offers some washability, but its higher sheen reflects more light, which means it highlights every bump and ding on the wall—the very things you want to hide in a busy hallway. This leaves homeowners with an impossible choice: hide flaws or have a cleanable surface? You can’t have both with paint.
This is a fundamentally flawed premise. The real solution is to step outside the paint-versus-paint debate and introduce a third, superior option. Textured vinyl wallpaper doesn’t force this compromise. It delivers excellent imperfection hiding AND excellent cleanability and scuff resistance. It is the only option that solves both problems simultaneously.
As the Giffy Walls Design Team points out, “High-quality textured wallpaper is incredibly durable and can last for many years… It’s more resistant to scratches, scuffs, and tears than paint, making it a great choice for busy households.” This isn’t just an opinion; it’s a statement of material fact. The final scorecard below offers a clear, pragmatic comparison across all the metrics that truly matter for a hallway in a home with kids or pets.
This comparative scorecard, based on an in-depth analysis of wall coverings for imperfect walls, leaves no room for doubt. On every single metric crucial for a high-traffic zone—from hiding flaws to long-term cost—textured vinyl outperforms both matte and satin paint.
| Metric | Matte Paint | Satin Paint | Textured Vinyl |
|---|---|---|---|
| Imperfection Hiding | Good | Poor | Excellent |
| Scuff Resistance | Poor | Good | Excellent |
| Cleanability | Poor | Good | Excellent |
| Repairability | Difficult (flashing) | Moderate | Easy (replace strip) |
| Long-Term Cost | High (frequent repainting) | Moderate | Low (15-20 year lifespan) |
Stop the endless cycle of touch-ups and repainting. It’s time to choose a wall solution engineered for the reality of your life. Explore textured vinyl options and plan for a hallway that stays beautiful, no matter what your family throws at it.
Frequently Asked Questions about Textured Vinyl Wallpaper
What’s the difference between ‘Strippable’ and ‘Peelable’ vinyl wallpaper?
Strippable wallpaper can be removed in full sheets without water or chemicals. Peelable means only the top vinyl layer comes off, leaving the backing that requires additional removal steps.
Which backing makes vinyl easiest to remove?
Non-woven or fabric-backed vinyl provides structural integrity allowing the wallpaper to be pulled off in large sheets, while paper-backed vinyl often tears during removal.
How does wall preparation affect future removal?
Walls that are correctly ‘sized’ or primed before installation will release wallpaper cleanly, whereas unprepared walls cause the paper or its backing to tear and stick firmly to the wall during removal.