Achieving perfect pathway lighting isn’t about following a generic ‘feet-apart’ rule. It’s a deliberate design process of layering light to sculpt a safe, intuitive, and beautiful journey. By mastering the principles of light pooling, lumen levels for safety, and strategic placement, you can transform a simple path into an elegant, glare-free experience that enhances both your landscape’s aesthetics and its nighttime functionality.
As a lighting designer, I often see the same mistake: a beautifully landscaped garden path undermined by poorly conceived lighting. The result is often a series of isolated, glaring hotspots or, worse, treacherous dark patches that turn a pleasant stroll into a hazardous walk. Many homeowners and even some landscapers fall back on simplistic rules of thumb, placing bollards a generic number of feet apart, hoping for the best. This approach completely misses the point of landscape lighting.
The goal isn’t just to make a path visible; it’s to create a visual narrative that guides movement, enhances textures, and builds an atmosphere. It’s about painting with light to create a cohesive and intuitive experience. This involves understanding the interplay between brightness (lumens), color temperature (Kelvin), and the physical placement of each fixture. It’s a craft that balances the technical requirements of safety with the art of aesthetic design, considering everything from the fixture itself to the surface it illuminates.
But what if the key wasn’t the distance between lights, but the quality of the light itself and the way it interacts with its environment? This guide moves beyond generic advice to give you a designer’s framework. We’ll deconstruct the process, focusing on creating overlapping pools of glare-free light that form a continuous, safe, and visually pleasing “carpet of light.” We will cover the critical aspects of lumen selection, installation stability, color rendering on different materials, and the professional techniques used to troubleshoot and time your installation for flawless results.
This comprehensive guide breaks down the essential considerations for designing and installing a professional-grade bollard lighting system. Discover the key principles that will elevate your project from merely functional to truly exceptional.
Summary: A Designer’s Guide to Flawless Bollard Lighting
- Why 10 Lumens is Decorative but You Need 100 Lumens for Safety?
- How to Install Bollards in Soft Soil So They Don’t Lean Over Time?
- Warm White (2700K) vs Cool White (4000K): Which Looks Better on Stone Paths?
- The Placement Mistake That Turns Light Fixtures into Tripping Blocks
- How to Troubleshoot a Daisy-Chain Failure in Low-Voltage Bollards?
- Why You Need Lithium-Ion Batteries for Reliable Winter Lighting?
- When to Install Outdoor Lighting: Before or After Hardscaping Completion?
- How to Position Spotlights to Highlight Bark Texture Without Blinding Guests?
Why 10 lumens is decorative but you need 100 lumens for safety?
The single most important decision in pathway lighting is choosing the correct brightness, measured in lumens. A common mistake is selecting fixtures based on decorative appeal alone, which often means they emit as little as 10-20 lumens. While this can create a charming twinkle, it’s dangerously insufficient for safe navigation. For true safety, a pathway requires a baseline of 100 to 200 lumens per fixture to adequately illuminate the walking surface and reveal potential obstacles.
This requirement becomes even more critical in multigenerational homes. Research shows that aging eyes need significantly more light to perceive the same level of detail and contrast as younger eyes. What appears as a gently lit path to a thirty-year-old might be a series of confusing shadows to a senior, increasing the risk of falls. According to IES guidelines referenced by lighting professionals, even low-traffic residential paths should adhere to the 100-200 lumens standard for safety, with higher-traffic community paths needing up to 600 lumens.
Brightness needs vary by location. While pathways need that 100-200 lumen baseline, other areas have different requirements. Steps and stairs, which are high-risk zones, benefit from 100-300 lumens to clearly define each riser. Main entrances and porches require 300-800 lumens for both safe entry and clear facial recognition. Decorative accent lighting, by contrast, can function effectively with as little as 50 lumens if the goal is simply to highlight a plant or feature. Always prioritize function and safety first, then layer in decorative elements.
How to install bollards in soft soil so they don’t lean over time?
A perfectly spaced lighting layout is worthless if the fixtures themselves are unstable. Bollards installed in soft soil are notorious for leaning or shifting due to ground settlement, frost heave, and moisture changes. Simply driving a stake into the dirt is a recipe for failure. The professional solution is to create a robust foundation that isolates the fixture from ground movement: a concrete pier.
This process involves more than just a bag of quick-set concrete. For maximum stability, especially in regions with frost, the foundation must extend below the local frost line. This prevents the seasonal freezing and thawing of soil from pushing the fixture upwards and out of alignment. Depending on the climate and local regulations, bollard code requirements may demand sinking the base as deep as four feet below grade. This ensures the bollard is anchored in stable, undisturbed soil.
The image below illustrates the professional method for setting a bollard. A Sonotube or similar form is used to create a clean, cylindrical concrete pier. The conduit for the low-voltage wiring is run up through the center of the pier, and the bollard’s mounting base is anchored directly into the cured concrete, creating an incredibly durable and permanent installation.
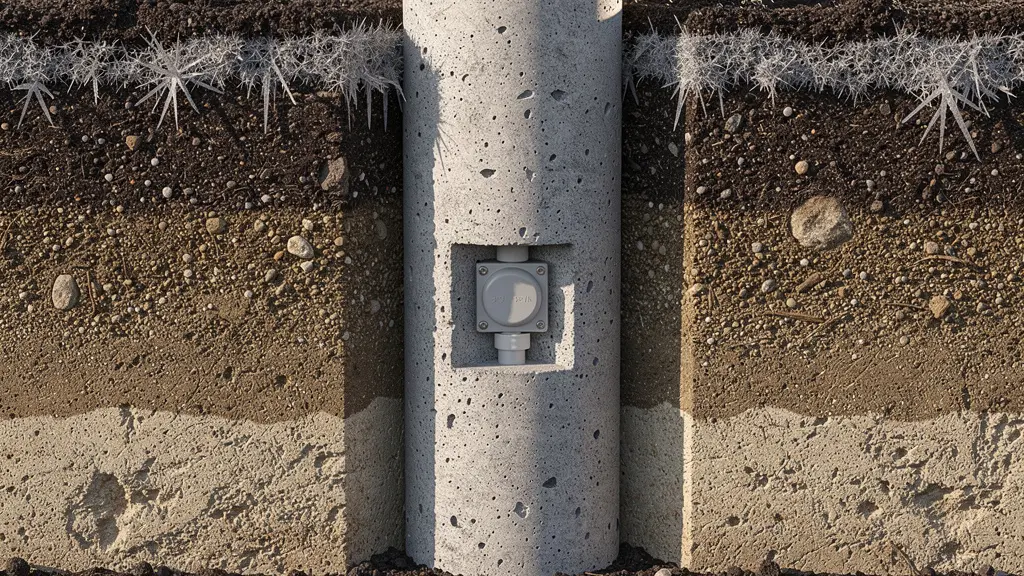
In extreme cold climates, professionals take this a step further to mitigate frost heave. Techniques include using greased or poly-lined Sonotubes for the top several feet. This creates a friction-reducing sleeve, allowing the frozen ground to move around the pier without gripping and lifting it. This expert-level technique guarantees that your bollards will remain perfectly vertical for years, regardless of weather conditions.
Warm white (2700K) vs cool white (4000K): which looks better on stone paths?
The color temperature of your light source, measured in Kelvin (K), dramatically affects the mood and appearance of your landscape. For stone pathways, the choice between a warm or cool light is not just a matter of preference—it’s about enhancing the natural material. A warm white light (2700K to 3000K) is almost always the superior choice for residential settings. It mimics the gentle glow of incandescent or candlelight, creating a welcoming and relaxing atmosphere.
As the outdoor lighting experts at Lumaz Life state in their research:
For most residential yards, 2700-3000K offers warm, attractive light that minimizes blue light impacts. For security areas where clarity is important, 3000-4000K may be acceptable. Avoid >4000K in residential settings to reduce glare and potential wildlife disruption.
– Lumaz Life Outdoor Lighting Research, Energy-Efficient Outdoor Lighting Guide 2025
Cool white light (4000K and above) contains more blue light and can appear harsh, clinical, or even sterile in a garden setting. It tends to flatten textures and wash out the rich, earthy colors of natural stone. While 4000K might be suitable for commercial or high-security areas where maximum clarity is the only goal, it robs a residential landscape of its charm. The following table breaks down how color temperature interacts with common stone types. Another crucial metric is the Color Rendering Index (CRI), which measures a light’s ability to reveal colors faithfully. For natural materials, a CRI of 90+ is ideal.
| Stone Type | 2700K Effect | 4000K Effect | Recommended CRI |
|---|---|---|---|
| Rough Flagstone | Enhances rustic texture with soft shadows | Can appear harsh on uneven surfaces | 90+ CRI |
| Modern Cut Pavers | Warm, welcoming appearance | Accentuates clean lines with sharp contrast | 80+ CRI |
| Cobblestones | Three-dimensional texture enhancement | High contrast may create glare | 90+ CRI |
The placement mistake that turns light fixtures into tripping blocks
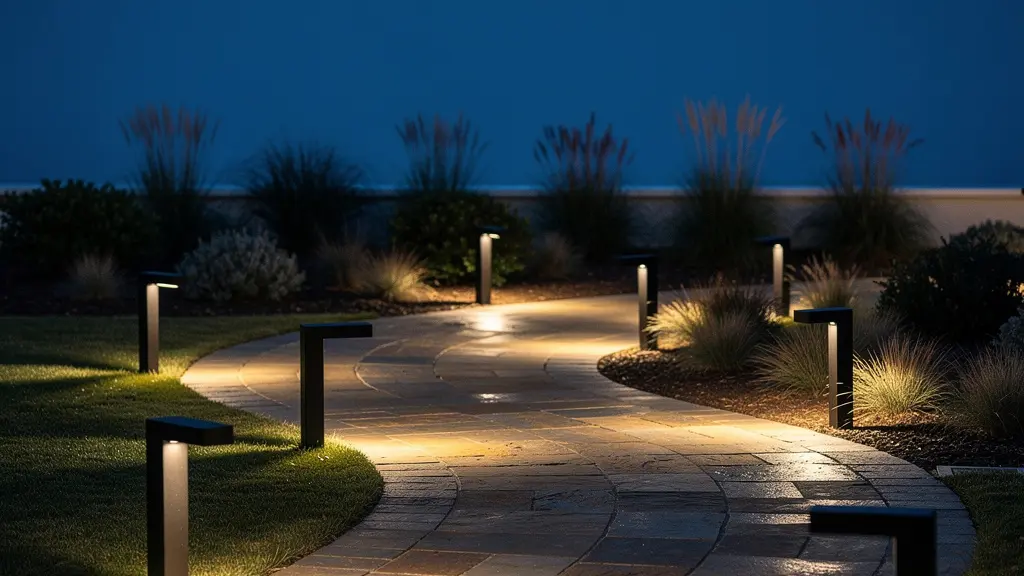
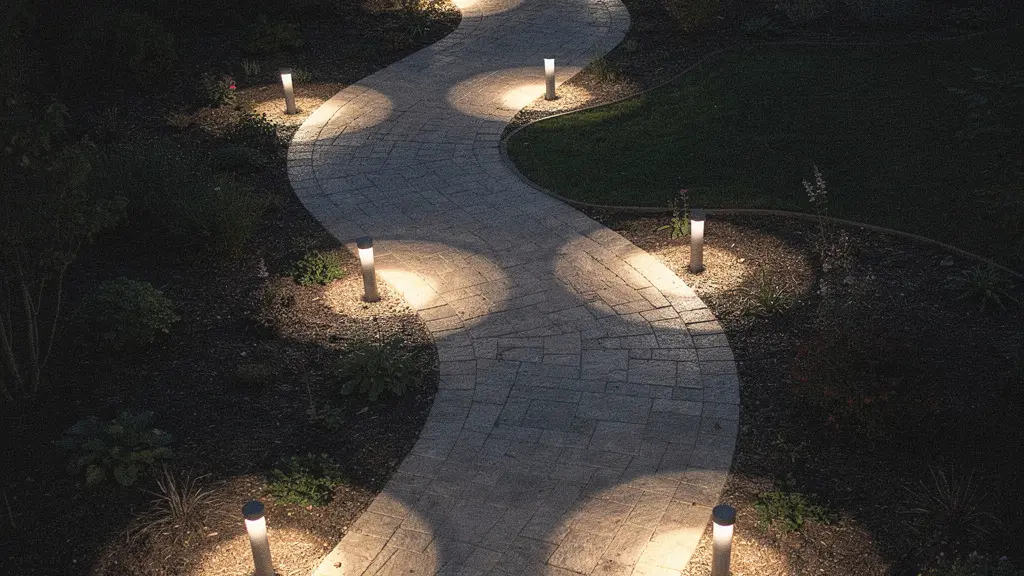
The most common and dangerous placement error is creating discontinuous pools of light. When fixtures are spaced too far apart, the path alternates between bright spots and hazardous dark gaps. The eye struggles to adjust, and what’s in the shadows becomes a trip hazard. The goal is not just to dot the path with lights but to create a continuous, overlapping “carpet” of illumination.
While a general guideline from professional lighting designers recommends 10 to 15 feet of space between lights, this is merely a starting point. The optimal distance depends entirely on the fixture’s beam spread—the diameter of the useful light it casts on the ground. The key technique is to space the bollards so that the edges of their light pools overlap slightly. This creates a “scalloping” effect, as seen in the aerial view below, ensuring there are no unlit areas.
To achieve this, you must test your fixtures at night before final installation. Place them temporarily and perform a walk-through. Do you feel your eyes straining? Are there any dark spots where your foot could land unseen? Adjust the spacing until the path is seamlessly lit from beginning to end. For narrow paths (under 4 feet wide), a staggered layout is often better than placing fixtures directly opposite one another, as it creates a more natural visual rhythm and avoids a “runway” look. Finally, always position the first and last lights very near the start and end of the path to clearly mark the entry and exit points.
How to troubleshoot a daisy-chain failure in low-voltage bollards?
In a “daisy-chain” wiring layout, fixtures are connected one after the other in a single line running from the transformer. This method is simple but has a major drawback: a single point of failure (like a bad connection or a cut wire) can cause all subsequent lights in the chain to go out. When this happens, a systematic approach is needed to find the fault without digging up the entire installation.
The first step is always to use a multimeter to check the voltage. Start at the transformer to ensure it’s outputting the correct voltage (typically 12-15V AC for low-voltage systems). Then, test the voltage at the first fixture, the middle fixture, and the last fixture. A significant voltage drop (more than 2V) between the first and last light indicates a problem with resistance, often due to an undersized wire for the run’s length or corroded connections. All outdoor connections must use waterproof wire nuts or gel-filled connectors to prevent this corrosion.
If a section of lights is completely out, the “divide and conquer” method is most effective. Go to the middle of the non-working section, disconnect the chain, and test the voltage on the wire coming from the transformer. If you have voltage there, the problem is further down the line. If there’s no voltage, the problem is between that point and the last working light. This process of halving the problem area allows you to quickly isolate the faulty wire or connector.
Your Action Plan: Diagnosing a Daisy-Chain Outage
- Check the Source: Use a multimeter to confirm the transformer is outputting the correct voltage (12-15V AC).
- Test for Voltage Drop: Measure voltage at the first, middle, and last fixture in the chain. A drop greater than 2V signals a wiring or connection issue.
- Divide and Conquer: Disconnect the chain in the middle of the failed section to isolate whether the fault is upstream or downstream.
- Inspect Connectors: Visually inspect each connection point for signs of corrosion or looseness. Replace any non-waterproof or damaged connectors.
- Verify Wire Gauge: Confirm the wire gauge used is appropriate for the total wattage of the fixtures and the length of the run to prevent excessive voltage drop.
Why you need lithium-ion batteries for reliable winter lighting?
For solar-powered bollards, battery performance is everything, especially during the short, cold days of winter. Older solar lights often used Nickel-Cadmium (Ni-Cd) or Nickel-Metal Hydride (Ni-MH) batteries, which suffer from poor performance in cold temperatures and have a shorter lifespan. Modern, high-quality solar fixtures rely on advanced lithium-ion battery chemistries for consistent, year-round reliability.
Specifically, many top-tier manufacturers now use Lithium Iron Phosphate (LiFePO4) batteries. This specific type of lithium-ion battery offers several key advantages for outdoor lighting. It has a much longer cycle life (meaning it can be charged and discharged more times), is more thermally stable (safer), and, most importantly, it maintains its capacity and ability to deliver power far better in cold weather than other battery types. A system that works perfectly in summer can fail completely on a freezing winter night if it uses inferior battery technology.
A well-designed solar bollard with a quality battery can provide dependable light even with limited sun. For example, some professional-grade fixtures equipped with a modern 3.2V 3000mAh battery provide three nights of illumination on a single full charge. This autonomy is crucial for getting through consecutive overcast days. While these advanced batteries are more expensive initially, their longevity and reliability make them a wise investment. Cheaper models with inferior batteries may need their batteries replaced every year or two, negating any upfront savings and leading to frustratingly dark pathways when you need them most.
When to install outdoor lighting: before or after hardscaping completion?
One of the costliest mistakes in landscape design is treating lighting as an afterthought. Attempting to install in-ground wiring after a stone patio, concrete walkway, or asphalt driveway has been completed is incredibly difficult, expensive, and often results in a compromised installation. As a designer, the rule is absolute: plan your lighting and install your conduit before or during hardscaping.
The professional approach is a two-phase installation method. As the Light My House guide advises, you must begin by sketching a layout to visualize the final effect.
When installing pathway lighting, thoughtful planning and execution can achieve both functionality and aesthetic appeal. Here are some key tips to help you create optimal lighting effects while highlighting your property at night: Plan Your Layout. Begin by sketching a layout that incorporates architectural features and landscape lights. This helps visualize how the path will be illuminated, especially around garden features like flower beds.
– Light My House Professional Guide, How Far Apart Should Pathway Lights Be – Installation Guide 2025
Phase 1 (During Construction): While the ground is open and before any pavers, stone, or concrete are laid, you must install all the necessary electrical conduit. This involves laying 1-inch diameter PVC conduit sleeves under any areas that will be hardscaped. Using a wider-than-needed conduit provides flexibility for future repairs or expansions. These conduits act as tunnels for your future wiring.
Phase 2 (After Completion): Once the hardscaping is finished and the dust has settled, you can proceed with the lighting installation. The low-voltage wires are easily pulled through the pre-installed conduits without any need for disruptive trenching or drilling. The fixtures, like bollards, can then be placed precisely on the finished surfaces, and their foundations (concrete piers) can be poured. It is absolutely critical to map and photograph the locations of all conduits before they are covered over, creating a permanent record for future maintenance.
Key Takeaways
- Safety First: Pathway safety requires a minimum of 100-200 lumens per fixture; decorative lighting levels are insufficient.
- Design with Overlap: The goal is not just spacing, but creating overlapping pools of light (scalloping) for a continuous, glare-free “carpet of light.”
- Install Conduit Early: To avoid expensive and damaging rework, always install wiring conduits under paths and patios *before* hardscaping is completed.
How to position spotlights to highlight bark texture without blinding guests?
While bollards are the workhorses for illuminating pathways, a truly sophisticated lighting design layers different techniques to create depth and interest. One of the most effective ways to add drama to a landscape is by highlighting the texture of specimen trees. However, done incorrectly, this can create blinding glare for anyone walking nearby. The secret is in the positioning of the spotlight, using a technique called “grazing.”
Grazing involves placing a narrow-beam spotlight very close to the trunk of the tree and aiming it almost straight up. The light “grazes” the surface of the bark at an extreme angle, creating dramatic micro-shadows that reveal every crack and crevice. This makes the texture pop in a way that standard uplighting—where the light is placed further away—cannot. Uplighting tends to create a general wash of light that flattens texture. For this accent lighting, you don’t need intense brightness; a focused beam of 50-300 lumens is typically sufficient.
The key to doing this without blinding your guests is fixture placement and shielding. The light should be aimed parallel to the nearby path, not towards it. Furthermore, using a fixture with a built-in shroud or adding an accessory like a honeycomb louver is essential. A louver is a grid-like filter that sits over the lens and dramatically cuts down on side glare, ensuring the light goes exactly where you want it—on the bark—and not into anyone’s eyes. The following table compares the different techniques.
| Technique | Light Position | Effect on Bark | Guest Safety |
|---|---|---|---|
| Grazing | Very close to trunk, aimed straight up | Dramatic micro-shadows reveal texture | Minimal side glare |
| Uplighting | Further from trunk | General wash, flattens texture | Potential glare issues |
| With Honeycomb Louver | Close to trunk with shroud | Focused texture enhancement | Eliminates stray light |
Frequently asked questions about LED Bollard Lighting
Why do the last lights in my daisy chain appear dimmer?
This phenomenon, known as voltage drop, occurs when the wire gauge is too small for the total length and electrical load of the circuit. Resistance in the wire causes voltage to decrease the further it gets from the transformer, resulting in dimmer light. Using a thicker gauge wire or converting to a hub-and-spoke layout can solve this.
What voltage reading indicates a problem in the chain?
A voltage drop greater than 2V between the first and last fixture in a low-voltage system indicates significant resistance issues. This could be caused by undersized wire, a run that is too long, or poor, corroded connections that need to be replaced.
Should I use waterproof connectors for outdoor installations?
Absolutely. All outdoor low-voltage connections must use waterproof wire nuts or specialized gel-filled connectors. Standard indoor wire nuts will allow moisture to enter, leading to corrosion, high resistance, and eventual failure of the connection.
Begin mapping your own landscape today to transform your garden into a safe and enchanting nighttime experience.