The secret to a stunning courtyard specimen tree isn’t finding the perfect species, but treating it as long-term living architecture whose growth, light, and risks are managed from day one.
- A tree’s vertical presence is essential for making small, flat spaces feel larger and more dynamic.
- Proactive measures like root barriers and directional pruning are non-negotiable for protecting your property and maintaining the tree’s scale.
Recommendation: Shift your focus from a simple plant purchase to a strategic, long-term design investment. Your foundation will thank you.
For the urban homeowner, the desire for a dramatic focal point in a courtyard or small garden is a common creative impulse. The vision is clear: a single, beautiful tree that provides structure, shade, and a touch of natural grandeur. The typical advice often revolves around lists of popular small trees, like Japanese Maples or Dogwoods, and vague reminders about “four-season interest.” This approach treats the tree as a simple decorative object, a piece of furniture to be placed in the corner of an outdoor room.
But this perspective misses the fundamental nature of your investment. A tree is not static. It is living architecture, a four-dimensional element that will grow, change, and interact with its environment for decades. Ignoring this reality is the single biggest mistake a homeowner can make. The real challenge isn’t just choosing a pretty plant; it’s selecting and managing a dynamic structural element that won’t become a liability, cracking your patio, overwhelming your space, or plunging your home into unwanted darkness.
So, if the key is not just the *what* but the *how*, how do we shift our thinking? This guide abandons the simple catalog approach. Instead, we will explore the principles of long-term management from the perspective of an urban arborist. We will dissect the strategic decisions behind creating a focal point that is both beautiful today and sustainable for the next 30 years, covering everything from manipulating visual space and sculpting with light to proactively containing the powerful forces growing just beneath the surface.
This article provides a comprehensive framework for making a wise, long-term investment in your landscape’s most critical feature. The following sections will guide you through the essential considerations, from initial design concepts to the practical realities of maintenance and risk management.
Summary: A Strategic Guide to Selecting and Managing a Courtyard Specimen Tree
- Why a Flat Lawn Makes Your Property Look Smaller Than It Actually Is?
- Statue vs Specimen Tree: Which Anchor Point Adds More Winter Interest?
- Deciduous vs Evergreen: Which Specimen Offers Better Year-Round Structure?
- Why Multi-Stem Trees Look More Sculptural with Up-Lighting?
- How to Position Spotlights to Highlight Bark Texture Without Blinding Guests?
- The Tree Planting Error That Can Crack Your Foundation in 10 Years
- The Root Barrier Necessity You Ignore at Your Foundation’s Peril
- When to Prune Your Specimen Tree to Control Size and Shape?
Why a Flat Lawn Makes Your Property Look Smaller Than It Actually Is?
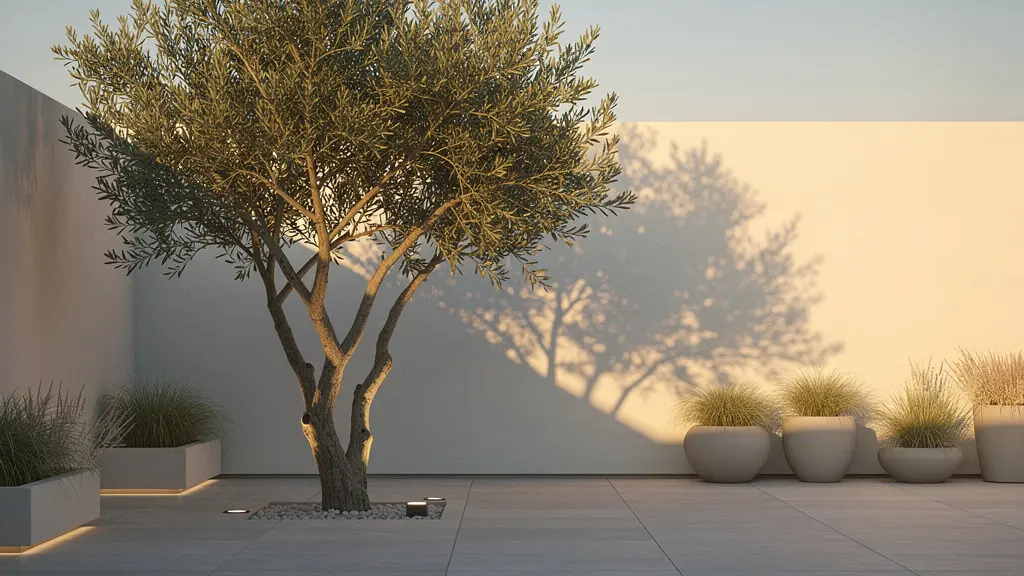
The most common mistake in small urban landscape design is an over-reliance on the horizontal plane. A flat, unbroken expanse of lawn, patio, or decking forces the eye to scan from side to side, quickly finding the property’s boundaries. This horizontal focus inadvertently emphasizes the limited square footage, making the entire space feel confined and visually uninteresting. Without vertical elements, there’s nothing to draw the eye upward, creating a sense of scale and depth.
A specimen tree shatters this two-dimensional illusion. By introducing a strong vertical element, you create living architecture that claims the overhead space. As professional designers note, trees that grow above eye level take up very little precious ground space while claiming the sky, helping to alleviate the cramped feeling common to small spaces. This verticality forces a dynamic viewing experience, encouraging the eye to travel up the trunk, through the branches, and into the canopy, effectively blurring the perceived boundaries of the garden.
This strategic use of height doesn’t just add visual interest; it fundamentally alters the perception of the space. The tree acts as a structural anchor, creating distinct zones and layers within the garden. Instead of one monotonous plane, you now have a complex environment with a foreground, mid-ground, and a vertical backdrop, making the property feel significantly larger and more thoughtfully designed.
The following table illustrates the dramatic difference in visual impact between a flat landscape and one anchored by a specimen tree, highlighting how a single element can transform spatial perception.
| Design Element | Flat Lawn Only | With Specimen Tree |
|---|---|---|
| Visual Height | Ground level only | Creates vertical layers |
| Spatial Definition | Undefined, monotonous | Creates distinct zones |
| Eye Movement | Horizontal scanning | Upward draw, dynamic viewing |
| Perceived Size | Emphasizes boundaries | Extends visual space vertically |
| Seasonal Interest | Static green carpet | Four-season focal point |
Statue vs Specimen Tree: Which Anchor Point Adds More Winter Interest?
When selecting a focal point, many homeowners weigh the merits of a permanent art piece, like a statue or fountain, against a living specimen tree. While a sculpture offers immediate, unchanging structure, it presents a static picture. Its interest is fixed. A specimen tree, conversely, offers a dynamic, evolving presence that a static object can never replicate, especially during the stark winter months.
During winter, a well-chosen deciduous tree doesn’t die back; it reveals its soul. The loss of leaves unveils its muscular trunk, peeling bark, and intricate branch architecture. This winter silhouette is a living sculpture that changes with the light and weather—dusted with snow, glistening with ice, or casting long, dramatic shadows in the low winter sun. Unlike a statue, which remains the same day after day, the tree provides a living timeline that anchors the garden through a narrative of seasonal progression.
This concept of the tree as a dynamic anchor is perfectly captured by the Monrovia Nursery Design Team, who state that “small trees are the ultimate vertical accents in the garden, acting like punctuation points in a landscape.” A statue is a period—a full stop. A tree is an ellipsis, always suggesting what comes next: the first buds of spring, the lush canopy of summer, and the fiery colors of autumn. This constant evolution provides a depth of interest and a connection to nature that no inanimate object can match, making the tree a far more compelling anchor for year-round engagement.
Deciduous vs Evergreen: Which Specimen Offers Better Year-Round Structure?
The choice between a deciduous and an evergreen specimen is a primary fork in the road, defining the garden’s character throughout the year. There is no single right answer; the best choice depends on your design goals. Evergreens offer constant color and mass, providing a solid, unchanging screen and a strong presence in winter. However, this consistency can also be a drawback, as their form remains largely static. Deciduous trees, on the other hand, offer a more dynamic performance, a concept the Houzz Editorial Team summarizes perfectly: “Ideally, a small to medium-size tree for a courtyard has plenty to offer year-round — spring flowers, summer shade, fall color and attractive branches for winter interest.”
For pure architectural value, particularly in a tight courtyard viewed up close, a deciduous tree often has the edge. Its greatest strength is the stark winter silhouette. When the leaves drop, the tree’s fundamental structure—its branching pattern, trunk form, and bark texture—is revealed. This provides a natural sculpture that an evergreen, with its dense foliage, can never display. For example, a ‘Tamukeyama’ Japanese maple provides vibrant leaf color through summer and fall, but its true magic is the contorted, pendulous branching structure that becomes a dramatic focal point in winter.
Ultimately, the choice hinges on whether you prioritize constant presence (evergreen) or dynamic change and architectural revelation (deciduous). Evaluating a potential specimen is a year-long consideration, not a snapshot decision made at the nursery.
Your Specimen Tree Audit: A 5-Point Checklist
- Spring Performance: Assess the quality and duration of the flowering display. Note the color of new foliage and the initial vigor of its growth. Is it a showstopper or a quiet start?
- Summer Presence: Analyze the canopy’s density. Does it provide dappled, usable shade or create a dark, oppressive space? Evaluate its tolerance to your climate’s heat and humidity.
- Autumn Spectacle: Document the intensity and duration of its fall color. Is it a brief flash or a long, evolving display? Observe its leaf drop pattern for maintenance considerations.
- Winter Architecture: Once bare, critically evaluate its branch structure and bark. Does it have a compelling, sculptural form or is it just a collection of twigs? This is its most honest state.
- Long-Term Viability: Research its mature size, root system aggressiveness, and maintenance needs (pruning, water, pests). Does its long-term reality match your courtyard’s capacity?
Why Multi-Stem Trees Look More Sculptural with Up-Lighting?
While a single-trunk tree provides a classic vertical line, a multi-stem specimen offers immediate complexity and architectural interest. Its multiple trunks emerge from a single point, creating a vase-like shape that feels more like a natural sculpture. This form is inherently more dynamic, providing layers and depth from the moment it’s planted. However, the true sculptural potential of a multi-stem tree is only fully realized with a thoughtful lighting strategy, specifically uplighting.
Uplighting, the technique of placing light fixtures at the base of the tree and angling them upward, transforms the tree at night. It works by catching the underside of branches and leaves, creating a dramatic interplay of light and shadow that highlights the tree’s three-dimensional form. On a multi-stem tree, this effect is amplified. Light can be woven between the trunks, isolating certain branches while leaving others in silhouette, revealing a structural complexity that is completely hidden in the flat light of day. This technique is what we call light sculpting.
As seen in formal courtyard designs featuring multi-stem redbud trees, the openness of the tree in spring, with flowers appearing on bare branches, creates an especially powerful effect when lit from below. The uplighting emphasizes the pleasing balance and symmetry of the specimen’s branching structure, turning it into a dramatic, living candelabra. This thoughtful illumination is what separates a simple landscape from a truly designed space, extending the garden’s beauty long after the sun has set.
To achieve this effect, a precise lighting design is crucial. Follow these steps for professional results:
- Position low-wattage uplights 12-18 inches from the trunk base, aimed at a 30-degree angle to graze the trunks.
- Install a secondary, softer light source opposite the primary one to fill in harsh shadows and reveal more of the form.
- Use warm white LEDs (2700K-3000K range) to enhance bark texture and foliage color in a natural, inviting way.
- Consider a third accent light placed behind the tree to create a halo effect (backlighting), separating it from the background.
- Install dimmers on your system to allow for seasonal adjustments, reducing intensity when the tree is bare and increasing it for a full summer canopy.
How to Position Spotlights to Highlight Bark Texture Without Blinding Guests?
Once you’ve committed to uplighting your specimen tree, the next level of artistry involves highlighting its specific features, like the intricate texture of its bark. The common mistake is to aim a spotlight directly at the trunk, which flattens the texture and creates a harsh, unappealing hotspot. The professional technique to avoid this is called “grazing.”
Grazing involves placing a narrow-beam spotlight very close to the trunk’s surface and aiming it at an acute angle, almost parallel to the bark. Instead of flooding the surface with light, this technique “skims” or “grazes” it. The light catches the high points of the bark’s ridges and furrows while casting deep, sharp shadows in the crevices. This high contrast dramatically reveals the bark’s natural texture and three-dimensional quality, turning it into a detailed work of art. The key is that the light source itself remains hidden from common viewing angles.
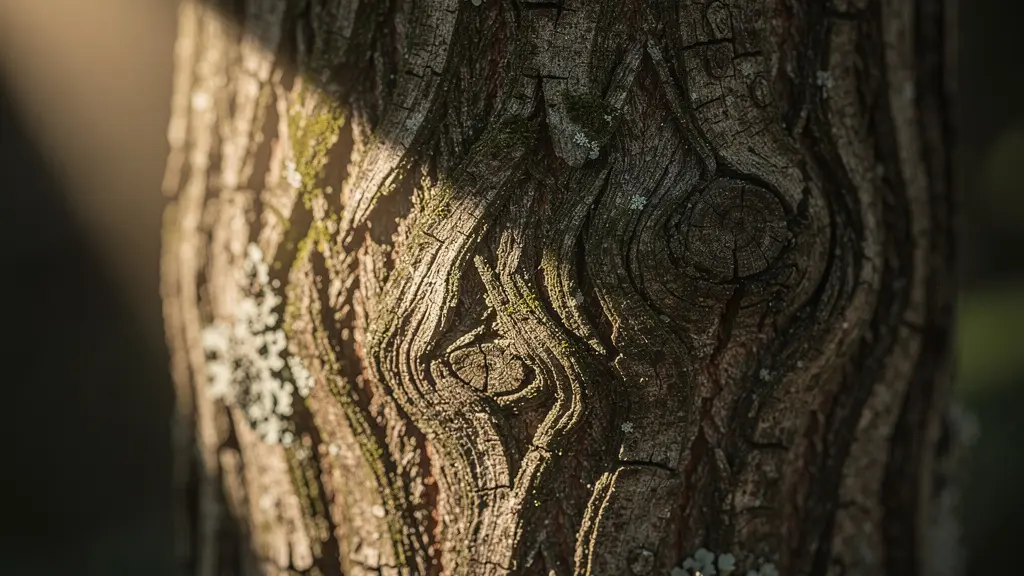
To implement this without blinding guests, positioning is everything. The fixture should be placed on the side of the trunk that is least visible from primary seating areas or pathways. Use a “snoot” or “glare guard” accessory on the fixture to control light spill and ensure the beam is tightly focused only on the trunk. By carefully managing the angle and position, you create a stunning visual effect where guests see the beautifully illuminated texture, not the glaring bulb that creates it. This is the essence of sophisticated light sculpting: revealing beauty without revealing the source.
The Tree Planting Error That Can Crack Your Foundation in 10 Years
The most catastrophic and costly mistake in planting a specimen tree is underestimating the power and persistence of its root system. A charming, five-foot sapling planted a “safe” distance from the house can, over a decade, become a formidable agent of destruction. The primary error is simple: planting too close. Tree roots are opportunistic; they will grow wherever they find water and nutrients, and the soil around your home’s foundation is often an ideal environment due to better moisture retention and aeration.
As roots expand, they can exert immense pressure on foundation walls, leading to cracks, settlement, and structural instability. According to foundation repair specialists, these issues are not just a minor inconvenience; foundation repairs from tree root intrusion typically cost between $2,000 and $10,000, and often much more. This financial risk transforms the root system from a biological curiosity into a significant potential liability against your property’s value.
The danger is amplified by soil type and tree species, as one homeowner group discovered.
Homeowners report that trees like willow, silver maples, and American elms have aggressive root systems that grow rapidly and spread wide, with clay soils tending to compact as roots grow, causing foundation settlement, while in looser soils, roots displace earth creating voids beneath homes, leading to foundation cracks.
Ignoring planting distances is a gamble against time. To avoid this costly error, adhering to established minimum distance guidelines is not optional; it’s a critical act of long-term property management.
- Small Trees (under 25 ft. mature height): Plant at least 10-15 feet from the foundation.
- Medium Trees (25-40 ft. mature height): Maintain a 15-20 foot minimum distance.
- Large Trees (over 40 ft. mature height): Position at least 20-30 feet away.
- Aggressive Species (e.g., Willows, Poplars): Increase clearance to 25-50 feet, regardless of mature height.
Key Takeaways
- Treating a tree as “living architecture” requires long-term planning for its growth, light interaction, and potential risks.
- Vertical elements like trees are crucial for making small spaces feel larger by drawing the eye upward and creating visual depth.
- Proactive containment through root barriers and strategic pruning is not optional maintenance but essential risk management for protecting your property.
The Root Barrier Necessity You Ignore at Your Foundation’s Peril
While correct planting distance is the first line of defense, in the tight confines of an urban courtyard, it’s often not enough. This is where a root barrier becomes an essential tool of proactive containment. A root barrier is a physical, underground wall installed between the tree and your foundation. Its purpose is not to kill the roots, but to deflect them, forcing them to grow down and away from critical structures like foundation footings, sewer lines, and patios.
Ignoring this step is a significant financial gamble. As roots grow and soil shifts, the resulting structural damage can be astronomical. Data from arborists and repair companies shows that tree root damage can cost homeowners from $15,000 to over $50,000 to repair. This is the true cost of what I call root-system liability. This risk is not hypothetical; entire neighborhoods have faced this crisis. In established MetroWest, Massachusetts neighborhoods, for example, maples and oaks planted 25-30 years ago are now causing constant foundation issues, a problem exacerbated by the region’s clay soils and architectural styles.
Installing a root barrier during the initial planting is a minor upfront cost that acts as a long-term insurance policy against catastrophic future expenses. Various materials are available, each with different costs and lifespans.
This comparative analysis from a recent study shows the different options available for homeowners looking to install this critical protection.
| Material Type | Cost/Linear Foot | Lifespan | Effectiveness |
|---|---|---|---|
| HDPE Plastic Sheets | $65-85 | 50+ years | Good for new installations |
| Biobarrier (with herbicide) | $100-150 | 15-20 years | Excellent, slows root growth |
| Metal Mesh Barriers | $90-120 | 30-40 years | Good for aggressive roots |
| Recycled Composite | $75-95 | 25-35 years | Eco-friendly, moderate protection |
When to Prune Your Specimen Tree to Control Size and Shape?
If a root barrier is the proactive containment strategy below ground, then pruning is its counterpart above ground. For a specimen tree in a courtyard, pruning is not about radical size reduction once a year. Instead, it’s a continuous process of small, strategic adjustments to guide the tree’s growth, maintain its scale, and enhance its architectural form. This is less like hedging and more like bonsai—a thoughtful dialogue with the tree throughout the seasons.
The goal is to use directional pruning to encourage growth where you want it and discourage it where you don’t. This involves making precise cuts just above an outward-facing bud. This simple action tells the tree to send its energy in that outward direction, slowly guiding the branch away from the house, a pathway, or other branches. It’s a subtle but powerful technique for shaping the tree’s future form without resorting to large, damaging cuts later on.
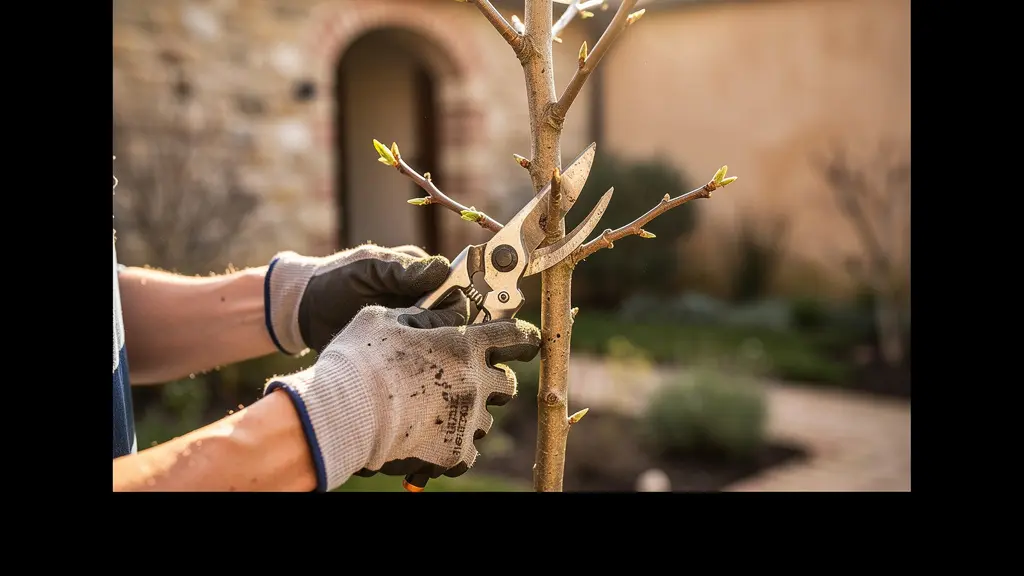
Timing is critical to this process. Pruning at different times of the year yields different results. A micro-pruning schedule allows for gentle, year-round management that keeps the tree healthy and perfectly scaled to its environment.
- Early Spring (pre-bud): Focus solely on removing any dead, damaged, or crossing branches to clean up the structure before the growth season begins.
- Late Spring (post-bloom): Gently pinch or snip the soft new growth tips on branches you want to keep compact. This is the key to size control.
- Midsummer: Make light thinning cuts to improve air circulation and allow more light into the canopy. This is also a good time for minor shape refinement.
- Early Fall: Make final shaping cuts and remove any vigorous “water sprouts” (vertical shoots) before the tree enters dormancy.
- Winter: No active cutting. Use this time to assess the bare structure and plan your pruning strategy for the upcoming year.