Attaching a pergola to a fragile facade often leads to structural failure because common methods anchor to non-structural cladding instead of transferring loads to the building’s frame.
- Wind creates powerful uplift forces that can easily rip improper anchors from the wall.
- A professional installation requires bypassing the facade with a dedicated load transfer system.
Recommendation: Use specialized stand-off hardware and professional two-part flashing techniques to ensure a secure, watertight connection that protects your home’s integrity.
The dream of a wall-mounted pergola is to seamlessly extend your living space outdoors—a beautiful, shaded area for dining and relaxing, perfectly integrated with your home. But for homeowners with modern exterior insulation (like EIFS) or decorative siding, this dream is often overshadowed by a significant fear: How do you attach a heavy structure to a wall that feels anything but solid? Many guides offer simplistic advice like “use longer screws” or “just anchor it to the wall,” but this is dangerously misleading. These fragile facades are merely a building’s “skin”; they have no structural capacity.
Anchoring directly into this non-structural cladding is the single biggest cause of catastrophic failures. The real challenge isn’t just about holding the pergola’s weight; it’s about resisting the immense, invisible forces of wind uplift that can act like a giant wing, trying to tear the structure away from your house. The common approach treats the symptom, not the cause. It focuses on the anchor itself, rather than the system of forces at play.
But what if the secret wasn’t about a stronger anchor, but a smarter connection? The key is to stop thinking about attaching the pergola *to* the facade and start thinking about attaching it *through* the facade. This guide will walk you through the professional, engineering-based approach. We will move beyond simple DIY tips to explain how to create a robust load transfer system that safely carries all forces directly to your home’s structural frame, all while keeping your wall’s insulation and weather barrier perfectly intact. We’ll cover everything from managing water runoff and calculating space to the critical anchoring techniques that ensure your investment stands strong for decades.
This article provides a comprehensive overview of the key considerations and technical solutions for a successful and safe installation. Explore the sections below to master each aspect of the project, from initial planning to final verification.
Summary: A Professional Guide to Fragile Facade Pergola Installation
- Why Adding a Solid Roof Pergola Might Darken Your Living Room by 40%?
- How to Seal the Gap Between Pergola and Wall to Prevent Water Runoff?
- 3m vs 4m Projection: Which Depth is Necessary for a 6-Person Dining Table?
- The Anchoring Error That Causes Wall-Mounted Pergolas to Collapse in Storms
- How to Calculate the Ideal Mounting Height for Maximum Afternoon Shade?
- How to Sync Your Pergola Louvers with Your Smart Home Hub in 3 Steps?
- How to Track Shadows in Your Garden to Pinpoint the Perfect Lounge Spot?
- How to Test a Pergola for Watertightness Before Finalizing the Payment?
Why Adding a Solid Roof Pergola Might Darken Your Living Room by 40%?
One of the most overlooked consequences of adding a pergola is its impact on the natural light entering your home. While the goal is shade outdoors, nobody wants to create a permanently gloomy living room. The amount of light lost is a direct function of two factors: the pergola’s material and its orientation. Dark materials absorb light, while light materials reflect it. This is measured by a Light Reflectance Value (LRV), and the difference is significant.
A professional installation plan always includes a shadow analysis. Modern tools can eliminate the guesswork entirely. As a case study, professional pergola designers now use SketchUp with solar path extensions to provide precise shadow predictions throughout the year. This allows homeowners to visualize exactly how a structure will cast shadows at different times of the day and year. These simulations often reveal that an east-facing pergola can reduce afternoon living room light by 30-45%, a crucial piece of information for making design decisions.
To mitigate this, choosing materials with a high LRV is essential. A white-painted aluminum roof can reflect the vast majority of light, brightening the space underneath and bouncing ambient light towards your windows, whereas a dark composite will absorb it and create a much darker effect.
| Material | LRV (%) | Light Impact |
|---|---|---|
| White-painted aluminum | 85-90 | Maximum light reflection |
| Natural cedar wood | 35-40 | Moderate absorption |
| Dark composite decking | 5-10 | High absorption |
| Light gray concrete | 45-50 | Balanced reflection |
Understanding these values allows for a strategic choice. If maximizing indoor light is a priority, a high-LRV material is non-negotiable. This planning step ensures your new outdoor space enhances your home, rather than detracting from it.
How to Seal the Gap Between Pergola and Wall to Prevent Water Runoff?
An improperly sealed pergola-to-wall connection is a direct invitation for water damage. Rainwater will inevitably run down your home’s facade and, without proper intervention, will find its way behind the pergola’s ledger board. This can lead to rot, mold, and costly structural damage to your home’s wall assembly. A simple bead of silicone is not a sufficient or long-term solution. The correct method involves installing a two-part metal flashing system.
This system works by creating an impenetrable barrier. The first piece, a counter-flashing, is inserted directly into a mortar joint or a precisely cut groove above the pergola. It directs water over the second piece, the main flashing attached to the pergola itself. This layered approach ensures that even if one seal fails, the other provides backup protection. Crucially, the sealants used must be able to accommodate movement. Different materials expand and contract at different rates with temperature changes. For instance, aluminum expands 2.4mm per meter for every 10°C temperature change, while masonry barely moves. A rigid sealant will crack and fail quickly; a high-quality elastomeric or polyurethane sealant is required.
The process is meticulous but essential for a professional, leak-proof installation. It involves cutting into the masonry, carefully inserting the flashing, and sealing every joint with the correct, flexible materials. A drip edge at the bottom of the flashing is a final professional touch, breaking the water’s surface tension and forcing it to drip away from the wall instead of curling back underneath.
3m vs 4m Projection: Which Depth is Necessary for a 6-Person Dining Table?
Choosing the right pergola projection (depth) is a critical decision that dictates its ultimate functionality. It’s a common mistake to simply measure the dining table and add a little extra. In reality, the required space is much larger. For a standard 6-person dining table (roughly 180x90cm), a 3-meter projection might seem adequate, but it often proves insufficient for comfortable, all-day use.
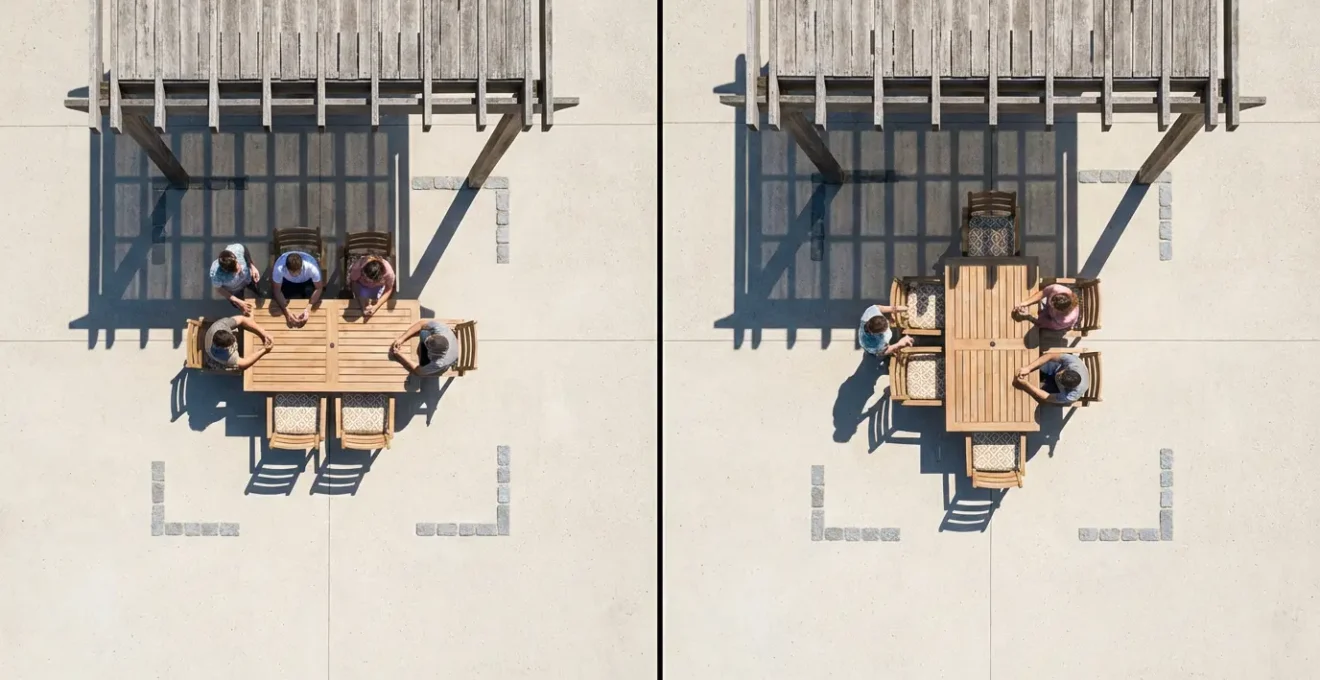
As the illustration above demonstrates, true usability depends on what experts call the “dynamic use zone.” This includes not just the table’s footprint, but the essential space required for people to pull out their chairs, sit down, and for someone to walk around the table to serve. Ergonomic studies of outdoor dining spaces provide clear guidelines: a minimum 120cm circulation zone is needed on all accessible sides. This brings the minimum practical space requirement for a 6-person table to approximately 4.2m wide by 3.3m deep. This instantly makes a 4-meter projection the necessary choice for true comfort and functionality.
With a 3-meter projection, guests seated on the outer edge will likely have their chairs in the full sun or rain, and moving around the table becomes a clumsy shuffle. A 4-meter projection, however, ensures the entire dining area—including the circulation space—remains protected from the elements. It transforms the pergola from a simple sunshade into a true outdoor room, dramatically increasing its value and usability.
The Anchoring Error That Causes Wall-Mounted Pergolas to Collapse in Storms
The single most catastrophic error in pergola installation is misunderstanding the forces at play. Homeowners often assume the main challenge is supporting the pergola’s weight (dead load). However, the real danger comes from wind. In a storm, a pergola roof acts like an airplane wing, creating a powerful lifting force. As the Engineering Express Structural Analysis Team notes, “The ‘wing effect’ where wind flowing over the pergola roof creates a powerful lifting force, literally trying to rip the anchors out of the wall, is the primary mode of failure in storms.”
The ‘wing effect’ where wind flowing over the pergola roof creates a powerful lifting force, literally trying to rip the anchors out of the wall, is the primary mode of failure in storms.
– Engineering Express Structural Analysis Team, How To Determine Uplift Reactions For Canopies-Carports-Pergolas
This is not a minor force; engineering analysis reveals that wind uplift can generate forces 40% greater than the pergola’s own weight, even at moderate wind speeds. When you anchor into non-structural materials like insulation, brick veneer, or siding, you are attaching to a layer that has zero tensile strength. The anchors will simply pull out, taking a chunk of your facade with them.
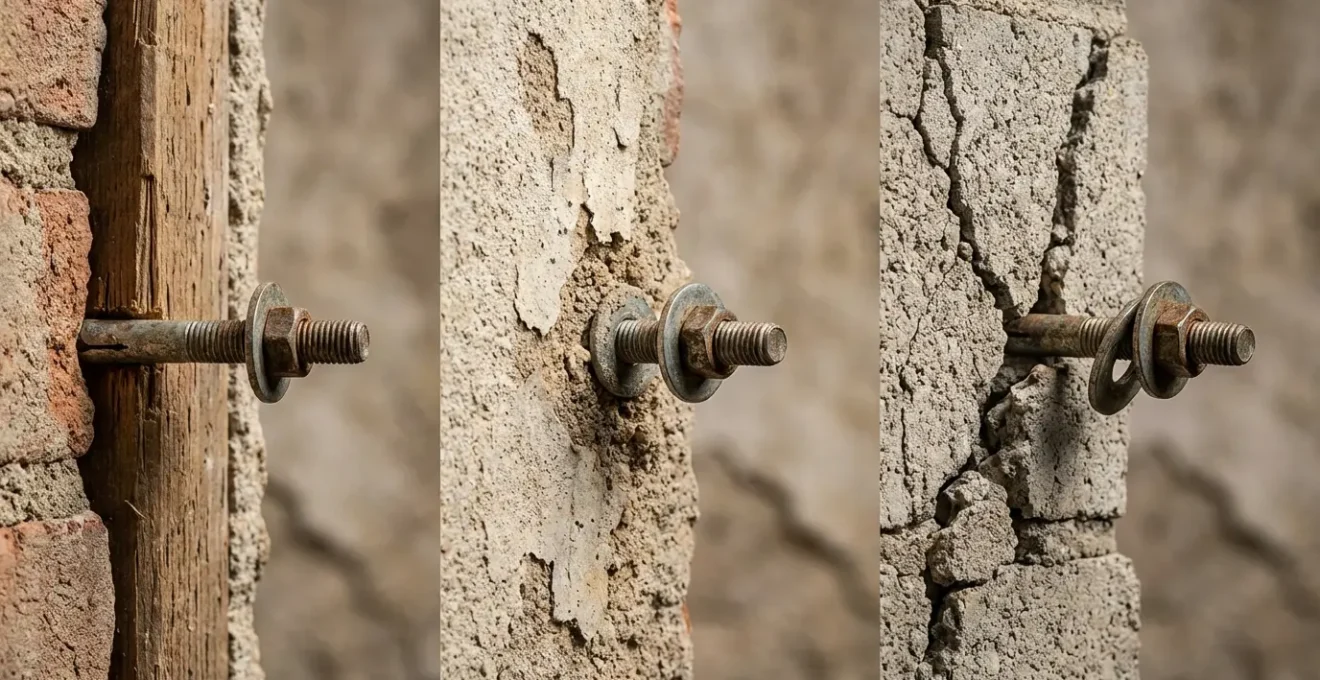
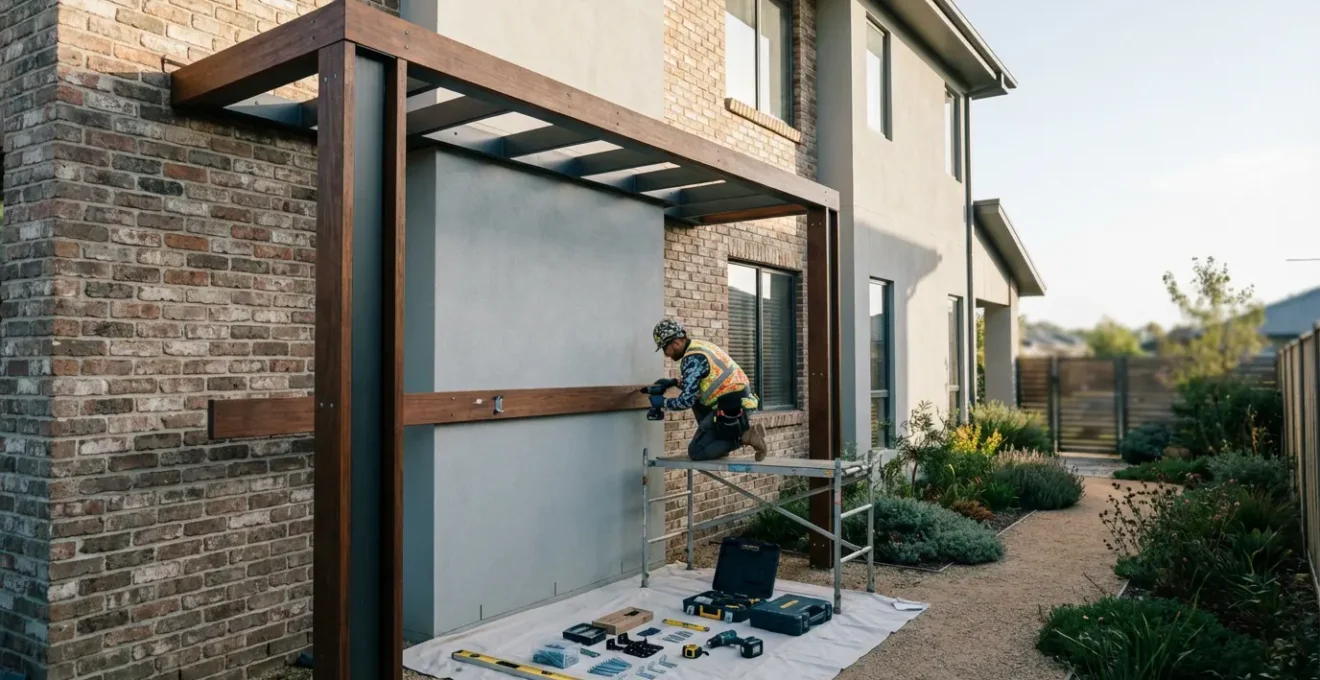
The correct method is to create a load transfer system that completely bypasses the fragile outer wall. This involves using threaded rods or specialized bolts that extend through the cladding and are secured directly to the home’s structural frame (e.g., the rim joist or wall studs). Between the pergola’s ledger board and the structural frame, rigid, non-compressive stand-off spacers or pipes are used. These spacers are crucial: they prevent you from crushing the insulation or siding when you tighten the bolts, and they maintain an air gap, which is vital for preventing moisture buildup.
How to Calculate the Ideal Mounting Height for Maximum Afternoon Shade?
Determining the perfect mounting height for a pergola’s ledger board is a blend of science and aesthetics. Mounting it too low can create a cramped, claustrophobic space and block views from your windows. Mounting it too high can severely reduce its effectiveness for providing shade, especially from the low-angled afternoon sun. Furthermore, height directly impacts structural integrity; structural engineering data confirms that every 30cm increase in mounting height increases wind shear forces on the anchors by approximately 15%. This makes an informed calculation essential.
The ideal height is one that provides maximum shade during your desired hours of use without compromising structural safety or aesthetics. You can calculate this with surprising accuracy using basic trigonometry. The key variable is the sun’s angle at the time you most want shade (e.g., 4 PM in summer).
Here is a simplified method for this calculation:
- Find your solar angle: Use an online solar calculator to find the sun’s altitude angle for your specific location and the time/date you want maximum shade (e.g., 4 PM in July). This is typically between 35 and 45 degrees in many regions.
- Determine desired shadow length: This is simply the projection of your pergola (e.g., 4 meters).
- Apply the formula: The mounting height of the pergola’s outer edge can be estimated with the formula: Height = Shadow Length × tan(Solar Angle). For the wall mounting height, you would use: Height = Shadow Length × tan(90° – Solar Angle).
- Check against minimums: The lowest point of the pergola should always maintain a minimum headroom of 2.2 meters for comfort and safety. If your calculation results in a lower height, you must default to the 2.2m minimum.
- Aesthetic verification: Ensure the final calculated ledger board height does not awkwardly bisect windows or doors. A common rule is to keep it above the top third of any adjacent window frames.
This methodical approach ensures your pergola is positioned for optimal performance, balancing the need for shade with structural and visual harmony.
How to Sync Your Pergola Louvers with Your Smart Home Hub in 3 Steps?
A modern motorized pergola offers more than just push-button convenience; it can become a fully integrated part of your smart home ecosystem. Syncing the louvers with a hub like Home Assistant, Alexa, or Google Home unlocks automated routines that adapt to weather, time of day, and your lifestyle. Imagine your pergola automatically closing its louvers when the wind picks up or opening them gently to let in the morning sun.
A homeowner in Florida provides a great case study. They integrated their motorized aluminum pergola with a Home Assistant hub, creating powerful automated scenes. Their “Morning Coffee” scene opens the louvers to 30% at sunrise. A “Storm Mode” automatically closes the louvers completely whenever local wind sensors detect speeds over 25 mph, protecting outdoor furniture. Finally, a “Movie Night” scene closes the louvers and dims the integrated LED strips to 20% brightness with a single voice command. This level of automation is achieved by linking the pergola’s motor to the hub and using simple “if-then” logic.
Achieving this integration is a straightforward three-step process for most modern systems:
- Establish the Connection: First, you must bridge the communication gap. This typically involves connecting the pergola’s motor to your smart hub using a compatible protocol. Many motors use Z-Wave, Zigbee, or a proprietary WiFi bridge provided by the manufacturer. Check compatibility before purchasing.
- Configure Scenes and Automations: Once connected, you can use your hub’s interface to create rules. This is where the magic happens. You can create logic such as: “IF the time is 7:00 AM, THEN set louver position to 40%,” or “IF the weather forecast reports rain, THEN close louvers.”
- Enable Voice and Remote Control: The final step is to link your hub to your voice assistant. You can create custom commands like, “Alexa, set the pergola for dinner,” which could trigger a scene that adjusts the louvers to a 75% closed position and turns on the integrated lighting.
By syncing your pergola, you transform it from a static structure into a dynamic, responsive element of your home that adds real convenience and value.
How to Track Shadows in Your Garden to Pinpoint the Perfect Lounge Spot?
Before you even consider a pergola’s location, you must first understand the “shade highways” in your garden. The sun’s path changes dramatically between seasons, and a spot that is perfectly shaded in June might be in full, baking sun in September. Relying on a single day’s observation is a common mistake. A more systematic approach is needed to map how shadows move across your space throughout the day and the year.
For a low-tech but highly effective method, you can perform a solar time-lapse shadow map. On a sunny day near an equinox (March or September), you can physically trace the sun’s path. Place colored markers, like golf tees, at the very edge of key shadow lines (from your house, trees, or fences) at different times. For example:
- Use yellow tees to mark shadow edges at 9 AM.
- Use red tees for shadow edges at 12 PM.
- Use blue tees for shadow edges at 3 PM.
By connecting the same-colored markers with garden twine, you will reveal the areas that receive morning sun, midday sun, and afternoon sun. Repeating this process near the summer and winter solstices will give you a complete, year-round understanding of your garden’s microclimates, helping you pinpoint the ideal spot that needs shade most.
For a high-tech approach, Augmented Reality (AR) apps can provide instant and accurate insights. One user shared their experience:
Using the Sun Seeker AR app, we discovered our ‘perfect’ lounge spot was actually in full sun from 2-5 PM in summer. The app’s ability to show shadows for any future date helped us relocate our seating area 3 meters northeast, where a large oak provides afternoon shade that we hadn’t noticed before.
– AR App Success Story
Whether you use low-tech markers or a high-tech app, this data-driven approach is invaluable. It ensures you place your pergola or lounge area in a location that truly maximizes its comfort and usability across all seasons.
Key Takeaways
- Securing a pergola to a fragile facade requires a load transfer system, not just anchors in the cladding.
- Wind uplift is a greater force than the pergola’s weight and is the primary cause of failure.
- Proper two-part flashing and elastomeric sealants are non-negotiable for preventing water damage.
How to Test a Pergola for Watertightness Before Finalizing the Payment?
After the installation is complete, a final, crucial step remains before you sign off and make the final payment: verifying the watertightness. Trusting that all seals are perfect is a risk you shouldn’t take. A professional installer should be confident enough in their work to agree to a standardized water test. This test simulates a heavy, wind-driven rainstorm to reveal any potential leaks at the wall connection, around screws, or at the louver seals.
This is not a simple-minded spray with a garden hose. A proper test follows a clear, repeatable protocol to be fair to both the homeowner and the installer. Any reputable installation contract should allow for such a test. In fact, some professional organizations include specific clauses for it. As the American Landscape Structures professional template suggests, “Final payment shall be contingent upon successful completion of watertightness test with no more than three individual drips observed during a 10-minute period following the standardized test protocol.” This sets a clear, objective standard for success.
Running this test yourself provides ultimate peace of mind. It allows you to identify and address any small issues before they become major problems, ensuring your investment is perfectly sealed and ready to withstand the elements from day one.
Your Action Plan: The Storm Simulation Testing Protocol
- Position the sprinkler: Place an oscillating sprinkler approximately 3 meters away from the pergola, aimed at a 45-degree angle towards the roof and the wall connection to simulate wind-driven rain.
- Simulate sustained rainfall: Run the sprinkler continuously for a full 15 minutes, ensuring thorough saturation of all surfaces and joints.
- Conduct a high-pressure joint test: Immediately following the sprinkler test, use a direct hose spray (not a pressure washer) for 5 minutes, focusing on all joints, seals, and especially the main flashing where the pergola meets the house.
- Mark and identify leaks: During the entire test, stay under the pergola and mark any active drips you observe with a piece of removable chalk. A tiny drip now can become a significant leak later.
- Document for the record: Use your phone to take photos or a short video of any marked drips. This documentation is crucial for discussing remediation with your installer and for any potential warranty claims.
For a project of this significance, this final verification is not optional. It is the definitive step that confirms the quality of the installation and secures the long-term health of your home.
By following these technical principles—from planning and load transfer to sealing and verification—you can confidently add a beautiful, durable, and safe wall-mounted pergola to your home, even with a fragile facade. To begin your project, the next logical step is to get a professional assessment of your specific wall structure to design the correct load transfer system.