A large sectional sofa shouldn’t block your room; it should be the architectural tool that defines it.
- Mastering measurements that account for “activity zones” is the key to avoiding a “tight fit” disaster.
- Strategic placement (“floating”) and correct orientation (LAF/RAF) are essential for creating clear, intuitive traffic paths in open-plan areas.
- The right rug size and table shape are not decorative afterthoughts; they are critical components that complete the functional zone your sectional creates.
Recommendation: Before committing, use painter’s tape on your floor to create a full-scale mockup of your potential sectional. Live with it for 48 hours to truly understand its impact on your daily movements.
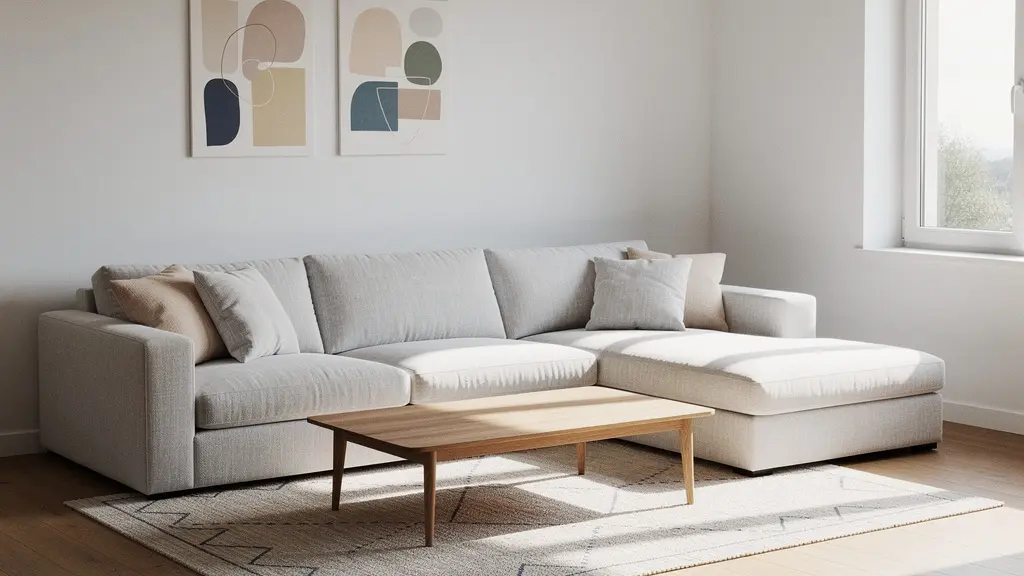
The arrival of a sectional sofa should be a moment of joy. It promises cozy movie nights, ample space for guests, and a comfortable hub for family life. Yet for many homeowners, especially those with open-plan layouts, that initial excitement can quickly sour into frustration. The very piece of furniture meant to bring people together can become a physical barrier, choking traffic flow and making the entire living area feel cramped and awkward. You end up with a beautiful, expensive roadblock instead of a functional centerpiece.
Common advice often falls into simplistic rules: “float it away from the wall” or “just put it in the corner.” While not entirely wrong, these tips barely scratch the surface. They treat the sectional as a passive object to be squeezed into a pre-existing space. But what if the approach was fundamentally different? What if the goal wasn’t just to ‘fit’ the sofa, but to use it as a powerful tool for spatial choreography—actively sculpting your room’s layout, defining functional zones, and orchestrating human interaction?
This is the shift from simple decoration to strategic spatial planning. By treating your sectional as an architectural anchor, you can transform an undefined open area into a series of intuitive, harmonious spaces. This guide moves beyond the basics to provide a systematic framework for positioning your sectional. We will explore the logic of creating conversation zones, the non-negotiable rules of measurement, the subtle but critical choice between orientations, and how every related element—from the coffee table to the rug—plays a role in achieving perfect flow.
This article provides a comprehensive roadmap for mastering the art of sectional placement. From the social dynamics it enables to the precise measurements required, each section builds upon the last to give you a complete system for optimizing your living space.
Summary: A Strategic Guide to Positioning Your Sectional for Optimal Flow
- Why Sectional Sofas Encourage More Family Interaction Than Separate Sofas?
- How to Measure Your Living Room Corner to Avoid a “Tight Fit” Disaster?
- Left-Arm Facing vs Right-Arm Facing: Which Fits Your TV Setup?
- The Placement Error That Blocks Radiators and Damages Your Sofa Leather
- How to Rotate Sectional Cushions to Prevent “Favorite Spot” Sagging?
- Why Round Tables Facilitate Better Conversation Than Rectangular Ones?
- The Rug Size Mistake That Makes Your Living Room Look Tiny
- Manual vs Power Recliners: Which Lasts Longer in a Family Home?
Why Sectional Sofas Encourage More Family Interaction Than Separate Sofas?
Before diving into the technical aspects of placement, it’s crucial to understand the primary function of a sectional: connection. Unlike a scattered arrangement of sofas and armchairs, a sectional’s continuous seating is engineered to foster social cohesion. It physically removes the barriers between people, creating a shared space that encourages casual conversation and togetherness. This isn’t just a feeling; it’s a principle rooted in social psychology. By design, a sectional creates a “nest” or a “conversation pit” that naturally draws people in and holds them in a comfortable, inclusive arrangement.
The shape itself promotes better conversational geometry. On a sectional, no one is relegated to the “bad seat” far from the central cluster. Everyone is part of the main group, able to make eye contact and participate without leaning across empty space. This is supported by research into family dynamics, which shows that environments facilitating effective communication are linked to greater emotional regulation and prosocial attitudes within families. A well-placed sectional is an architectural tool for building these positive interactions.
To maximize this effect, consider how the sectional’s shape can define a natural conversation zone:
- The L or U-shape naturally establishes a cozy group area without forcing people to lean forward to be heard.
- When “floating” in a room, the sectional’s back creates a soft boundary, defining the conversation zone from the surrounding space.
- The continuous seating eliminates hierarchical positioning common with separate chairs, making the atmosphere more relaxed and egalitarian.
- Angling the chaise component away from a main traffic path creates an inviting nook that encourages people to gather without feeling “trapped.”
Ultimately, the goal of strategic placement is to enhance this inherent social benefit. The right position doesn’t just look good; it makes it easier for your family and friends to connect. This social function should be the guiding principle behind every technical decision you make.
How to Measure Your Living Room Corner to Avoid a “Tight Fit” Disaster?
The single most common and costly mistake in buying a sectional is poor measurement. This goes far beyond a simple length-by-width calculation. A sectional’s true size is its kinetic footprint—the total space it occupies, including the area needed for human activity around it. A sofa that technically “fits” can still ruin a room if it obstructs walkways, blocks drawers, or prevents recliner operation. Proper measurement is an exercise in spatial choreography, accounting for both the static object and its dynamic use.
Forget just measuring the walls. The key is to map out the sectional’s dimensions directly onto your floor with painter’s tape. This simple act provides an unignorable visual reference that a tape measure alone cannot. It allows you to “feel” the sofa’s presence in the room, walk around it, and identify potential conflicts before spending a dollar. You must also measure the diagonal clearance of your doorways, hallways, and stairwells; a long sectional piece often needs to be tilted to navigate corners, and its diagonal length is always greater than its straight length.

As this visual guide suggests, planning involves more than just the sofa’s outline. You must account for the “activity zones” that bring the space to life. This means leaving adequate clearance for both visual balance and practical function. Before you finalize your choice, a thorough measurement plan is non-negotiable.
Your Pre-Purchase Measurement Checklist
- Map it Out: Use painter’s tape to outline the sectional’s exact measurements on the floor. This provides a true-to-scale visual you can interact with.
- Check Diagonal Clearance: Measure the diagonal width and height of all entryways, hallways, and corners. The sofa’s diagonal dimension must be smaller than these openings.
- Account for Activity Zones: Add 12-18 inches of clearance for recliner swing space. Measure the pull-out arc of any nearby coffee table or console drawers.
- Define Walkways: Ensure there are at least 30-36 inches of clear walking space for all major traffic paths around the floated sectional.
- Live with a Mockup: Before purchasing, test the layout with cardboard boxes or other objects to simulate the sectional’s mass. Experience the traffic patterns for 24-48 hours.
Left-Arm Facing vs Right-Arm Facing: Which Fits Your TV Setup?
Once you have your measurements, the next critical decision in your spatial choreography is orientation. “Left-Arm Facing” (LAF) and “Right-Arm Facing” (RAF) are industry terms that cause endless confusion, but the concept is simple: the direction is determined as you face the sectional. A “Left-Arm Facing” piece has the arm on your left side. This seemingly small detail has a massive impact on your room’s flow, visual balance, and functionality, especially in relation to your primary focal point, such as a TV.
The golden rule is to use the sectional’s shape to create an open and welcoming entry into the seating area. The long side of the “L” should run along the main wall, while the shorter side (the chaise or return) should not obstruct the primary walkway into the room. If you enter your living room from the right, a LAF sectional is often ideal because it leaves the right-hand path open. Conversely, an RAF sectional works best when the main entry is on the left. This simple choice dictates whether your room feels inviting or like an obstacle course.
For U-shaped configurations, the spacing between the two parallel arms is paramount. According to interior design experts, 72-78 inches is the optimal distance needed between sectional pieces to allow for a functional coffee table and comfortable traffic flow through the middle. Any less, and the space feels cramped; any more, and the coffee table feels disconnected from the seating.
The choice between LAF and RAF is a strategic one that balances traffic flow with optimal viewing angles and room balance. This matrix breaks down the key decision factors:
| Factor | Left-Arm Facing (LAF) | Right-Arm Facing (RAF) |
|---|---|---|
| Best For Room Entry | When entrance is on the right side | When entrance is on the left side |
| TV Viewing Angle | Ideal when TV is mounted left of center | Ideal when TV is mounted right of center |
| Window Glare | Better for east-facing windows | Better for west-facing windows |
| Traffic Flow | Keeps right pathway clear | Keeps left pathway clear |
| Visual Weight | Anchors left corner of room | Anchors right corner of room |
The Placement Error That Blocks Radiators and Damages Your Sofa Leather
A perfectly measured and oriented sectional can still be ruined by one common placement error: ignoring the room’s microclimates. Pushing a sofa directly against a heat source like a radiator, heating vent, or even a window with intense, direct sunlight is a recipe for disaster. The constant, dry heat can cause leather to crack, fade, and become brittle. For fabric sofas, it can lead to discoloration and weaken the fibers over time. Beyond damaging your investment, this placement is also inefficient and unsafe, as it blocks airflow and can create a fire hazard.
The solution is to maintain a mandatory buffer zone. A minimum of 12-18 inches should be left between your sectional and any direct heat source. This allows for proper air circulation, protecting both the furniture and your home’s heating efficiency. This buffer doesn’t have to be dead space. It’s the perfect opportunity to place a slim console table behind the sofa. This not only enforces the safety gap but also provides a functional surface for lamps, decor, or drinks, further enhancing your room’s layout.
Mapping your room’s microclimates is a key part of your spatial planning. This includes not only obvious heat sources but also zones of direct sunlight that shift throughout the day. A study on furniture longevity found that optimized lighting and temperature control significantly impact furniture longevity. UV exposure from windows can be even more damaging than radiators over the long term. Consider sheer curtains or UV-blocking film for windows that cast intense light on your sectional.
Before finalizing your sofa’s position, perform a quick safety audit:
- Maintain a minimum 12-18 inch gap between the sectional and any heat source.
- Map the room’s “microclimates,” including HVAC vents, direct sunlight zones, and even heat from electronics.
- If space is tight, install a radiator cover that redirects heat forward, away from the back of the sofa.
- Use a tall, open-backed console table as a stylish and functional buffer zone.
- Assess daily UV exposure from windows, as this silent damage can be the most severe over time.
How to Rotate Sectional Cushions to Prevent “Favorite Spot” Sagging?
The architectural integrity of your sectional is only as good as its structural condition. Over time, every household develops a “favorite spot”—that perfect corner seat with the best TV view. Concentrated use in one area leads to uneven wear, resulting in the dreaded “favorite spot sag.” This not only looks unsightly but also compromises the comfort and support of the entire piece. Preventing this requires a proactive maintenance strategy: a regular cushion rotation schedule.
Treating your sectional like a system with interchangeable parts is key. The goal is to distribute wear evenly across all cushions. This maintains a consistent look and feel and significantly extends the life of the sofa’s filling and support structures. A quarterly rotation is a good baseline. This involves systematically moving cushions from high-traffic areas (like the corner) to low-traffic areas (like the ends) and vice-versa. For an even more thorough approach, unzip the cushion covers monthly to fluff and redistribute the internal filling by hand.

As this detailed view shows, maintaining the loft and shape of each cushion is a hands-on process. For modular sectionals, you have an even greater advantage: you can swap entire sections on a semi-annual basis to completely alter wear patterns on the frame and springs. While you have the cushions off, it’s a good time to press down on the underlying springs or webbing to check for any persistent sagging that might indicate a deeper frame issue.
A disciplined rotation schedule preserves your sectional’s form and function. Here is a simple plan to follow:
- Zone Your Sectional: Mentally map your sofa into zones: the high-traffic corner, the medium-traffic middle seats, and the low-traffic ends.
- Rotate Quarterly: Every three months, move the corner cushions to the middle, the middle cushions to the ends, and the end cushions to the corner.
- Fluff Monthly: Unzip the cushions and manually redistribute the fill by beating and fluffing them to restore their loft.
- Swap Modular Sections: If your sectional is modular, swap the position of entire units every six months to alter foot traffic and sitting patterns.
- Inspect the Foundation: When cushions are removed, test the underlying springs for uniform resistance. Significant dips could signal a frame or support issue needing professional attention.
Why Round Tables Facilitate Better Conversation Than Rectangular Ones?
The sectional defines the seating zone, but the coffee table at its center dictates how that zone functions. While a rectangular table might seem like a logical choice, a round coffee table is often a superior partner for a sectional, especially in an open-plan layout. The reason lies in its ability to enhance both flow and conversation. A round table has no sharp corners, which immediately creates more walkable area and a softer, safer traffic path around it—a crucial factor in the “kinetic footprint” of your living area.
More importantly, a round table optimizes the conversational geometry established by the sectional. In an analysis of living room layouts, designers found that round tables create better focal points, particularly when a sectional is “floated” in the center of a room. The curved lines of the table harmonize with the enclosing shape of the sectional. This creates a democratic, non-hierarchical arrangement where no one occupies a “head of the table” position. Everyone is an equal distance from the center, facilitating more natural, inclusive group conversations.
Furniture design specialists note that the absence of corners provides more equitable access from all seating positions. Everyone can comfortably reach for a drink or a snack without having to perform an awkward forward lunge. This small ergonomic detail contributes significantly to a relaxed and comfortable social atmosphere. The combination of a U-shaped or L-shaped sectional with a round coffee table is a classic design pairing for a reason: it creates a self-contained, highly functional social hub that is both visually pleasing and ergonomically sound.
The shape of your coffee table is not a minor decorative choice. It is a strategic decision that directly impacts the flow and function of the primary zone you’ve worked to create. By eliminating corners and promoting a more egalitarian seating arrangement, a round table acts as the perfect nucleus for the conversational hub your sectional is designed to be.
The Rug Size Mistake That Makes Your Living Room Look Tiny
If the sectional is the architectural anchor of your living space, the area rug is the foundation it sits upon. The most common mistake homeowners make is choosing a rug that is too small. A “postage stamp” rug that just floats in the middle of the floor, with all furniture sitting off it, visually shrinks the room and makes the arrangement feel disconnected and temporary. A properly sized rug unifies the seating area, defines the zone, and makes the entire space feel larger and more deliberate.
There are two primary rules for sizing a rug with a sectional. The first, and most ideal, is that the rug should be large enough for the entire sectional to sit completely on it. This creates a cohesive, island-like zone. For floating sectionals, the rug should extend at least 18-24 inches beyond the sofa on all sides to create a generous, well-proportioned border. The second acceptable rule is that at least the front legs of all pieces of the sectional must be on the rug. This still visually connects the pieces and anchors them to the defined space.
In most cases, this means standard-sized rugs are simply not large enough. As a baseline, interior design guidelines confirm that most living rooms need an 8×10 or 9×12 rug to properly ground the space and create visual cohesion with large furniture like sectionals. In larger rooms, you may need to go even bigger or consider a custom size to achieve the right proportions. Avoid the temptation of L-shaped rugs; a large, simple rectangular rug creates a more unified and expansive look that serves as a better foundation for your zone.
Here are the essential rules for getting rug size right:
- Go Big: The rug must be large enough to place at least the front feet of every piece of the sectional on it.
- Define the Float: For a floating sectional, the rug should extend 18-24 inches beyond the sofa’s footprint on all exposed sides.
- Anchor the Corner: For a corner placement, you can choose between full coverage or the front-legs-only rule.
- Create Secondary Zones: Use a smaller runner or rug behind a floating sectional to define a separate walkway.
- Size Up: An 8×10 foot rug is the minimum for most standard living rooms; larger rooms will likely require a 9×12 foot rug or bigger.
Key Takeaways
- Treat your sectional as an architectural tool to define zones, not just as a piece of furniture to be placed.
- Precise measurement of “activity zones” and walkways using painter’s tape is more critical than simply measuring wall dimensions.
- The right rug size (at least 8×10) and table shape (often round) are not decorative afterthoughts; they are essential components that complete and unify the seating zone.
Manual vs Power Recliners: Which Lasts Longer in a Family Home?
The final element of spatial choreography involves the moving parts: the reclining function. The choice between a manual and a power recliner within your sectional has significant implications for placement, durability, and the overall kinetic footprint of your room. A manual recliner, operated by a lever or handle, is mechanically simple. This simplicity is its greatest strength; with fewer moving parts, there is less that can go wrong, often leading to a longer lifespan without mechanical issues.
However, manual mechanisms typically require significant clearance, often needing 12-16 inches of space between the sofa and the wall to fully recline. This can be a major constraint in all but the largest rooms. Furthermore, the exposed mechanisms can pose a pinching risk for small children or pets. Power recliners, on the other hand, offer a more elegant solution for spatial planning. Many modern power models are “wall-huggers,” engineered with a forward-gliding mechanism that requires zero clearance behind the sofa. This allows you to place your sectional much closer to the wall, maximizing usable floor space.
While power recliners are more complex, with motors, cables, and electrical components, their serviceability is often better. In a family home durability analysis, it was noted that while manual mechanisms are simpler, modern power recliners with replaceable components offer better long-term serviceability. If a motor fails, a technician can often replace the modular part without needing to replace the entire chair. Their two-button operation can also be safer for children than an easily accessible lever. The primary drawback is the need for an electrical outlet, which can limit placement options, especially for a floating arrangement.
Your choice depends on your priorities: the mechanical simplicity and placement freedom of a manual, versus the space-saving design and modern serviceability of a power recliner.
| Feature | Manual Recliners | Power Recliners |
|---|---|---|
| Wall Clearance Needed | 12-16 inches | Zero clearance ‘wall-hugger’ options available |
| Mechanical Complexity | Simple lever mechanism | Motors, cables, electrical components |
| Repairability | Harder to source replacement parts | Modular parts often replaceable |
| Child Safety | Exposed mechanisms pose pinching risk | Safety stops, two-button operation |
| Placement Flexibility | No electrical requirements | Requires outlet access, limits floating options |
By applying these principles of spatial choreography, you can transform your sectional from a bulky piece of furniture into the heart of a well-designed, functional, and inviting home. The next step is to begin mapping out your own space with these strategies in mind.