Successfully extending a historic home isn’t about fighting regulations; it’s about making them your co-designer to create a timeless architectural dialogue that increases both character and value.
- Permit rejections are often due to a lack of detail and a misunderstanding of heritage principles, not a fundamental opposition to modernization.
- True value comes from material honesty and structural legibility, not from creating a ‘pastiche’ or a jarring, disconnected addition.
Recommendation: Shift your perspective from ‘restriction’ to ‘framework’. Treat heritage compliance as the DNA of a high-quality, valuable project from the very first sketch.
The dream is a familiar one: you own a property steeped in history, a Victorian or Edwardian home with character etched into its very bones. You love its story, but you crave light, space, and a connection to the garden that modern life demands. The solution seems obvious—a beautiful, contemporary extension. Yet, this dream is often followed by a creeping sense of dread. The spectre of planning departments, listed building consent, and heritage laws looms large, suggesting a battle of wills between your vision and a committee dedicated to preserving the past at all costs.
Common advice often falls into two unhelpful camps: either attempt a pastiche, creating a ‘fake history’ that devalues the original, or bolt on a generic modern box that feels like a complete afterthought. Both approaches miss the point. They treat the historic home as a problem to be solved or an obstacle to be ignored. This thinking leads to jarring material clashes, awkward proportions, and, all too often, frustrating and costly planning rejections.
But what if the regulations weren’t your enemy? What if, instead, they provided a framework for a more thoughtful, valuable, and ultimately more successful project? As a heritage architect, I can tell you that the most successful extensions are not those that fight the historic context, but those that enter into a respectful and creative architectural dialogue with it. This is not about restriction; it’s about understanding the DNA of your home to create an addition that feels both inevitable and inspiring.
This guide will walk you through the key strategic decisions and technical considerations, from navigating the planning process to sequencing your build. We will explore how to make structural changes respectfully, choose materials with integrity, and ensure your new space enhances, rather than diminishes, the legacy of your historic property.
For those who prefer a visual format, the following video offers a great introduction to the principles and benefits of heritage home programs, setting the stage for the detailed advice in this guide.
To navigate this complex but rewarding journey, we’ve structured this article around the critical questions that arise when blending modern ambition with historical integrity. The following summary outlines the path we will take, from the bureaucratic realities of permits to the fine art of creating a seamless visual flow.
Summary: A Heritage Architect’s Framework for Modernizing Historic Properties
- Why 30% of Renovation Permits Get Rejected on the First Application?
- How to Replace a Load-Bearing Wall with a Steel Beam in 5 Steps?
- Restore or Rebuild: Which Is More Cost-Effective for a 50-Year-Old Extension?
- The Material Clash Mistake That Lowers Your Home’s Resale Value
- When to Hire the Glazier: Before or After the Steel Frame Installation?
- Why a Victorian Conservatory Can Increase Curb Appeal for Historic Homes?
- How to Ensure Your New Addition Doesn’t Look Like an Afterthought?
- How to Create a Visual Flow Between Old House and New Extension?
Why 30% of Renovation Permits Get Rejected on the First Application?
The fear of permit rejection is a significant source of anxiety for homeowners, and not without reason. Indeed, recent renovation data reveals that 33% of homeowners face month-long permit delays, a costly and frustrating setback. However, these rejections are rarely born from a council’s inherent opposition to change. More often, they stem from a failure to communicate the project’s intent within the language and principles of heritage conservation. The application is not telling the right story.
Heritage officers are not looking for slavish imitation of the past. They are tasked with protecting the “special character” of a building or area. An application is often rejected because the submitted plans lack the necessary detail to prove this has been considered. As seen in historic districts, plans with insufficient detail are a primary cause for rejection. Heritage officers need to see a deep understanding of the existing structure. Your application must demonstrate that you have considered:
- Preservation of character-defining features: This includes original windows, decorative brickwork, rooflines, and unique mouldings. Your plans must show how these are either retained or respectfully referenced.
- Minimal structural alterations: Interventions should be as minimal as possible to maintain the historic fabric. The more of the original structure you can keep, the better.
- Demonstration of reversibility: This is a key conservation principle. Could your extension theoretically be removed in the future without permanently damaging the original historic building?
- Compliance with established standards: Many jurisdictions have guidelines, like the Secretary of the Interior’s Standards for Rehabilitation in the US, that provide a clear framework for appropriate interventions.
Essentially, a rejected application often means you haven’t done the homework to prove your modern addition is a respectful partner to the historic home, not a hostile takeover. It’s about demonstrating a sophisticated understanding, not just presenting a pretty picture.
How to Replace a Load-Bearing Wall with a Steel Beam in 5 Steps?
One of the most transformative interventions in a historic home is removing a load-bearing wall to create an open-plan living space. This act of “structural surgery” is the key to unlocking the light and flow many owners desire, but it must be undertaken with surgical precision. It’s not a simple builder’s task; it’s a multi-disciplinary process involving architects, engineers, and specialist contractors. The goal is to make the intervention feel seamless while ensuring the long-term health of the building’s historic fabric.
The process is far more than just demolition and installation. It’s a carefully orchestrated sequence designed to manage risk, respect the structure, and achieve a high-quality finish. In our practice, we view this as a five-phase procedure that ensures nothing is left to chance. This detailed approach is what separates a masterful renovation from a potentially disastrous one, safeguarding the integrity of your home at every stage. The result can be a design feature in itself, celebrating the structural legibility of the intervention.
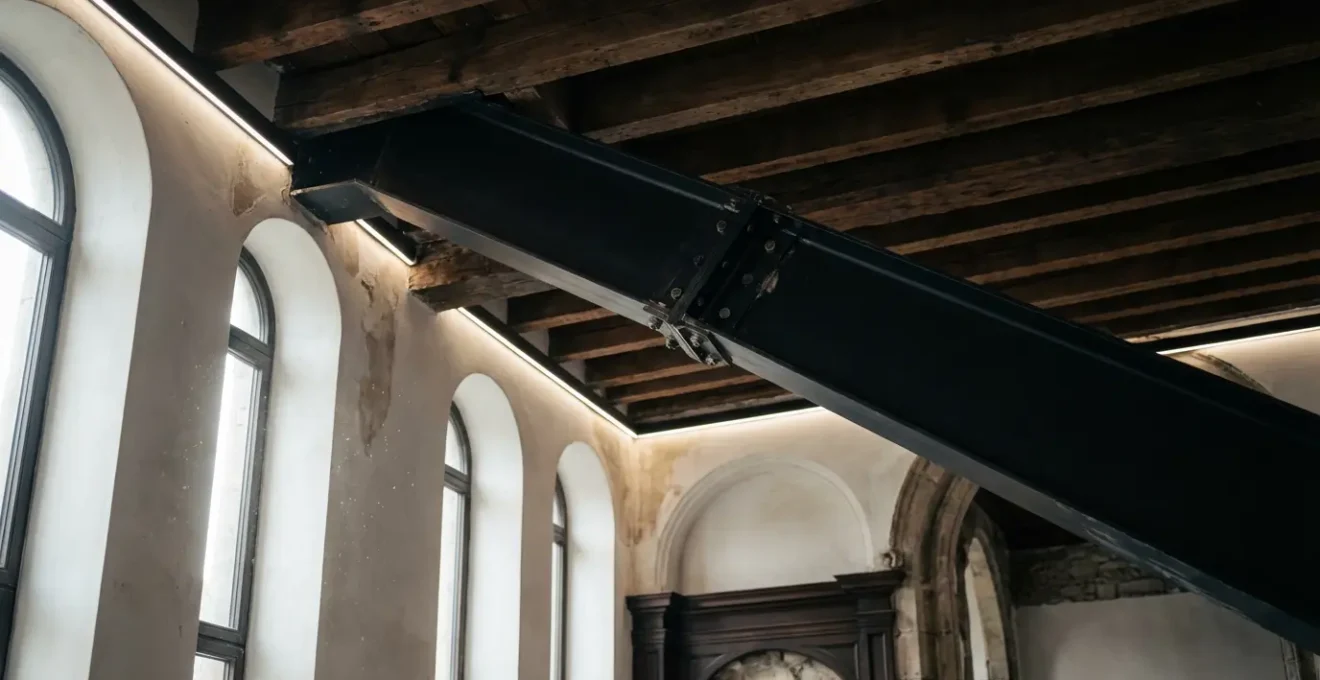
As the image above demonstrates, when done correctly, the new structural element can enter into a beautiful dialogue with the old, with the exposed steel beam becoming a crisp, modern line that highlights the texture and form of the original building. This is the essence of a forward-looking heritage approach.
Your Action Plan: The 5-Phase Structural Surgery Process
- Diagnostic Phase: Before any drawings are finalized, conduct thorough structural surveys, material analysis, and a historical assessment to understand precisely what you’re working with and how the house has settled over time.
- Specialist Selection: Engage a structural engineer with proven experience in historic buildings and contractors who can replicate or respectfully work alongside original construction techniques.
- Protection Protocol: Implement and enforce strict protocols for minimizing dust, vibration, and stress on the remaining historic structure during demolition and installation.
- Foundation Engineering: Design and install new foundations or padstones for the beam that are engineered to carry the new loads without causing differential settlement or stress on the old foundations.
- Feature Integration: Work with your architect to decide whether to conceal the beam for a seamless look or expose it as a deliberate design element, using contrasting finishes to celebrate the junction between old and new.
Restore or Rebuild: Which Is More Cost-Effective for a 50-Year-Old Extension?
Often, a historic home comes with a less-than-historic addition from a more recent, but still bygone, era—perhaps a poorly insulated extension from the 1970s. The immediate question is one of pragmatism: is it better to work with what’s there or tear it down and start again? The answer is rarely straightforward and extends beyond a simple calculation of initial build costs. A true cost-benefit analysis must factor in long-term maintenance, sustainability, and the ultimate impact on your home’s character and resale value.
While a complete rebuild might seem cheaper initially due to the use of standard materials and processes, restoring and upgrading an existing structure can offer superior long-term benefits. This is especially true when considering the embodied carbon—the carbon emissions associated with manufacturing and transporting new materials. Preserving the existing structure is an inherently sustainable act. The following table, based on insights from industry analysis, breaks down the key factors to consider in this critical decision.
| Factor | Restoration | Rebuild |
|---|---|---|
| Initial Cost | Higher (specialized labor) | Lower (standard construction) |
| Long-term Maintenance | Lower (quality materials) | Higher (modern materials) |
| Embodied Carbon | Preserved (sustainable) | Lost (new materials) |
| Resale Value | Premium for authenticity | Standard market value |
| Timeline | Longer (careful work) | Shorter (efficient process) |
The “Resale Value” point is particularly crucial. A generic new build adds space, but a thoughtfully restored and integrated extension adds something more valuable: character. It contributes to a cohesive narrative for the property, which discerning buyers often pay a premium for.
A skillfully restored period-appropriate extension can add more character and resale value than a generic new build.
– Sarah Magness, HGTV Design Expert Interview
The Material Clash Mistake That Lowers Your Home’s Resale Value
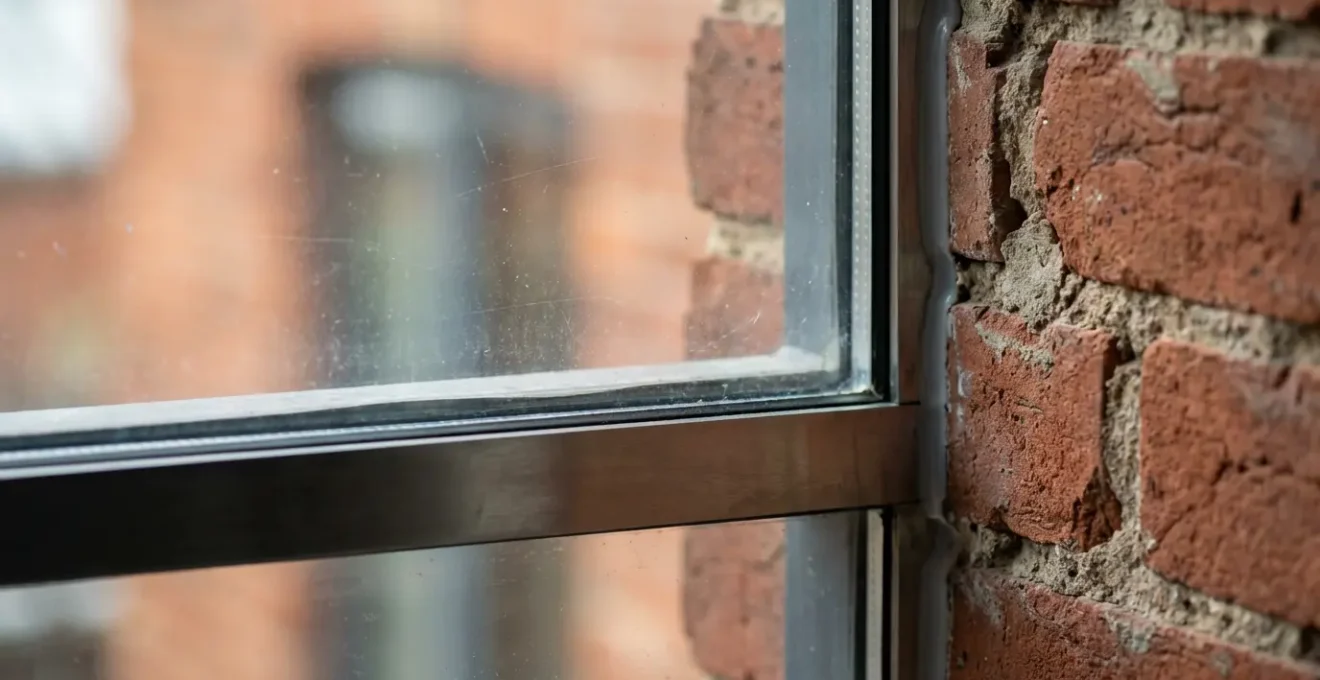
Nothing screams “unsuccessful extension” more than a clumsy clash of materials. Choosing the right materials is not about finding a perfect match for the old brick or stone; this often leads to a ‘pastiche’ effect that looks subtly wrong. The key is what we call material honesty. This principle dictates that modern materials should look and act like modern materials, while respecting the texture, scale, and colour palette of the historic building. The goal is harmony, not imitation.
A successful extension creates a dialogue between materials. The crisp, clean lines of architectural concrete or the deep, evolving patina of Corten steel can beautifully complement the textured, time-worn surface of historic brickwork. It’s about creating a palette where each material is true to itself but also part of a larger, cohesive composition. Poor material choices, on the other hand, can create a visual disconnect that makes the extension feel cheap and temporary, ultimately lowering the property’s overall appeal and value.
Case Study: Brooklyn Brownstone Material Integration
A notable project on an urban brownstone in Brooklyn demonstrates this principle perfectly. Rather than trying to find a “brownstone” brick that would never quite match, the architects created an innovative rear addition using materials that complemented the original brick’s tone and texture while being unapologetically modern. By maintaining consistent design elements like window proportions across both old and new sections, they achieved a harmonious blend that honoured the brownstone’s historic character while providing a new, functional space.
To avoid the common pitfalls, your material palette should be a curated collection, not a random assortment. Consider the following principles:
- Echo, Don’t Imitate: Select modern materials that echo historic textures or colours without directly copying them. Think zinc, Corten steel, or architectural concrete.
- Embrace Patina: Choose materials that will age gracefully and develop their own character over time, such as bronze, copper, or untreated cedar.
- Match the Scale: Ensure the scale and proportion of your new materials (e.g., the size of cladding panels) complement the scale of the original building (e.g., the size of the bricks).
- Design the Transition: Treat the point where old meets new as a deliberate, celebrated architectural moment, perhaps with a glass link or a shadow gap, rather than an awkward junction.
When to Hire the Glazier: Before or After the Steel Frame Installation?
This seemingly minor question about project sequencing reveals a fundamental truth about high-quality renovations: precision and process are paramount. In a standard new build, tolerances are more forgiving. In a historic renovation, where you are fitting a precise, modern frame into a non-uniform, centuries-old structure, there is no room for error. Ordering expensive, custom-sized glass before the steel frame is fully installed, measured, and signed off is a recipe for disaster.
The correct sequencing of trades is not just about efficiency; it’s a critical risk management strategy. A historic building is never perfectly level, plumb, or square. The “as-built” dimensions of the installed steel frame will always differ slightly from the architectural drawings. The glazier must take their final measurements from the actual, in-situ frame to ensure a perfect fit for the glass panels. Getting this wrong can lead to costly remakes, significant delays, and compromised weatherproofing.
This underscores the importance of a main contractor and project lead who specialize in heritage work. As industry experts emphasize, a contractor with 15+ years of specialized experience is recommended because they understand this critical path. The timeline is not arbitrary; it is a proven sequence for success.
- Phase 1: Heritage Architect – Initial assessment and design development, setting the vision.
- Phase 2: Structural Engineer – Performs load calculations and produces specifications for the frame.
- Phase 3: Planning Officer Consultation – Secures all necessary permissions with detailed plans.
- Phase 4: Main Contractor – Installs the structural frame, carefully monitoring and recording final “as-built” dimensions and tolerances.
- Phase 5: Glazier/Joiner – Is called to the site *only after* the frame is complete to take precise site measurements for fabrication.
Why a Victorian Conservatory Can Increase Curb Appeal for Historic Homes?
This question is, in fact, a trick question. While the image of a delicate, ornate Victorian conservatory attached to a period home is a romantic one, the reality is often a disappointing and value-damaging failure. The problem lies in the very idea of adding “new” history to an authentically old building. A modern, mass-produced “Victorian-style” conservatory rarely matches the quality, proportion, or detail of the original house, resulting in a look that heritage professionals call ‘pastiche’.
As architect Alexandra Barker of BFDO Architects notes, this approach can be counterproductive.
A poorly-executed ‘pastiche’ Victorian conservatory can actually damage curb appeal and devalue a truly historic home by creating a ‘fake history’ aesthetic.
– Alexandra Barker, BFDO Architects
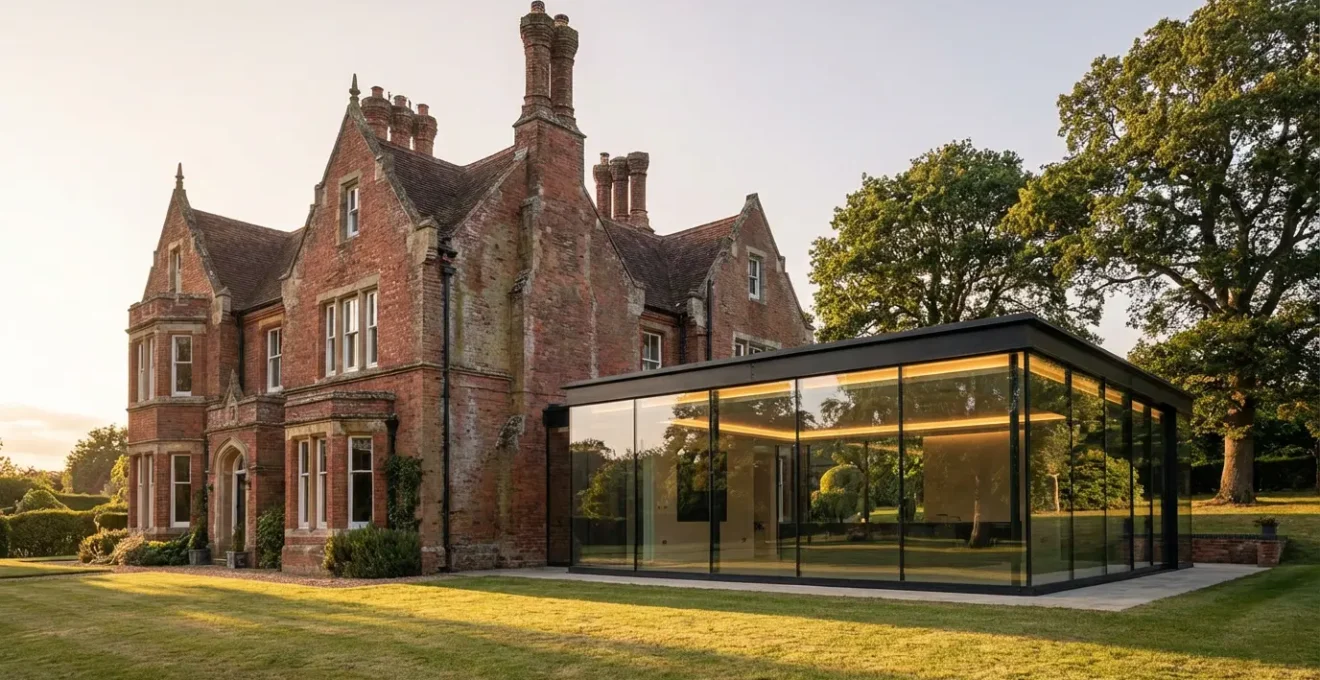
A far more successful and architecturally honest approach is to use a modern glazed structure. A contemporary glass box or a minimalist orangery can fulfill the same desire for light and a connection to the garden, but it does so with integrity. It allows the original facade of the historic home to remain visible and celebrated, acting as an ‘internal’ wall of the new space. This creates a beautiful dialogue between eras, rather than a confused imitation.
The modern glass extension, as seen here, doesn’t compete with the historic home; it complements it. It is clearly an addition of its own time, and this material honesty is what planning officers and design purists respect. It provides the desired functionality while enhancing, not compromising, the original building’s character.
How to Ensure Your New Addition Doesn’t Look Like an Afterthought?
The difference between an extension that elevates a historic home and one that detracts from it lies in a single word: integration. A poorly designed addition often looks like a separate entity that has been unceremoniously attached to the main building. A successful addition, however, feels like it’s part of a cohesive and intentional whole, even if it’s stylistically distinct. This is achieved through the careful application of timeless architectural principles.
This integration is not about camouflage. It’s about respecting the hierarchy and grammar of the original building. Your new addition should be subordinate to the main historic structure, not compete with it for attention. A case in point involves a Victorian home project that successfully added a contemporary extension. By carefully selecting materials that echoed the original architecture and ensuring the new volume was visually secondary to the main house, the architects created a seamless transition between eras. The principles they followed are universal.
To achieve this sense of belonging, architects employ several key strategies:
- Design the ‘Architectural Seam’: The connection point can be designed to be either an almost invisible link, a clearly subordinate connection, or a celebrated moment of architectural expression (like a glass corridor).
- Apply Golden Ratio Proportions: Using classic proportions like the Golden Ratio for the massing and openings of the extension can create a subconscious sense of harmony and rightness.
- Respect Dominant Rooflines: The roofline of the extension should typically be lower than and subordinate to the main roof of the historic building.
- Maintain Hierarchy of Form: The overall volume and massing of the extension should appear secondary to the original structure, reinforcing its historical importance.
- Use Deliberate Material Palettes: As discussed earlier, materials should be either consistently high-quality or form a deliberate, complementary contrast.
Key Takeaways
- Heritage compliance is a framework for quality, not a barrier to creativity. Use it to your advantage.
- Successful modernization relies on ‘architectural dialogue’ and ‘material honesty’—respecting both the old and the new for what they are.
- Process and precision, from permit applications to the sequencing of trades, are paramount to managing risk and ensuring a high-quality outcome.
How to Create a Visual Flow Between Old House and New Extension?
Once the structure is built and the materials are chosen, the final element of a successful integration is creating a seamless sense of flow. The transition from the often smaller, more enclosed rooms of the historic house to the open, light-filled space of the extension should feel like a natural journey, not an abrupt shift. This is achieved through the deliberate and consistent application of interior design and architectural detailing that bridges the two spaces.
This continuity guides the eye and the body, making the two parts of the house feel like a single, unified home. It’s about creating uninterrupted sightlines and a consistent sensory experience. As one owner who converted a historic church noted, success comes from blending the best of both worlds. As Lynn Pechuekonis of Rockhaven B&B explains, they made a point to “preserve standout wood features…while mixing in furniture from multiple eras.” This layering of history, old and new, is key.
To foster this sense of unity, consider these four powerful strategies for creating visual continuity:
- Install Continuous Flooring: Using a single flooring material, such as polished concrete or a specific wide-plank wood, that runs seamlessly from the old space into the new is the most effective way to unify them.
- Implement a Unified Lighting Strategy: Use a consistent colour temperature (e.g., warm white 2700K) and complementary fixture styles throughout the old and new zones to create a cohesive atmosphere.
- Celebrate Thresholds: Make the transition point a deliberate design moment. This could be a dramatic steel portal, a short flight of steps, or a frameless glass doorway that marks the passage from one era to another.
- Align Openings for Sightlines: Where possible, align new doorways and windows with existing ones to create long, uninterrupted sightlines that draw the eye from the historic interior, through the extension, and out into the garden.
To ensure your project successfully creates this dialogue between past and present, the crucial first step is engaging with a heritage specialist to develop a compliant, creative, and cohesive strategy from the very beginning.