A perfectly zoned patio is born from foundational engineering, not decorative afterthoughts.
- The success of your dining and lounging areas depends on invisible decisions about the sub-base, material heat-reflection, and ergonomic clearances.
- Planning for “invisible infrastructure” like electrical conduits and drainage from day one saves thousands and ensures future functionality.
Recommendation: Shift your focus from what furniture to buy, to what foundational work needs to be done to support it for decades.
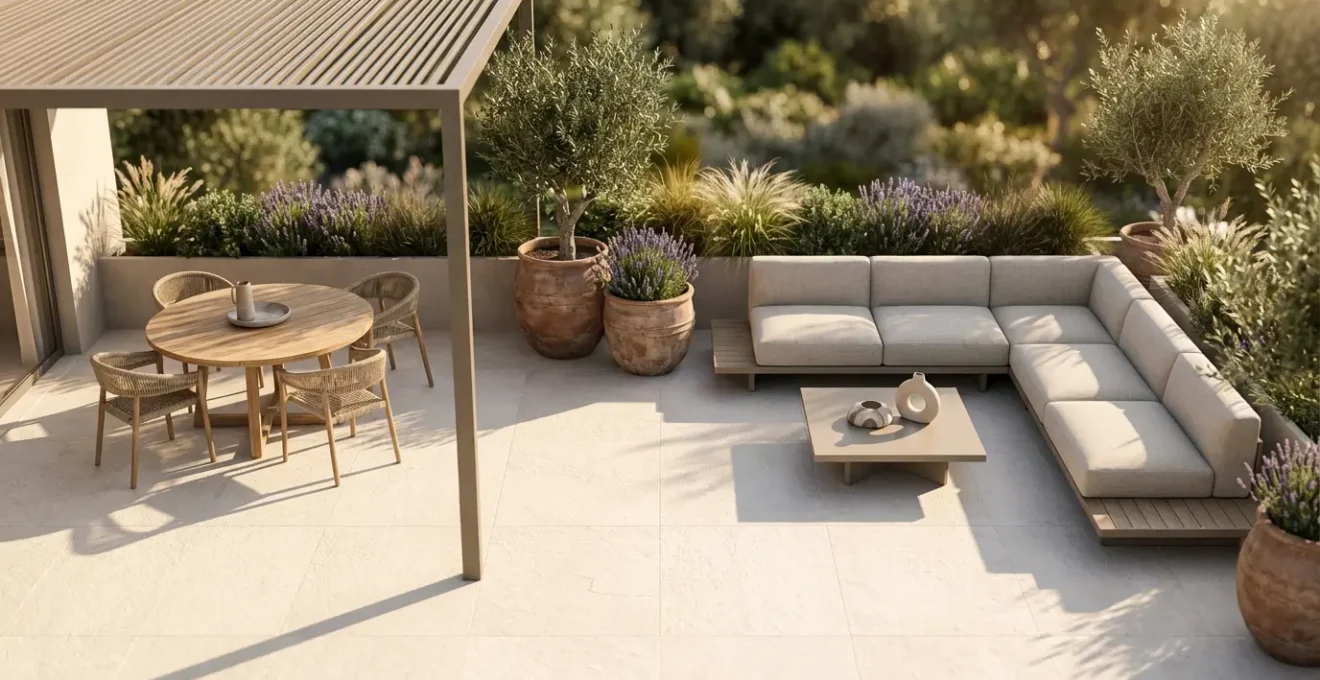
The dream of a medium-sized patio is a space of dualities: one corner for vibrant, al-fresco dining, the other for tranquil lounging under the stars. Yet, for many homeowners, the reality is a space that feels compromised—too cramped for a proper dinner party, too awkward for relaxing. The common advice is to use outdoor rugs or different furniture styles to visually separate these areas. While helpful, this approach often addresses the symptom, not the cause of the dysfunction.
These decorative solutions are merely a top layer. They fail to address the core issues that make a patio feel crowded, uncomfortable, or unusable for much of the year. The problem isn’t a lack of aesthetic vision; it’s a lack of foundational planning. What if the true key to unlocking your patio’s potential wasn’t about the furniture you place on it, but the unseen decisions made long before?
This is the essence of spatial engineering. The secret to a patio that effortlessly accommodates both dining and lounging without feeling crowded lies in its invisible infrastructure. It’s in the preparation of the ground, the choice of materials based on sun exposure, the precise calculation of clearances, and the pre-planning of utilities for future ambitions. These are the elements that dictate flow, comfort, and usability for years to come.
This guide will walk you through these critical, foundational decisions. We will move beyond superficial decorating tips to explore the structural and environmental engineering that transforms a simple paved area into a highly functional and valuable extension of your home. By understanding these principles, you can build a patio that works for you, not against you.
Summary: Engineering Your Ideal 50m² Outdoor Space
- Why Your North-Facing Patio Stays Damp and Unused 9 Months a Year?
- How to Prepare the Sub-Base to Prevent Pavers from Sinking After 2 Years?
- Natural Stone vs Porcelain: Which Stays Cooler Under Direct Summer Sun?
- The Spacing Error That Makes Moving Chairs on Your Patio Impossible
- How to Run Gas and Electric Lines for a Future Outdoor Kitchen Safely?
- Why a Water Feature Is the Best Defense Against Traffic Noise?
- Why 10 Lumens is Decorative but You Need 100 Lumens for Safety?
- Composite vs Hardwood Decking: Which Is Truly Maintenance-Free for 10 Years?
Why Your North-Facing Patio Stays Damp and Unused 9 Months a Year?
A north-facing patio’s greatest challenge is its lack of direct sunlight, creating a perpetually cool, damp environment that becomes a breeding ground for algae and moss. This green sheen isn’t just unsightly; it creates a slippery, uninviting surface that discourages use for most of the year. The scale of this problem is vast; a significant portion of the 9 million metric tons of sulfur produced annually in the U.S. is for creating algae-resistant materials, highlighting how widespread this issue is. For the homeowner, it means constant cleaning and a space that never truly feels welcoming.
The solution lies in a counter-intuitive strategy: instead of fighting the shade, you must engineer the patio to thrive within it. This begins with material selection. The porosity of your pavers is a critical factor. Porous materials like natural sandstone can absorb 5-10% of their weight in water, creating a damp reservoir. In contrast, dense materials like porcelain have a very low water absorption rate (around 1.1-1.5%), keeping the surface drier and more resistant to organic growth.
Beyond material choice, managing moisture requires an active approach. Installing a sub-surface French drain along the patio’s perimeter is a non-negotiable piece of invisible infrastructure. This system actively channels water away from the foundation and pavers, preventing the deep-seated dampness that fosters algae. Finally, you can embrace the nature of the space by transforming it. Instead of forcing a sun-lounge atmosphere, design a serene meditation or shade garden with ferns, hostas, and even a small water feature. By working with the environment, you create a patio that is intentionally designed for its specific microclimate, ensuring it’s a desirable destination, not a neglected corner.
How to Prepare the Sub-Base to Prevent Pavers from Sinking After 2 Years?
The most beautiful, expensive pavers in the world will fail if the ground beneath them is not properly prepared. Paver settlement—the dreaded sinking and shifting that creates uneven surfaces and tripping hazards—is almost always a result of a failed sub-base. This foundational layer is the true secret to functional longevity. It’s not just about digging and pouring some gravel; it’s a multi-layered system designed to distribute weight, manage water, and resist the freeze-thaw cycles that heave the ground.
A proper sub-base consists of two key layers. The first is a 4- to 6-inch (10-15 cm) layer of compacted aggregate, typically crushed stone. This layer must be compacted in 2-inch lifts using a mechanical plate compactor to achieve at least 95% compaction. Skipping this step is the single most common cause of failure. The second layer is a 1-inch (2.5 cm) bed of coarse sand, which provides a level surface to set the pavers themselves.
The critical role of this foundation was highlighted in a 2024 study of concrete elements in coastal environments like Tampico, Mexico. Researchers found that environmental loads, including humidity and temperature shifts, caused significant durability issues and sinking within just two years on samples with improper sub-base preparation. In contrast, the control samples built with correctly layered and compacted foundations showed no such degradation. This demonstrates that the sub-base isn’t just fill; it’s an engineered system that actively protects your investment from environmental stress. Investing the time and effort here is the most cost-effective decision you can make.
Natural Stone vs Porcelain: Which Stays Cooler Under Direct Summer Sun?
When zoning a patio that includes a sun-drenched lounging area, material choice is paramount for comfort. The difference between a surface that’s pleasant for bare feet and one that could fry an egg comes down to a property called the Solar Reflectance Index (SRI). This index, on a scale of 0-100, measures a material’s ability to reflect solar heat. The higher the SRI value, the cooler the surface will remain. This is where a major distinction between natural stone and modern porcelain emerges.
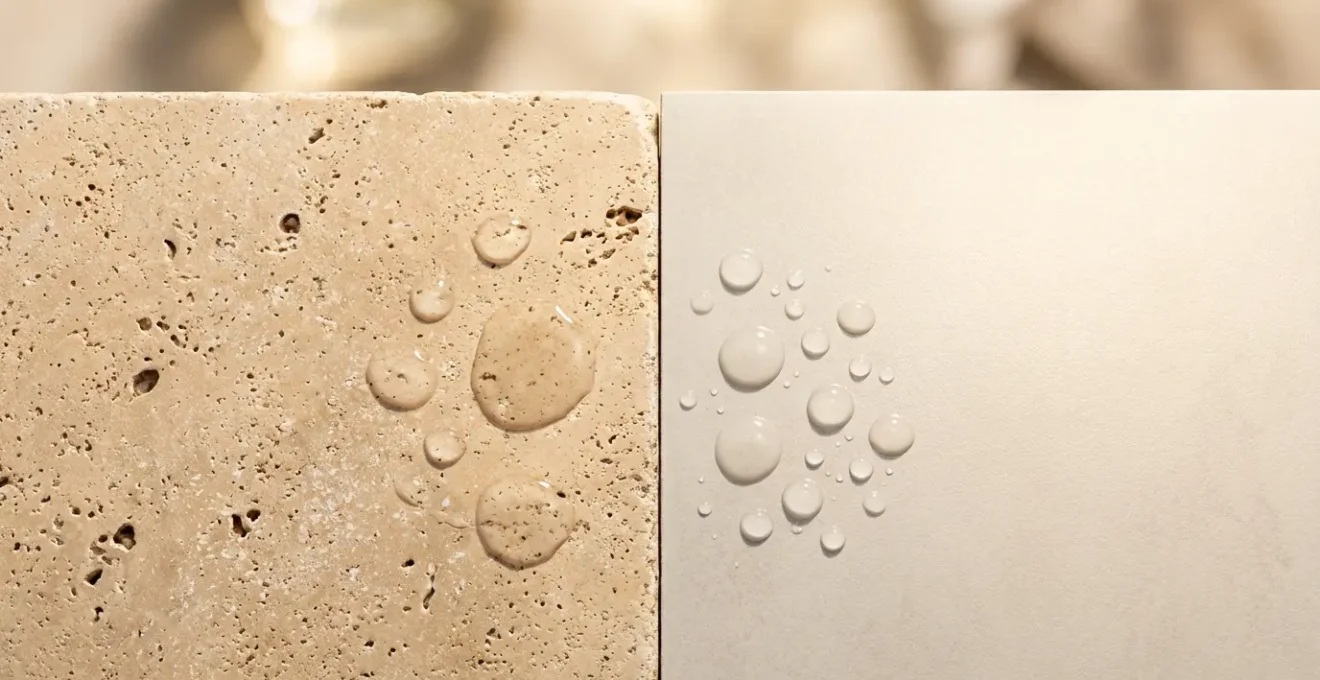
Light-colored porcelain tiles are the clear winner for sunny applications, typically boasting an SRI value between 75 and 85. Their dense, non-porous surface reflects a significant amount of solar radiation. In contrast, many popular natural stones, especially darker varieties like slate or bluestone, have low SRI values, often ranging from 20-40. They absorb heat throughout the day, creating a “micro heat island” effect that can make your patio unbearable in peak summer. This retained heat can raise the ambient temperature around your home by several degrees, forcing your air conditioning to work harder and increasing energy bills.
Beyond heat, another critical factor for a dual-use patio is safety, especially if your lounge area is near a pool or water feature. The Dynamic Coefficient of Friction (DCOF) measures slip resistance on wet surfaces. For safety, you should look for materials with a DCOF rating above 0.42. Textured porcelain is specifically engineered for this, often achieving ratings of 0.45 to 0.60. While beautiful, some polished natural stones can become dangerously slick when wet, with DCOF ratings falling to 0.30-0.35. Therefore, for a patio that needs to be both cool for lounging and safe for activity, high-SRI, textured porcelain is the superior engineering choice.
The Spacing Error That Makes Moving Chairs on Your Patio Impossible
The most common failure in patio zoning isn’t the choice of furniture, but the complete disregard for ergonomic clearance. Homeowners often place their dining set and lounge chairs in a way that looks balanced when empty, only to discover that the space becomes an impassable obstacle course once people are in it. The critical error is failing to account for the dynamic space required for human movement: pushing back a chair, carrying a tray of drinks, or simply walking past someone who is seated.
Effective spatial engineering for a patio relies on a set of non-negotiable rules for pathways and clearances. These “invisible” measurements are what make a space feel generous and functional, rather than cramped and frustrating. Key guidelines include:
- The Push-Back Rule: A minimum of 36 inches (approx. 90cm) must be left behind each dining chair. This allows a person to comfortably push their chair back and stand up without hitting a wall, a planter, or the person lounging behind them.
- The Major Thoroughfare Rule: Any primary path—for example, from the back door to the grill or from the patio to the lawn—requires a width of 48 inches (approx. 120cm). This allows two people to pass each other without turning sideways.
- The Squeeze-By Path: Secondary paths, such as the space between a lounge sofa and a fire pit, can be a minimum of 30 inches (approx. 75cm), which is just enough for a single person to pass through.
A professional technique to optimize this is to map out “desire lines”—the most natural and frequent paths of movement. A project that implemented this technique found that by observing and planning for these lines (e.g., door-to-grill, table-to-lounge), they unlocked 40% more usable space compared to a traditional, centered furniture layout. Before you buy a single piece of furniture, use cardboard cutouts to their full size and test these clearances. This simple step can save you from the costly mistake of a beautiful but unusable patio.
Your 5-Step Patio Flow Audit
- Identify Entry & Exit Points: Map all pathways from doors, gates, and other garden areas leading to and from the patio.
- Inventory Your “Movement Magnets”: List the key destinations on your patio (e.g., grill, dining table, lounge sofa, fire pit). These are your high-traffic hubs.
- Trace the Desire Lines: Draw the most frequent paths between your contact points and magnets. Are they direct, or do they force awkward detours around furniture?
- Assess Zone Bleed: Check if the push-back space from dining chairs intrudes on a major walkway or the lounge area. A functional patio prevents these overlaps.
- Create a Clearance Plan: Using your map, re-position furniture to ensure all “Desire Lines” meet the minimum width requirements and eliminate any zone bleed.
How to Run Gas and Electric Lines for a Future Outdoor Kitchen Safely?
When planning a versatile patio, thinking about a future outdoor kitchen is one of the smartest moves you can make. The critical error is treating it as a distant “maybe.” The time to plan for utilities is now, during the initial construction. Retrofitting gas and electric lines after the patio is complete is not only disruptive—involving tearing up expensive pavers—but also exponentially more expensive. The choice is stark: installing empty conduits during construction might cost a few hundred dollars, whereas retrofitting can easily cost $5,000 or more.
This is the ultimate example of planning for invisible infrastructure. Even if your budget doesn’t allow for a full outdoor kitchen today, burying the necessary conduits is a small investment that preserves the option for the future. For electricity, this means running at least one or two 20-amp circuits for small appliances and a dedicated 50-amp circuit for a potential electric grill. These should terminate in a weatherproof junction box in the designated kitchen area. It’s also wise to install weatherproof GFCI outlets every 8 feet along the patio perimeter for general use.
Running a gas line requires professional installation and strict adherence to local codes. The line should be buried below the frost line and include a clearly accessible shut-off valve for safety. Beyond the kitchen itself, consider running extra empty conduits for future smart home integrations. These can house wiring for Wi-Fi extenders, high-quality outdoor speakers, or controls for motorized shades and lighting. This foresight transforms your patio from a static slab into a dynamic, future-proofed platform for entertainment and comfort, maximizing your property’s value and your long-term enjoyment.
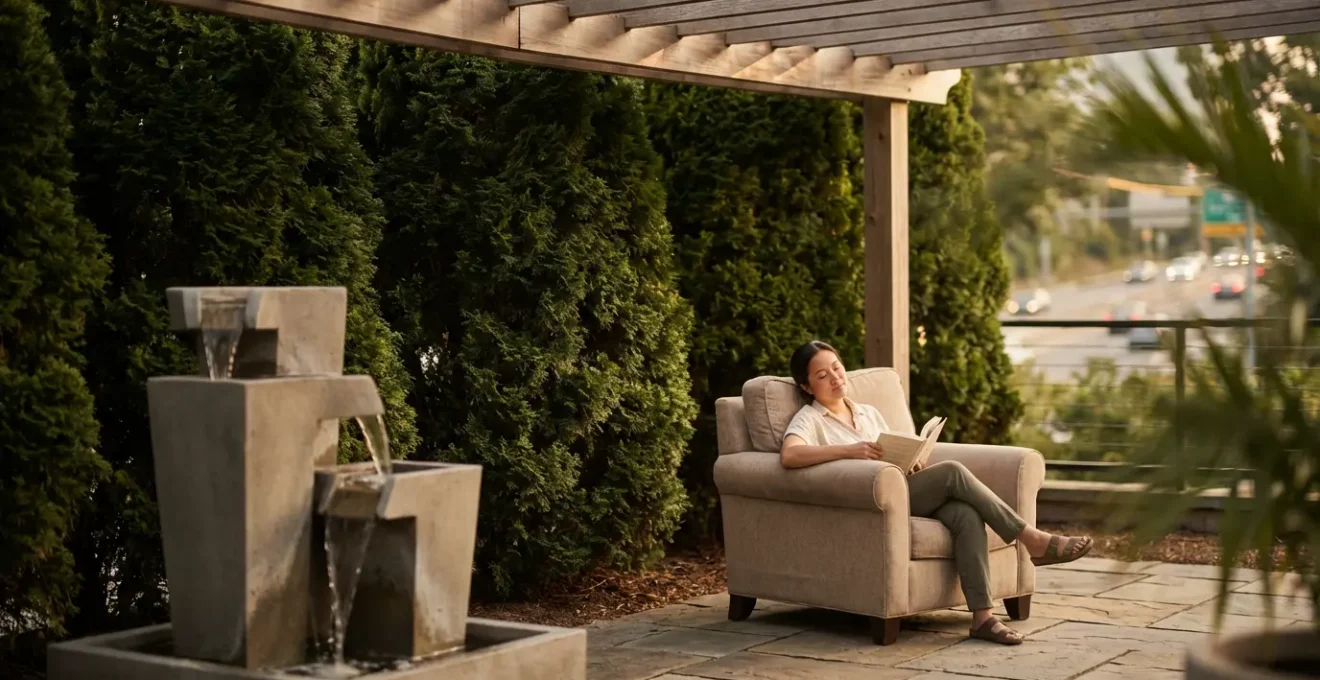
Why a Water Feature Is the Best Defense Against Traffic Noise?
For patios located near a busy street, the constant hum and sudden roars of traffic can destroy any sense of tranquility. Many homeowners attempt to solve this with tall fences or dense hedges. While these provide a visual barrier, they do little to block low-frequency sound waves. The most effective weapon against noise pollution is not a barrier, but a source of desirable sound: a water feature. This strategy is rooted in the science of psychoacoustic comfort.
The principle at work is called sound masking. As landscape designer James Moir Messervy explains, a water feature works its magic in a unique way.
Water features don’t block noise, but introduce a pleasant, consistent ‘broadband’ sound that makes the human brain filter out jarring, intermittent traffic noise through a psychoacoustic phenomenon called sound masking.
– James Moir Messervy, JMM Design Studio, as featured in HGTV
Your brain is wired to notice sudden, irregular sounds (a car horn, a truck’s brakes) over a constant drone. The gentle, varied sound of flowing water—a broadband sound that contains many different frequencies—gives your brain something pleasant and consistent to focus on. This effectively “masks” the annoying traffic noise, allowing your brain to push it into the background. The key is to place the water feature strategically between your primary seating area (the lounge or dining zone) and the source of the noise. This creates an “acoustic bubble,” a pocket of tranquility where the soothing sounds of water dominate your perception, making the outside world melt away.
Why 10 Lumens is Decorative but You Need 100 Lumens for Safety?
Patio lighting is often treated as a purely aesthetic choice, but it’s a critical element of safety and functionality. The most common mistake is using a single type of lighting for the entire space, resulting in areas that are either dangerously dim or unpleasantly glaring. A well-engineered lighting plan uses a 3-layer approach, understanding that the brightness required—measured in lumens—varies dramatically by zone and function. A 10-lumen light that creates a beautiful twinkle is decorative; a 100-lumen light is what prevents a guest from falling down the stairs.
The three essential layers are Ambient, Task, and Accent lighting. Ambient lighting is the base layer, providing general illumination for atmosphere and mood. This is where low-lumen fixtures (10-50 lumens) with a warm color temperature (around 2700K) excel. Task lighting is for safety and function. It requires much brighter light (100-300 lumens) in a more neutral color (around 4000K) and must be placed directly over work areas like the grill, the dining table, and especially over steps and pathways. For pathways, a fixture of at least 100-150 lumens every 4-6 feet is standard for safe navigation. Finally, Accent lighting (50-100 lumens) is used to highlight features like a beautiful tree, a stone wall, or a water feature, adding depth and visual interest.
This layered approach is clearly detailed in professional lighting guides, which provide specific requirements for creating a space that is both beautiful and safe.
| Lighting Layer | Lumen Range | Kelvin Temperature | Placement | Function |
|---|---|---|---|---|
| Ambient | 10-50 lumens | 2700K (warm) | Widespread, indirect | Mood setting, atmosphere |
| Task | 100-300 lumens | 4000K (neutral) | Over grill, dining table | Safety, food prep, reading |
| Accent | 50-100 lumens | 3000K (warm white) | Trees, water features | Highlighting, visual interest |
| Step/Path | 100-150 lumens | 3500K (neutral warm) | Every 4-6 feet on paths | Navigation safety |
Implementing a “Good Neighbor” lighting principle is also crucial. This involves using downward-facing, shielded fixtures to prevent light pollution onto adjacent properties. A successful Florida project used this layered approach and saw zero neighbor complaints over two years, proving that safety and ambiance can coexist with respect for the community.
Key Takeaways
- A patio’s functionality is determined by its “invisible infrastructure”—sub-base, drainage, and utility conduits—not just its surface decoration.
- Material choice is a scientific decision. Factors like Solar Reflectance Index (SRI) for heat and Dynamic Coefficient of Friction (DCOF) for safety are more important than aesthetics alone.
- True spatial design relies on ergonomic clearances and “desire lines” to ensure comfortable movement, preventing the common issue of a beautiful but cramped space.
Composite vs Hardwood Decking: Which Is Truly Maintenance-Free for 10 Years?
The term “maintenance-free” is the holy grail for homeowners, and it’s a claim often attached to composite decking. However, when we analyze the functional longevity over a decade, the reality is more nuanced. While composite materials spare you the annual sealing or staining required by wood, they are not immune to upkeep. They are susceptible to mold and mildew, especially in damp or shaded areas, requiring at least quarterly cleaning. Furthermore, a deep scratch or a stubborn stain on a composite board often means a full replacement of that board, with the risk of the new piece not matching the faded color of the originals.
Premium hardwoods like Ipe, on the other hand, require more predictable annual maintenance, typically a light sanding and sealing to maintain their rich color. While this is more hands-on, the material itself offers a different kind of longevity. As industry veteran Bill Ragan notes, the lifecycle of hardwood is fundamentally different.
After 15 years, a hardwood deck can often be sanded and restored to new, while a deeply scratched, stained, or faded composite board often requires full replacement, with the risk of non-matching colors from different production batches.
– Bill Ragan, Bill Ragan Roofing
When considering the total cost of ownership over 10 years, the lines blur even further. The higher initial cost of high-grade composite decking can often mean its total 10-year cost is comparable to, or even exceeds, that of premium hardwood when maintenance is factored in. Pressure-treated pine, while cheapest initially, often proves to be the most expensive over a decade due to frequent repairs and a higher risk of major replacement.
| Material | Initial Cost/sq ft | 10-Year Maintenance | Replacement Risk | Total 10-Year Cost/sq ft |
|---|---|---|---|---|
| Premium Hardwood (Ipe) | $8-12 | Annual sealing ($0.50/yr), bi-annual sanding ($0.25/yr) | Can be restored after 15 years | $15.50-19.50 |
| Composite (High-Grade) | $12-18 | Quarterly mold cleaning ($0.20/yr), annual deep clean ($0.30/yr) | Full replacement if damaged | $17-23 |
| Pressure-Treated Pine | $2-4 | Annual staining ($0.75/yr), repairs ($1/yr) | Major replacement at 10 years | $19.50-21.50 |
“Truly maintenance-free” is a myth. The choice is between the lower but more frequent maintenance of hardwood, which can be restored indefinitely, and the less frequent but more critical maintenance of composite, where damage can be permanent.
The next logical step is to begin sketching your own patio layout. Armed with this knowledge of spatial engineering, you can apply these principles of clearance, material science, and infrastructure to create a plan that ensures your outdoor space will be as functional as it is beautiful for decades to come.
Frequently Asked Questions on Patio Materials and Design
What is the Solar Reflectance Index (SRI) and why does it matter for patios?
The Solar Reflectance Index measures a material’s ability to reflect solar heat on a scale of 0-100. Higher SRI values mean cooler surfaces. Light-colored porcelain typically achieves SRI values of 75-85, while dark natural stone ranges from 20-40, making SRI a critical factor for patios in direct sun.
How much can patio material choice affect home energy costs?
A hot patio surface creates a ‘micro heat island’ effect that can raise ambient temperature around your home by 5-10°F. This can force air conditioning systems to work 15-20% harder, significantly increasing summer electricity bills.
What’s the best slip resistance rating for wet patio surfaces?
Look for materials with a Dynamic Coefficient of Friction (DCOF) rating above 0.42 for wet conditions to ensure safety. Textured porcelain often achieves 0.45-0.60, making it a safer choice than some polished stones which may only reach 0.30-0.35.