
Designing bespoke shelving for a significant collection is not about adding more wood; it’s a synthesis of material science, structural engineering, and aesthetic intent.
- Structural integrity depends on a precise span-to-thickness ratio and superior joinery, not just brute force.
- Aesthetic integration transforms storage into a display through museum-grade lighting and minimalist supports.
Recommendation: Approach your project as an engineering challenge with an artistic outcome. Analyze your load, choose your materials and joinery with intent, and light your collection to give it the showcase it deserves.
For any dedicated collector, the sight is a familiar and painful one: a beautiful, oversized art book, a hefty monograph, or a complete media series relegated to a stack on the floor. Standard, off-the-shelf bookcases, designed for mass-market paperbacks, inevitably bow and sag under the weight of a serious collection. This sagging isn’t just an aesthetic failure; it’s a structural one, signaling that the storage is unworthy of the treasures it holds. The common solutions—thicker planks or more brackets—are crude fixes that often compromise the very elegance the collection is meant to project.
The truth is, creating a home for a cherished collection of large-format books and media is less about carpentry and more about engineering. It requires a shift in thinking from “building shelves” to “designing a load-bearing system.” This involves understanding the physics of material deflection, the hierarchy of wood joinery, and the subtle art of integrating the shelving unit into the architecture of the room itself. It’s about creating a permanent piece of furniture that feels as curated and considered as the collection it houses.
But what if the solution wasn’t just about preventing collapse, but about elevating the display to a museum-quality exhibit in your own home? The key lies in a holistic approach that balances structural integrity with aesthetic integration. This guide moves beyond the obvious to deconstruct the critical, often-overlooked decisions that define truly bespoke shelving. We will explore the science behind shelf sag, the techniques for creating invisible supports, the transformative power of integrated lighting, and the joinery details that separate heirloom quality from disposable furniture.
This article provides a detailed roadmap for collectors, outlining the core principles of designing custom shelving that is both exceptionally strong and visually stunning. By understanding these elements, you can commission or build a library system that not only supports but celebrates your collection for decades to come.
Summary: Designing Bespoke Shelving for Prized Collections
- Why Your Shelves Sag: The Span-to-Thickness Ratio You Must Know?
- How to Route LED Channels into Shelves for a Museum Look?
- Wood vs Metal Supports: Which Is Slimmer for a Minimalist Aesthetic?
- The Anchor Failure That Rips Shelves off Drywall
- How to Use Pin Systems to Future-Proof Your Shelving Layout?
- Why Dovetail Drawers Last 50 Years Longer Than Glued Joints?
- Why Going Floor-to-Ceiling Doubles Your Utility Without Losing Floor Space?
- How to Identify Premium Joinery Details in Custom Cabinetry Quotes?
Why Your Shelves Sag: The Span-to-Thickness Ratio You Must Know?
The gentle, downward curve of a bookshelf is a classic sign of fatigue. This phenomenon, known as deflection, is the primary enemy of any collector of heavy volumes. It’s not a matter of a shelf being “weak” in general, but of a specific failure in the relationship between its length (span), its thickness, its depth, and the load it carries. The common mistake is to consider only the thickness of the material, but the span is the more insidious culprit. A shelf’s ability to resist sag decreases exponentially as its span increases.
This is where engineering principles become essential. For high-end cabinetry and library design, there is a quantifiable threshold for acceptable deflection. A perfectly flat shelf is an impossibility, but an imperceptible sag is the goal. According to woodworking engineering standards, shelf sag should remain under 0.02 inches per foot of span to be considered visually and structurally sound. Exceeding this can lead to a cascade failure over time, stressing joints and compromising the entire unit.
To achieve this standard, one must calculate the span-to-thickness ratio. For a collection of heavy art books, a typical 3/4-inch thick, 36-inch wide shelf made from particleboard is virtually guaranteed to fail. A 1.5-inch thick solid oak or high-quality plywood shelf, by contrast, might handle the same span with minimal deflection. Materials like Baltic birch plywood offer superior stiffness compared to MDF or standard plywood due to their void-free, multi-laminate construction, making them a preferred choice for custom library projects. The key is to treat shelf design as a calculation, not a guess.
How to Route LED Channels into Shelves for a Museum Look?
Once the structural integrity of your shelving is assured, the next step is to transform it from mere storage into a breathtaking display. Nothing achieves this more effectively than integrated lighting. Puck lights or stick-on strips are amateur solutions; a truly bespoke system embeds light directly into the structure, washing the spines of your books with a warm, even glow that evokes the reverence of a museum exhibit. This is achieved by routing channels into the shelves to house aluminum extrusions with LED strips and diffusers.
The quality of the light is paramount. For displaying art and prized objects, the Color Rendering Index (CRI) is the most important metric. CRI measures a light source’s ability to faithfully reveal the true colors of an object. A low CRI light will make even the most vibrant book cover look dull and flat. For a true museum-quality effect, professional art galleries and museums require LED lighting with a minimum 95+ CRI. This ensures that the deep reds, rich blues, and subtle tones of your collection are rendered with absolute fidelity.
This paragraph introduces a complex concept. To better understand it, it’s helpful to visualize its key components. The illustration below breaks down this process.
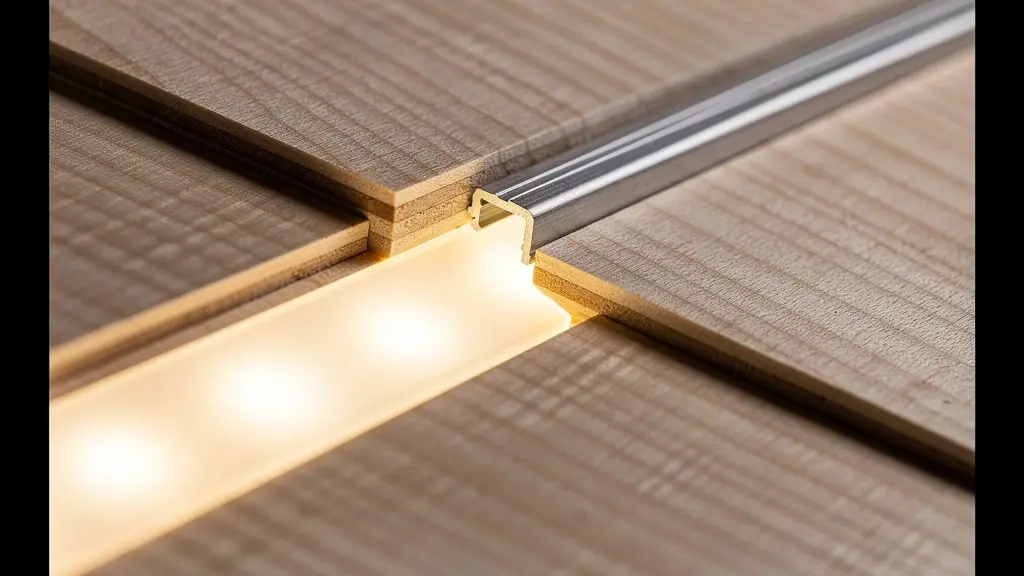
As this detailed view shows, a shallow groove is routed into the front or back edge of the shelf. An aluminum channel is set into this groove, which serves both as a heat sink to prolong the life of the LEDs and as a housing for a frosted diffuser. This diffuser is critical; it eliminates the harsh “dots” of individual LEDs, creating a seamless, continuous line of soft light. The Sistine Chapel’s famous lighting upgrade used this same core principle—high-CRI LEDs with advanced optical systems—to illuminate masterpieces without causing heat or UV damage, proving the power of quality lighting.
Wood vs Metal Supports: Which Is Slimmer for a Minimalist Aesthetic?
For collectors who favor a minimalist aesthetic, the challenge is to make the support structure for heavy books virtually disappear. The goal is the illusion of books floating in space, with no visible means of support. This requires moving beyond traditional wood cleats and brackets to more advanced, often hidden, structural systems. The choice between wood and metal supports becomes a trade-off between visual footprint, load capacity, and installation complexity.
While thick wooden shelves have a certain classic library appeal, achieving a slim profile with wood over a long span is a contradiction in terms. To maintain strength, wood needs mass. Metal, however, offers far greater tensile strength in a much smaller profile. This is why integrated steel has become the secret weapon of high-end cabinetmakers creating impossibly thin, long-span shelves. A small steel L-angle, routed into the back edge of a wooden shelf and hidden from view, can prevent sag over spans of 84 inches or more, a feat that would require a massive wooden beam otherwise.
The following table, based on an analysis of modern shelving techniques, compares the most common support systems for achieving a minimalist look. It breaks down the trade-offs between visibility, strength, and installation difficulty.
| Support Type | Visual Footprint | Load Capacity | Installation Complexity | Maximum Span |
|---|---|---|---|---|
| French Cleats | Nearly invisible | 150 lbs/shelf | Moderate | 36 inches |
| Floating Shelf Hardware | Completely hidden | 80-100 lbs/shelf | High | 48 inches |
| Steel L-Brackets | Visible but minimal | 200+ lbs/shelf | Low | 24 inches |
| Integrated Steel Skeleton | Invisible | 300+ lbs/shelf | Very High | 84 inches |
Ultimately, for the purest minimalist aesthetic combined with the highest load capacity, an integrated steel skeleton is the superior solution. While it represents the highest complexity and cost, it is the only method that truly delivers the appearance of a thin, floating plane capable of supporting a significant library of art books without any visible compromise.
The Anchor Failure That Rips Shelves off Drywall
A perfectly engineered shelf is worthless if it’s not properly secured to the wall. The most common point of catastrophic failure for any shelving system is not the shelf itself, but the anchor point. A fully loaded bookshelf represents a tremendous amount of both shear force (pulling downwards) and tension force (pulling outwards from the wall). Standard drywall, by itself, has almost no structural integrity to resist these forces. Driving a screw directly into drywall is a recipe for disaster.
Understanding the load is the first step. Engineering standards for library shelving calculate typical book loads at 35 pounds per linear foot. A single 3-foot shelf, therefore, can easily carry over 100 pounds. When you have an entire wall unit, the total weight can quickly reach thousands of pounds. Attaching this load to the wall requires a deep understanding of what lies behind the drywall—be it wood studs, metal studs, plaster and lath, or concrete block—and using an anchor system specifically designed for that material.
The gold standard is always to anchor directly into the wall studs, the vertical wooden beams that form the skeleton of the wall. However, the desired placement of a bookcase doesn’t always align with stud locations. In these cases, one must rely on heavy-duty hollow-wall anchors. A simple plastic plug is insufficient. Toggle bolts or snap toggles, which open up behind the drywall to spread the load over a wider surface area, are the minimum requirement for supporting a significant collection. Ignoring this critical connection between the cabinetry and the home’s structure is the single most dangerous mistake in custom shelving installation.
Your Action Plan: Wall Type Anchor Selection Guide
- Standard Drywall: Use toggle bolts rated for 50+ lbs per anchor, with a minimum of two anchors per bracket to distribute the load.
- Plaster and Lath: Pre-drill carefully with a masonry bit to avoid cracking the plaster, and use heavy-duty wall anchors with a 75 lb rating.
- Concrete Block: Use sleeve anchors or wedge anchors, ensuring a minimum diameter of 1/4 inch for secure purchase in the masonry.
- Double-Layered Drywall: Opt for snap toggles, which can provide up to 265 lbs of shear strength per anchor in thicker wall assemblies.
- Hollow Walls Without Studs: The only truly safe method is to first install blocking. This involves cutting away drywall to install a horizontal wood block securely between two studs, then patching the drywall and anchoring your shelf to the solid blocking.
How to Use Pin Systems to Future-Proof Your Shelving Layout?
A collection is a living entity. It grows, evolves, and reorganizes over time. A bespoke shelving system should not be a static cage, but a flexible framework that can adapt to these changes. While fixed shelves installed in dado joints offer maximum strength, they sacrifice all adjustability. This is where modern pin systems provide an elegant compromise, offering a way to future-proof your library’s layout.
The concept is simple: a series of precisely drilled holes run vertically along the inside of the bookcase uprights. Small metal pins are inserted into these holes to support the shelves. This allows the height between shelves to be changed in a matter of seconds, accommodating a new, oversized acquisition or allowing for a complete reorganization from books to media objects. The key to a high-end execution lies in the precision and material of the system. The holes must be drilled perfectly plumb and spaced with machine-like consistency (typically in 1-inch or 32mm increments) to ensure shelves sit perfectly level.
This image showcases the intersection of strength and flexibility, a hallmark of thoughtful design.
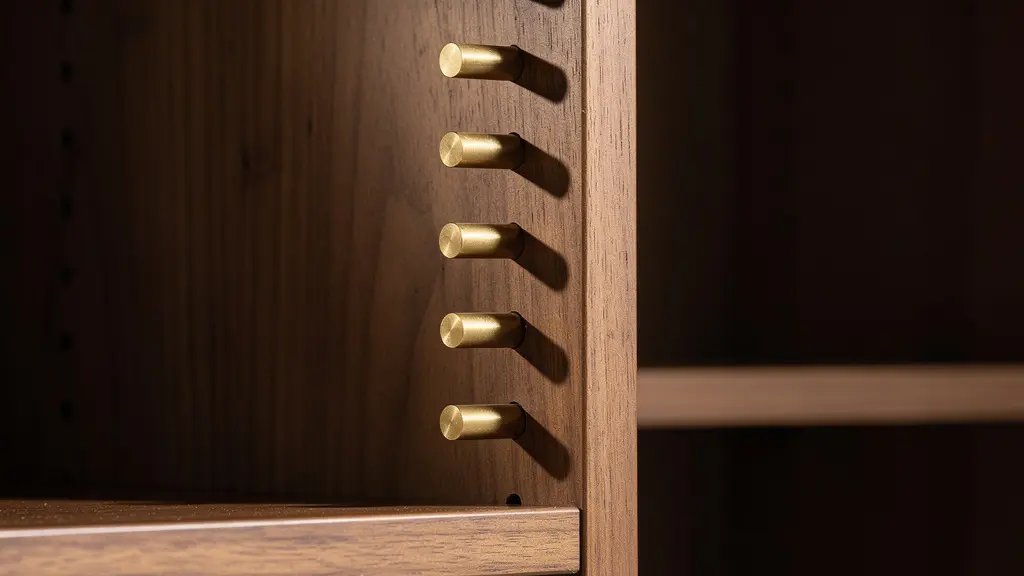
For a truly robust system, a hybrid approach is often best. A professional cabinetmaker might use fixed, high-strength dado joints for the primary structural shelves—perhaps one every 3-4 feet vertically—to lock the case together and prevent racking. Then, within these larger bays, they will implement a pin system for the intermediate shelves. This “hybrid-zoning” strategy, as seen in many custom woodworking projects, provides the best of both worlds: the monolithic strength of fixed joinery and the practical flexibility of an adjustable system for the bulk of the collection. It’s a design choice that acknowledges both the current weight and the future potential of your library.
Why Dovetail Drawers Last 50 Years Longer Than Glued Joints?
When commissioning custom cabinetry, the discussion often focuses on the visible elements: the wood, the finish, the hardware. But the true mark of heirloom quality lies in what is often hidden: the joinery. The method used to connect one piece of wood to another is the single greatest predictor of a cabinet’s longevity. A simple butt joint, where two pieces of wood are merely glued and screwed together, relies entirely on the fastener and the glue. It’s fast, cheap, and destined to fail under the stress of daily use or the weight of a collection.
At the other end of the spectrum is mechanical, interlocking joinery like the mortise and tenon or the dovetail. A dovetail joint, most famously used in high-end drawer construction, features a series of trapezoidal “pins” on one board that interlock with “tails” on another. When assembled, the joint is mechanically locked together. The glue is almost secondary; its primary job is to prevent rattling. This mechanical lock resists pulling forces in a way that a butt joint never could, which is why a well-made dovetail drawer can last for generations while a glued-and-stapled drawer falls apart in a few years.
The same principle applies to shelving. While true dovetails are less common for securing shelves, the concept of interlocking joinery is critical. A dado joint, where a groove is cut into a vertical upright to receive the end of a horizontal shelf, is a far superior method to simply resting a shelf on pins. The dado provides support along three surfaces, locks the shelf in place, and adds immense rigidity to the entire bookcase, preventing racking. A custom cherry and maple bookshelf built with dado joints for its 1-inch thick solid wood shelves creates a monolithic structure that simply cannot be achieved with simpler construction methods. This is the definition of heirloom joinery: building in a way that anticipates and defeats the forces of time and gravity.
Why Going Floor-to-Ceiling Doubles Your Utility Without Losing Floor Space?
A bespoke shelving unit should not feel like an object placed in a room; it should feel like part of the room’s architecture. The most effective way to achieve this seamless integration is to build a floor-to-ceiling unit. This design choice offers two profound benefits. First, it maximizes storage capacity by utilizing every inch of vertical space, effectively doubling your storage potential compared to a standard-height bookcase without consuming a single extra square inch of floor space. For a growing collection, this is an invaluable long-term strategy.
Second, and more aesthetically important, it creates a powerful architectural statement. A floor-to-ceiling library wall draws the eye upward, making the room feel taller and more grand. When finished with crown molding that matches the rest of the room, the unit ceases to be furniture and becomes a true “built-in,” appearing as if it was part of the home’s original design. Professional installers have several methods for this integration, such as notching the bookcase to wrap around existing molding or, for the most seamless look, removing the wall molding and running it continuously across the face of the bookcase.
However, installing a massive, room-height unit presents a significant logistical challenge. You cannot simply build a 9-foot-tall box and slide it into place; it will get wedged against the ceiling as you try to tilt it upright. The professional technique is to design the bookcase about 1.5 inches shorter than the final ceiling height. It is tilted into place, and then a separate, recessed base pedestal (or “toe-kick”) is slid underneath. This base not only closes the gap at the bottom but also serves as the critical platform for leveling the entire unit on uneven floors. The unit is then secured to the wall studs at multiple points, and the final crown molding is applied at the top to conceal the installation gap, creating a perfect, wall-to-wall, floor-to-ceiling fit.
Key Takeaways
- Structural Integrity First: Master the span-to-thickness ratio and use superior joinery (like dadoes) to prevent sag before considering aesthetics.
- Lighting is Not an Afterthought: High-CRI (95+) integrated LED lighting transforms a collection and should be planned from the start.
- Invest in the Invisible: The best support systems (like hidden steel) and anchoring techniques are often unseen but are critical for longevity and a minimalist aesthetic.
How to Identify Premium Joinery Details in Custom Cabinetry Quotes?
You have envisioned your perfect library, considered the engineering, and are ready to engage a professional. The quotes arrive, and they can be bewildering. One may seem like a bargain, another prohibitively expensive. The ability to decipher these documents and identify the markers of true quality is the final skill a collector must master. The difference in price is almost always a reflection of the materials used and, most importantly, the time-consuming labor of superior joinery.
A low-quality quote will be vague. It will use generic terms like “solid wood construction” without specifying the species or grade (e.g., FAS grade white oak vs. #2 common grade). It will likely make no mention of joinery methods, which implies the use of the fastest and weakest methods: screws and glue. It might mention “soft-close hardware” without specifying the brand, hiding the use of a cheap knockoff instead of a premium, lifetime-guaranteed brand like Blum or Häfele. These are all red flags indicating a piece of furniture designed for a price point, not for longevity.
A high-quality quote, by contrast, is a document of specifics. It will read like an architect’s specification sheet. It will name the wood, its grade, and the thickness of all key components. It will explicitly state the use of dado joints for shelves, and mortise-and-tenon or dovetail joints for drawers and case construction. It will specify premium hardware brands by name. It may even detail the finishing process, noting the use of a multi-step, catalyzed conversion varnish, which is far more durable than a simple coat of polyurethane. Reading a quote is a test of your knowledge; every specific detail listed is a green flag, a sign that the craftsperson respects their materials, their process, and your investment.
Your Action Plan: Red Flags vs. Green Flags in Cabinetry Quotes
- Wood Specification: A red flag is vague language like ‘solid wood.’ A green flag is specific: ‘FAS (First and Second) grade solid white oak for all face frames and doors.’
- Joinery Methods: A red flag is no mention of joinery. A green flag is explicit detail: ‘Case construction using dado and rabbet joints; drawers to be dovetailed with 1/2″ solid maple sides.’
- Hardware Brands: A red flag is generic terms like ‘soft-close hinges.’ A green flag specifies premium brands: ‘Blum Tandem full-extension soft-close drawer slides and Blum clip-top soft-close hinges.’
- Finishing Process: A red flag is a single mention of ‘finish.’ A green flag details the process: ‘Finished with a three-coat post-catalyzed conversion varnish, satin sheen.’
- Shelf Material: A red flag is ‘3/4″ shelving.’ A green flag shows consideration for load: ‘1 1/4″ thick veneer-core plywood shelves with solid wood front edge for sag resistance.’
Armed with this knowledge of engineering, aesthetics, and construction, you are no longer just a client but a connoisseur. You can now confidently engage with a designer or cabinetmaker, speaking their language and ensuring the final creation is not just a set of shelves, but a permanent, architectural tribute worthy of the collection it is destined to hold. Begin the process by auditing your collection’s needs and sketching a vision for its new home.