A flat, thirsty lawn is a maintenance nightmare; a drought-proof garden island solves this, but only if designed as a self-sufficient ecosystem, not just a pile of rocks and tough plants.
- Focus on building deep, living soil from the start using no-dig methods to create a water-retaining foundation.
- Implement “hydro-zoning” by grouping plants based on their water needs, not just aesthetics, to eliminate inefficient watering.
Recommendation: Begin by planting the structural “bones” of your island—trees and large shrubs—in the fall to leverage winter rains and establish strong root systems before the first summer stress.
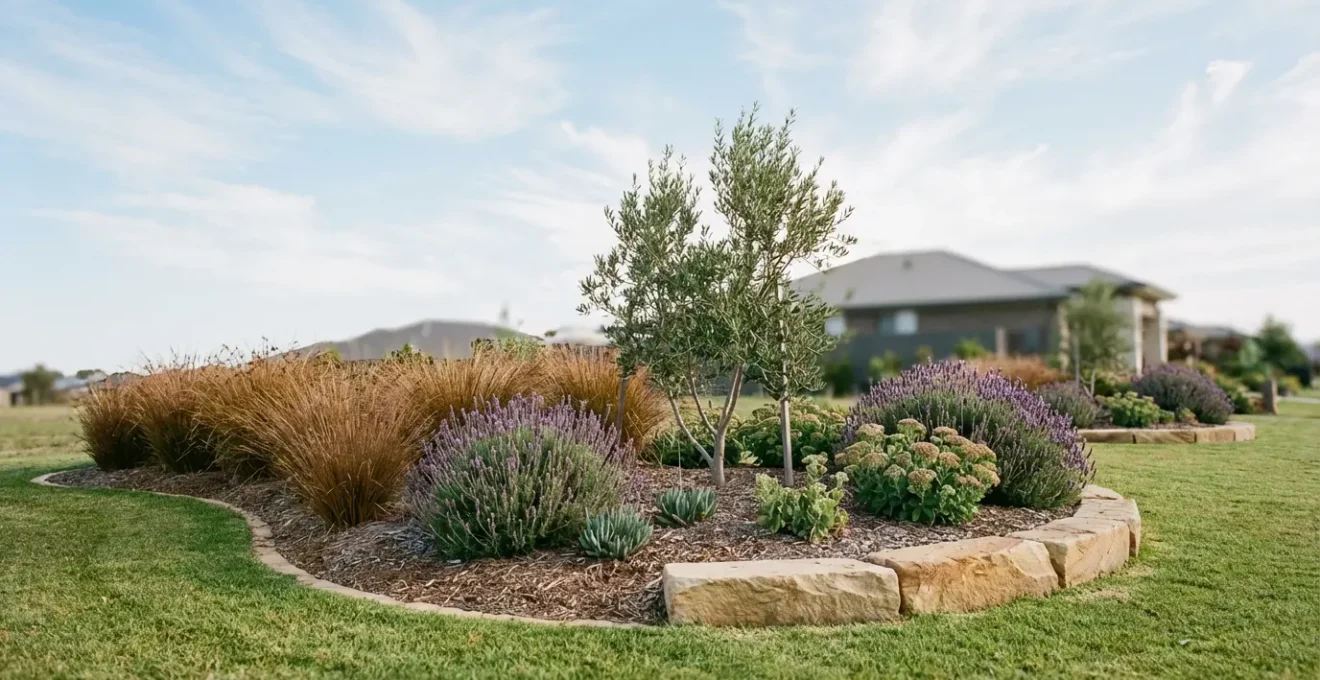
For owners of large properties, an endless expanse of flat lawn can feel less like a luxury and more like a burden. It presents a monotonous view, demands constant mowing, and becomes a significant drain on water resources, especially during increasingly hot and dry summers. The common solution is to add a garden island, a splash of color and texture in a sea of green. Many homeowners approach this by simply picking a few “drought-tolerant” plants like lavender or sedum, adding a layer of mulch, and hoping for the best. This often leads to disappointing results, with stressed plants requiring just as much water as the lawn they replaced.
But what if the problem isn’t the choice of plants, but the entire design philosophy? A truly resilient garden island isn’t just a collection of hardy survivors; it’s a piece of strategic landscape engineering. The key is to stop thinking about it as a decoration and start designing it as a self-regulating ecosystem. This approach focuses on creating a system where soil structure, water management, vertical design, and plant selection work in synergy. It’s about building a landscape feature that actively conserves water, creates its own microclimate, and provides year-round visual interest with minimal intervention.
This guide will walk you through the essential engineering principles for creating a garden island that doesn’t just survive droughts but thrives in them. We will deconstruct the process, from reshaping your landscape’s visual dynamics and preparing the soil, to selecting a structural anchor and implementing intelligent watering strategies. By embracing this ecosystem-based approach, you can transform a section of your high-maintenance lawn into a stunning, low-effort, and water-wise focal point.
To guide you through this process, this article breaks down the key strategic decisions you’ll need to make. The following summary outlines each stage of designing and building your resilient garden island.
Contents: Designing a Resilient Garden Island for Any Season
- Why a Flat Lawn Makes Your Property Look Smaller Than It Actually Is?
- How to Remove Sod and Prepare Soil for an Island Bed in One Weekend?
- Statue vs Specimen Tree: Which Anchor Point Adds More Winter Interest?
- The Watering Mistake That Kills Island Plants While Flooding Your Lawn
- When to Plant Your Garden Island: Spring Rain vs Autumn Soil Warmth?
- Why Multi-Stem Trees Look More Sculptural with Up-Lighting?
- Why You Need Underwater Plants to Keep Your Pond Clear?
- How to Select a Specimen Tree That Won’t Outgrow Your Courtyard?
Why a Flat Lawn Makes Your Property Look Smaller Than It Actually Is?
The human eye perceives space through cues like layering, perspective, and verticality. A large, unbroken lawn lacks these cues, creating a flat, two-dimensional plane. Your gaze sweeps across it and stops at the property line, making the entire space feel contained and smaller than its actual square footage. An island bed acts as a powerful visual interruption. By forcing the eye to stop, travel around it, and then continue, it creates a sense of foreground, mid-ground, and background. This simple trick adds layers and depth, a fundamental principle of landscape design. In fact, as landscape design experts confirm that island beds create 360-degree visual engagement, which tricks the eye into perceiving more depth.
The placement and shape are critical to maximizing this effect. Avoid placing the bed in the dead center of the lawn, which can look static. Instead, opt for an asymmetrical placement that creates a more natural and dynamic flow. In terms of shape, gentle, organic curves are almost always superior to rigid geometric forms like circles or squares. Curves encourage the eye to move smoothly through the landscape and make the bed feel like an integrated part of the environment rather than a man-made imposition. Finally, consider its location relative to your home and other vantage points. A well-placed island bed should draw attention away from less desirable views and create a beautiful focal point from a window or patio, ideally positioned at a distance of at least 1.5 times the island’s longest dimension from the main viewing point to feel balanced.
By thoughtfully breaking up the visual plane, you’re not just adding a garden; you’re actively reshaping the perceived dimensions of your entire property.
How to Remove Sod and Prepare Soil for an Island Bed in One Weekend?
Creating a resilient garden island begins from the ground up. You have two primary methods for dealing with the existing lawn: the brute-force method of sod removal or the ecosystem-building approach of “lasagna gardening.” For a fast, one-weekend result, sod removal is effective. It involves marking your bed’s outline, then physically digging out the grass and its root system to a depth of about six inches. This immediately clears the area for planting and, when followed by the installation of a high-quality landscape fabric, is highly effective at preventing grass and weeds from creeping back in. This is not just about aesthetics; it’s about eliminating root competition for water and nutrients.
Case Study: The Weekend Installation Method
The professional installers at Daytona Classic Curbs have perfected a weekend installation process. They begin by marking the bed outline with paint or flour. Next, they dig out the existing grass to a 6-inch depth. Critically, they install landscape fabric immediately to prevent any latent weed seeds from germinating. After cutting spaces in the fabric for the new plants, they cover the entire bed with a 3-4 inch layer of mulch. The company reports that using this method with landscape fabric reduces maintenance time by a staggering 60% in the crucial first year, proving its effectiveness in keeping the bed low-maintenance.
Alternatively, the “no-dig” or lasagna gardening method builds superior soil structure over time, creating a more resilient foundation for your drought-tolerant plants. This approach involves smothering the grass rather than removing it. You lay down a layer of cardboard directly on the lawn, which blocks sunlight and kills the grass. On top of this, you layer organic materials like compost, leaf mold, and finally, a thick layer of mulch. While it takes longer for the sod layer to decompose, this method enriches the soil, encourages beneficial microbial life, and dramatically improves its water-holding capacity—a core principle of our ecosystem engineering approach. A raised island bed is often a natural result of this layering, which further improves drainage and defines the space.
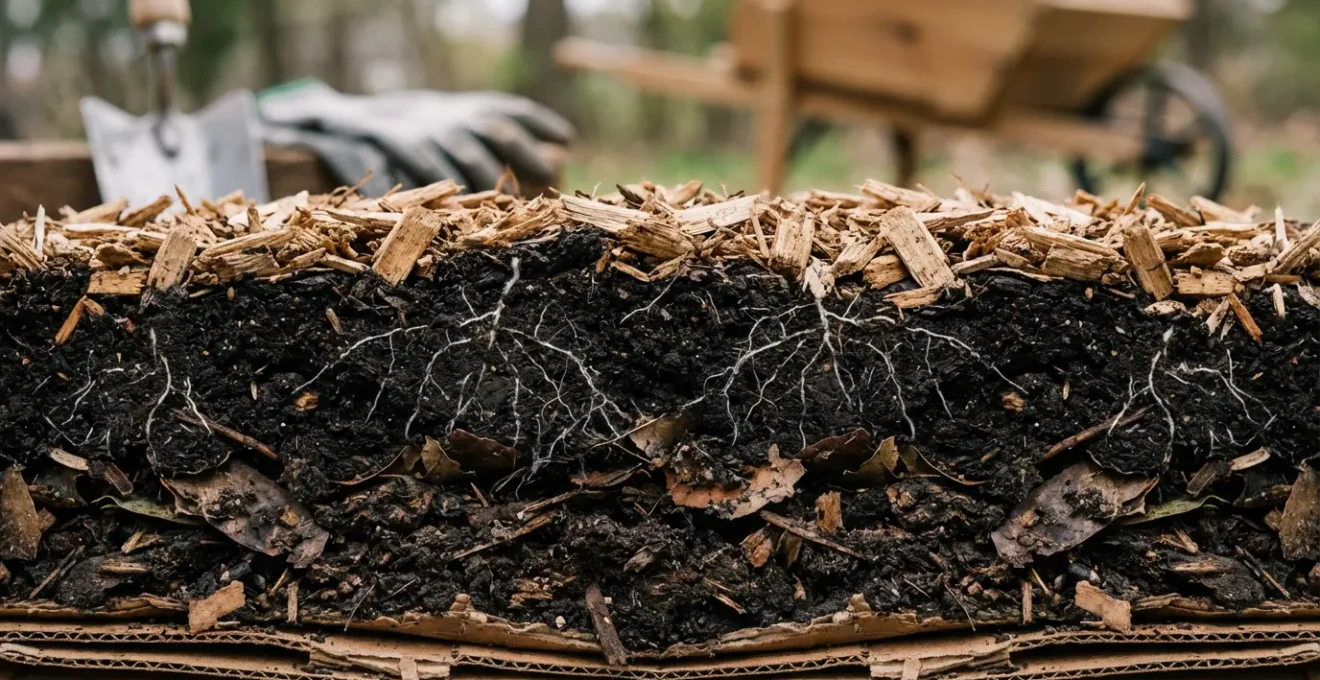
As the illustration above shows, the lasagna method creates distinct, functional layers. The cardboard base is a weed barrier, the organic matter becomes a nutrient-rich sponge, and the top layer of mulch protects the soil from evaporation and temperature extremes. This creates the structural resilience needed to support a thriving, low-water garden.
Ultimately, the method you choose depends on your timeline and long-term goals, but investing in soil preparation is a non-negotiable step toward a truly low-maintenance landscape.
Statue vs Specimen Tree: Which Anchor Point Adds More Winter Interest?
The center of your garden island needs an anchor—a primary focal point that provides structure and acts as the “vertical scaffolding” of your mini-ecosystem. This element is what gives the bed presence, especially during winter when perennials die back. The main contenders for this role are typically a specimen tree, a garden statue, or a cluster of natural boulders. While a statue provides a constant, unchanging form, a well-chosen specimen tree offers a dynamic, living sculpture that evolves with the seasons. Its bare branches in winter cast long, dramatic shadows, catch snow beautifully, and provide a vertical silhouette against a grey sky, offering far more evolving interest than a static object.
Boulders offer a third, compelling option. As noted by experts, they bring a powerful, natural element to the design. In their Houzz Design Guide, the team at Tate Studio Architects highlights this benefit:
Boulders placed in a landscape can help change the topography by creating miniature hills and mountains within a planting bed.
– Tate Studio Architects, Houzz Magazine Design Guide
This “topography change” is key; boulders ground the design and provide texture and form that feels ancient and permanent. The choice between these options is a balance of aesthetics, maintenance, and budget. A tree requires long-term care, a statue needs cleaning, and boulders, once placed, are zero-maintenance. To make an informed decision, it’s helpful to compare their attributes directly.
This comparative table breaks down the key differences between a specimen tree, a garden statue, and a boulder cluster as an anchor point for your island bed, helping you choose the best fit for your landscape’s goals.
| Feature | Specimen Tree | Garden Statue | Boulder Cluster |
|---|---|---|---|
| Winter Visual Impact | Dynamic shadows from bare branches | Consistent solid form | Natural texture with snow accumulation |
| Maintenance Required | Annual pruning, leaf cleanup | Occasional cleaning | Zero maintenance |
| Cost Range | $150-$500 | $200-$2000 | $300-$800 |
| Lifespan | 20-100+ years | Indefinite with care | Permanent |
| Year-Round Interest | Changes seasonally | Static but reliable | Develops patina and moss |
Ultimately, your anchor choice defines the character of your garden island year-round, making it a critical decision in the landscape engineering process.
The Watering Mistake That Kills Island Plants While Flooding Your Lawn
The most common watering mistake is treating a garden island like the lawn that surrounds it. Lawn sprinkler systems are designed for broad, shallow coverage, which is the exact opposite of what most island bed plants—even drought-tolerant ones—need to establish deep, resilient roots. This broadcast spraying often oversaturates the edges of the bed while leaving the center bone-dry, all while flooding the adjacent lawn. This creates a “water budget” disaster, wasting water and promoting weak, shallow root growth in your carefully selected plants. The solution is twofold: a thick layer of mulch and a dedicated, intelligent watering strategy.
Mulch is your first line of defense. A 3-to-4-inch layer of organic mulch (like shredded bark or wood chips) acts as a shield, preventing soil moisture from evaporating under the sun. It also suppresses weeds that compete for water and moderates soil temperature. The impact is significant; landscape professionals report that proper mulching cuts watering requirements by up to 40%. But mulch alone isn’t enough. You must separate the island’s irrigation from your lawn’s system. The best approach is a dedicated drip irrigation line, which delivers water directly to the root zone of each plant, eliminating overspray and evaporation. This allows you to give the island a deep, infrequent soaking that encourages strong root development, while the lawn gets its own, separate schedule.
To take this a step further, you can implement a “hydro-zoning” strategy within the island itself. This involves grouping plants with similar water needs together, creating zones for a highly efficient watering plan.
Action Plan: Implementing Your Island’s Hydro-Zoning Strategy
- Map your island bed into distinct water zones based on plant requirements (e.g., high-exposure outer edge, protected center).
- Group truly drought-tolerant plants like lavender or sedum along the outer edges, where they might get some sprinkler overlap and the most sun.
- Place plants with moderate water needs in the more protected, central areas of the bed, often in the shade of your anchor tree.
- Install a dedicated drip irrigation system for the island bed, completely separate from the main lawn sprinkler system.
- Use a soil moisture meter weekly before watering to determine the bed’s actual needs, rather than relying on a fixed schedule.
This level of landscape engineering ensures that every drop of water is used effectively, creating a truly water-wise feature that thrives independently from the surrounding lawn.
When to Plant Your Garden Island: Spring Rain vs Autumn Soil Warmth?
The timing of your planting is a strategic decision that has a massive impact on the long-term resilience and water needs of your garden island. While the rush of spring inspires many to garden, autumn is often the superior season for establishing the “bones” of your landscape. The primary reason is root development. In the fall, the air is cool, but the soil is still warm from the summer sun. This creates the perfect environment for plants to focus their energy on establishing a deep and robust root system, without the stress of producing leaves and flowers. They can take advantage of natural autumn and winter rainfall, settling in for months before facing their first summer heatwave.
The benefits of this strategy are well-documented. Research from leading horticultural institutions shows that plants given a head start in the fall are significantly better equipped to handle drought. For instance, a key finding from the Royal Horticultural Society (RHS) highlights a dramatic difference in water dependency, noting that plants established in fall require 50% less watering the following summer compared to their spring-planted counterparts. This is a critical advantage when engineering a low-maintenance, drought-proof ecosystem. It allows you to leverage your “water budget” from nature, reducing your reliance on irrigation from day one.
Case Study: The “Bones in Fall, Flesh in Spring” Method
The garden experts at The Home Depot advocate for a phased planting approach that maximizes both plant health and budget. They recommend planting the main structural elements—the “bones” like trees and large shrubs—in the fall. This is when nurseries often have sales, offering discounts of 25-40% on larger stock. These plants establish their root systems over the winter using natural rainfall. Then, in the spring, you add the “flesh”—the perennials, ornamental grasses, and annuals—when the selection is at its peak. This combined strategy was shown to result in 30% overall cost savings and significantly better plant survival rates compared to doing all the planting in a single season.
By working with the seasons instead of against them, you build structural resilience into your garden island from the very beginning, setting it up for years of low-effort success.
Why Multi-Stem Trees Look More Sculptural with Up-Lighting?
A multi-stem tree, such as a river birch or crepe myrtle, is already a living sculpture. Its multiple trunks create inherent visual complexity, depth, and texture that a single-trunk tree lacks. However, this sculptural quality can be dramatically amplified with a strategic design tool: up-lighting. During the day, sunlight comes from above, creating predictable shadows. At night, by placing one or two low-voltage spotlights at the base of the tree and angling them upwards, you reverse the natural order of light. This simple act transforms the tree into a dramatic focal point.
Up-lighting works by catching the texture of the bark, illuminating the undersides of leaves, and casting a web of intricate shadows against the tree’s own canopy and onto surrounding surfaces. It accentuates the architectural form of the trunks, making them appear more defined and three-dimensional. This technique is especially effective in winter when the leaves are gone. The light plays across the bare branches, creating a powerful silhouette against the dark sky. This turns your garden island’s anchor into a 24-hour feature, ensuring it provides visual interest long after the sun has set. This is a key part of creating “vertical scaffolding” that functions as a design element day and night.

As you can see in the image, the warm light from below reveals the peeling texture of the birch bark and separates the trunks from the dark background, an effect that would be completely lost in ambient moonlight. This isn’t just illumination; it’s a deliberate act of landscape painting with light, turning a natural element into a piece of art.
By investing in a few simple lights, you elevate your specimen tree from a mere plant to the undeniable sculptural centerpiece of your landscape, maximizing its year-round impact.
Why You Need Underwater Plants to Keep Your Pond Clear?
This question might seem out of place, but the answer provides a perfect analogy for the ecosystem you’re building in your garden island. A pond without underwater plants (oxygenators) quickly becomes a cloudy, algae-filled mess. This is because algae thrive on two things: sunlight and excess nutrients in the water. Underwater plants, like Hornwort or Anacharis, are essential because they directly compete with algae for these same resources. They absorb nutrients from the water column before algae can, and by growing densely, they block sunlight from reaching the bottom. They also release oxygen, which benefits fish and other aquatic life, creating a balanced, self-cleaning ecosystem.
Now, think of your garden island in the same way. It is a contained ecosystem that must be internally balanced to remain healthy and low-maintenance. Just as underwater plants are the workhorses of a clear pond, a thick layer of organic mulch is the workhorse of a water-wise garden bed. Mulch performs a similar competitive function: it blocks sunlight from reaching the soil, which prevents weed seeds (the “algae” of the garden bed) from germinating. It also helps retain moisture in the soil, preventing it from being lost to evaporation—effectively managing the “water budget” of the system. According to gardening experts, maintaining a 3-4 inches of mulch depth is optimal for moisture retention and weed suppression.
Whether it’s a pond or a garden island, the goal is to design a system that largely takes care of itself, rather than one that requires constant chemical or manual intervention.
Key Takeaways
- Design as an Ecosystem: A successful garden island functions as a self-regulating system, not just a collection of plants. Success depends on the synergy between soil, water management, and plant selection.
- Vertical Structure is Crucial: An anchor point like a specimen tree is not merely decorative. It provides essential verticality, creates microclimates with its shade, and offers year-round visual interest.
- Strategic Timing is Key: Planting the structural “bones” of your island in the fall leverages natural rainfall and warm soil to build deep, resilient root systems, drastically reducing water needs the following summer.
How to Select a Specimen Tree That Won’t Outgrow Your Courtyard?
While this article focuses on breaking up large lawns, the principles of selecting a tree for a confined courtyard are directly applicable to choosing the anchor for your garden island. An island bed, by definition, is a limited space. The single biggest mistake you can make is choosing a tree that will quickly outgrow its designated area, creating a maintenance nightmare of constant pruning and eventually requiring costly removal. The key is to select a tree whose mature size—not its size at the nursery—is appropriate for the scale of the island. You must research its ultimate height and, just as importantly, its spread.
Focus your search on dwarf or columnar varieties that have been specifically bred for compact spaces. A “dwarf” tree will typically stay under 10-15 feet tall, while a “columnar” tree has a very narrow growth habit, providing vertical interest without a wide, spreading canopy. Look for species known for slow growth rates and multi-season interest, offering features like spring flowers, interesting bark, or brilliant fall color. This ensures your anchor provides maximum design impact without becoming a liability. The study of a real-world application shows just how critical the right variety is.
Case Study: Urban Courtyard Tree Selection Success
Kurtz Bros Landscaping faced the challenge of a 20×20 ft courtyard. They selected a multi-stem Amelanchier (Serviceberry) of the ‘Regent’ variety, specifically grafted onto dwarfing rootstock. After 10 years, the tree had reached a manageable 12 feet tall with a 10-foot spread. It successfully provided spring flowers, edible summer berries, beautiful fall color, and architectural winter structure, all without overwhelming the small space. The success was entirely due to the specific choice of a variety genetically programmed for a smaller ultimate size.
To help guide your selection, consider trees with naturally controlled forms and sizes. The following table provides a starting point for reliable, beautiful, and size-appropriate options.
This table compares several excellent dwarf tree varieties that are perfect for contained spaces like courtyards or the center of a garden island, highlighting their mature size and key features.
| Tree Type | Mature Size | Growth Rate | Special Features |
|---|---|---|---|
| Dwarf Japanese Maple | 6-8 ft | Slow | Four-season interest, shade tolerant |
| Columnar Hornbeam | 10-15 ft x 4 ft wide | Moderate | Narrow profile, urban tolerant |
| Dwarf Serviceberry | 8-10 ft | Moderate | Spring flowers, edible berries |
| Weeping Redbud | 5-6 ft | Slow | Cascading form, pink spring flowers |
By choosing the right tree from the start, you are making the single most important decision for the future success and low-maintenance nature of your garden island.