
In summary:
- A successful flush threshold is a complete, engineered system, not just a single drainage product.
- Water management must address surface runoff (drainage), subsurface penetration (membranes), and slip safety (tile texture).
- Drainage capacity is not one-size-fits-all; it must be calculated for your specific climate and roof/patio area.
- Thermal performance is as crucial as waterproofing to prevent cold spots and drafts.
- Every material choice, from floor finish to wood sealant, is a critical component of the system’s success.
The allure of a seamless transition between your indoor living space and the outdoors is a cornerstone of modern architectural design. Erasing the boundary with a flush, level threshold creates an expansive, uninterrupted flow that can make a home feel both larger and more connected to nature. For design-lovers, it’s the ultimate expression of open-plan living. Yet, this beautiful ideal is haunted by a single, persistent fear: water. The traditional doorstep, for all its clumsiness, served one primary purpose—to keep the weather out.
Many homeowners believe that simply installing a high-quality linear drain is the silver bullet. While a drain is a critical component, this view is dangerously simplistic. The reality is that preventing water ingress at a level threshold is not about a single product, but about designing a holistic water management system. This system involves a chain of interdependent elements, where a failure in one link—be it the wrong tile finish, a gap in the insulation, or an undersized drain—can compromise the entire structure, leading to damp, drafts, and costly repairs.
But what if the key wasn’t just preventing water from getting in, but meticulously engineering every single millimetre of the transition zone? This guide moves beyond the basics. We will deconstruct the flush threshold into its core systems: surface water drainage, subsurface waterproofing, thermal integrity, and material science. We will explore why a system designed for a small balcony will fail under a large glass wall, and how a simple choice of flooring direction can become an active part of your water management strategy.
This article provides an expert, cautious-by-design framework for achieving that coveted seamless look without the risk. By understanding the interconnected principles, you can ensure your beautiful design feature is also a fortress of engineering, ready to stand up to the elements. The following sections break down each critical decision point in creating a truly resilient and beautiful flush threshold.
Summary: How to Create a Flush Threshold Without Risking Water Ingress?
- Why Using the Same Tile Inside and Out Makes Your Room Look 30% Bigger?
- How to Install Linear Drains for a Level Threshold in 4 Steps?
- Polished vs Textured: Which Stone Finish Is Safe for Wet Transition Zones?
- The Insulation Gap at the Doorstep That Causes Cold Drafts All Winter
- When to Schedule Threshold Replacement to Avoid Monsoon Damage?
- How to Achieve a Flush Threshold Between Timber Floor and Exterior Decking?
- Parallel or Perpendicular: Which Flooring Direction Makes a Narrow Hall Wider?
- Why Floor-to-Ceiling Glass Walls Transform Small Rooms into Open Spaces?
Why Using the Same Tile Inside and Out Makes Your Room Look 30% Bigger?
The visual impact of using continuous flooring is undeniable. By extending the same tile from your living room out onto the patio, you trick the eye into perceiving one single, expansive space. The traditional visual break of a threshold disappears, and the boundary between inside and out dissolves. This clever design choice can make a room feel significantly larger and more open, creating a resort-like connection with your garden or terrace. The focus shifts from the confines of the walls to the entire vista.
To truly achieve this effect, the transition must be flawless. The below image showcases the ideal: perfectly aligned grout lines and an almost invisible threshold detail, creating an uninterrupted plane.
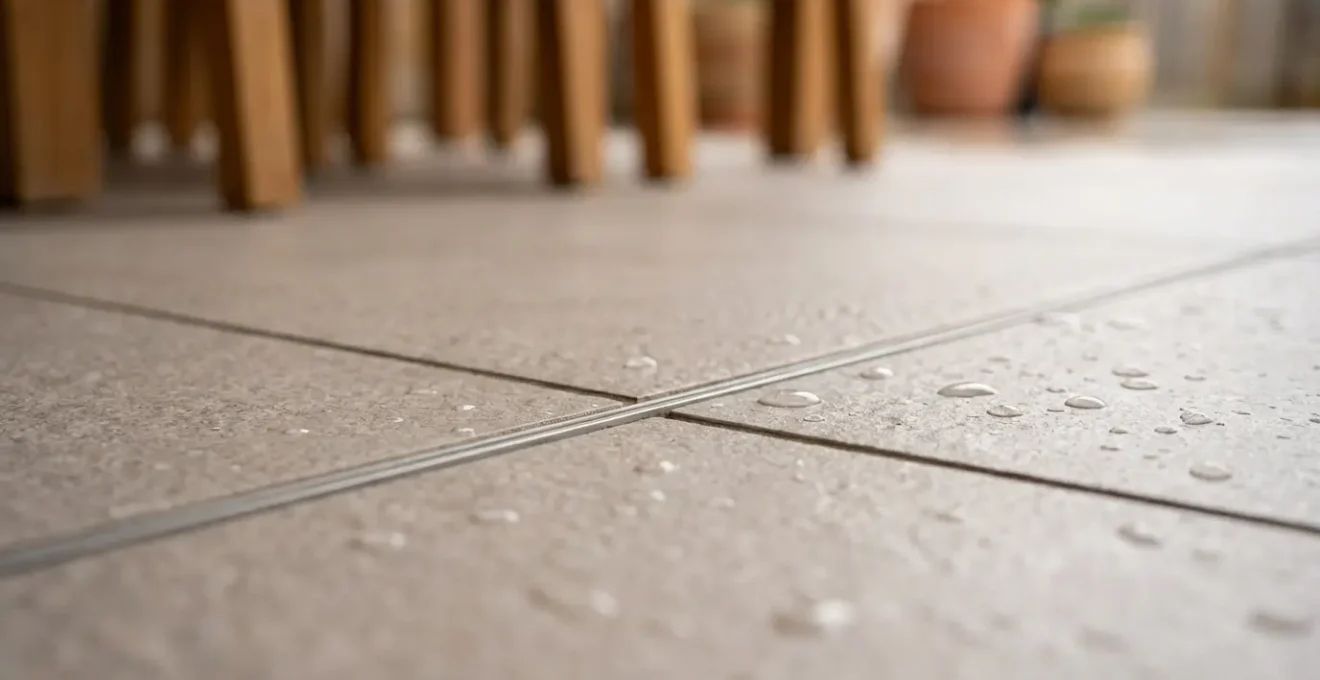
However, this aesthetic ambition introduces a critical, non-negotiable technical requirement: slip resistance. The tile that is perfectly safe inside becomes a potential hazard the moment it gets wet outside. A beautiful, polished porcelain might look stunning, but it can become dangerously slick with the first drops of rain. Therefore, the choice of material cannot be based on looks alone. Safety standards are paramount, and for any external walking surface that can get wet, flooring must meet specific criteria. For instance, according to UK safety standards, flooring must achieve a minimum Pendulum Test Value (PTV) of 36 to be considered safe. This single number dictates which “continuous” tiles are truly viable for your project.
How to Install Linear Drains for a Level Threshold in 4 Steps?
A linear drain is the workhorse of the flush threshold system, but it’s not a magic bullet. Simply having one is not enough; it must be the correctly specified and installed component within your holistic water management plan. The core function is to capture surface water running off the glazing and surrounding patio before it can cross the threshold. Success here depends on two factors: correct placement and adequate flow rate capacity.
While the detailed installation should be left to a professional, understanding the key principles is crucial. The process generally involves:
- Creating a Sub-Sill Tray: A fully waterproofed, recessed tray is constructed beneath the door sill to house the drain channel. This is the primary line of defense.
- Setting the Drainage Channel: The linear drain is set perfectly level within the tray, ensuring its top edge sits flush with the finished floor levels on both sides.
- Connecting the Waste Outlet: The drain must be connected to a suitable stormwater system. The size of this outlet is critical for performance; a small outlet can quickly become overwhelmed.
- Integrating Waterproofing Membranes: Waterproofing membranes from the wall and floor are lapped into and sealed against the drainage channel, creating a continuous, unbroken waterproof barrier.
The most common point of failure is under-specifying the drain’s capacity. The required flow rate, measured in Gallons Per Minute (GPM) or litres per minute, depends on your local climate’s peak rainfall intensity and the total surface area (roof, glass, and patio) draining towards the threshold. A system for a small sheltered balcony is wholly inadequate for a large patio exposed to torrential downpours. As a technical benchmark, high-capacity 3″ outlet products can achieve a flow rate of 21 GPM, which is often necessary for more demanding applications. This is a crucial number to discuss with your architect, as it dictates the underlying plumbing required.
Polished vs Textured: Which Stone Finish Is Safe for Wet Transition Zones?
The choice of stone or tile finish is where aesthetics and safety collide directly at the threshold. A high-gloss, polished finish may offer a luxurious indoor look, but it poses a significant slip hazard in a wet or even damp transition zone. As established, any flooring in this area must meet a minimum PTV score of 36+ to be deemed safe. Polished surfaces rarely meet this standard when wet.
This is where textured finishes become essential. Finishes like honed, bush-hammered, or flamed are not just stylistic choices; they are engineered safety features. They create a micro-texture on the stone’s surface that provides grip for footwear, drastically reducing the risk of slips. The trade-off is often in maintenance and visual style, moving from a sleek, reflective surface to a more matte, rustic, or natural appearance. It is crucial to select a single tile product that is available in both an interior finish (if you desire a smoother feel inside) and a high-grip exterior finish, allowing for aesthetic continuity without compromising safety.
The following table, based on data from stone specialists, illustrates how different finishes perform in wet conditions. It clearly shows the risk associated with smoother surfaces and the safety offered by more textured options.
| Stone Finish Type | Typical PTV Range (Wet) | Maintenance Required | Aesthetic Impact |
|---|---|---|---|
| Polished | 15-25 (High Risk) | Daily cleaning | High gloss, luxurious |
| Honed | 28-35 (Moderate Risk) | Weekly cleaning | Matte, sophisticated |
| Bush-Hammered | 40-55 (Low Risk) | Monthly deep clean | Textured, rustic |
| Flamed | 45-60 (Very Low Risk) | Quarterly maintenance | Rough, natural |
This data, highlighted in a comprehensive guide to anti-slip ratings, makes it clear that finishes like Bush-Hammered and Flamed are the most responsible choices for the exterior portion of a flush threshold. Choosing a “Honed” finish is a compromise that still carries moderate risk and may not be suitable for all applications.
The Insulation Gap at the Doorstep That Causes Cold Drafts All Winter
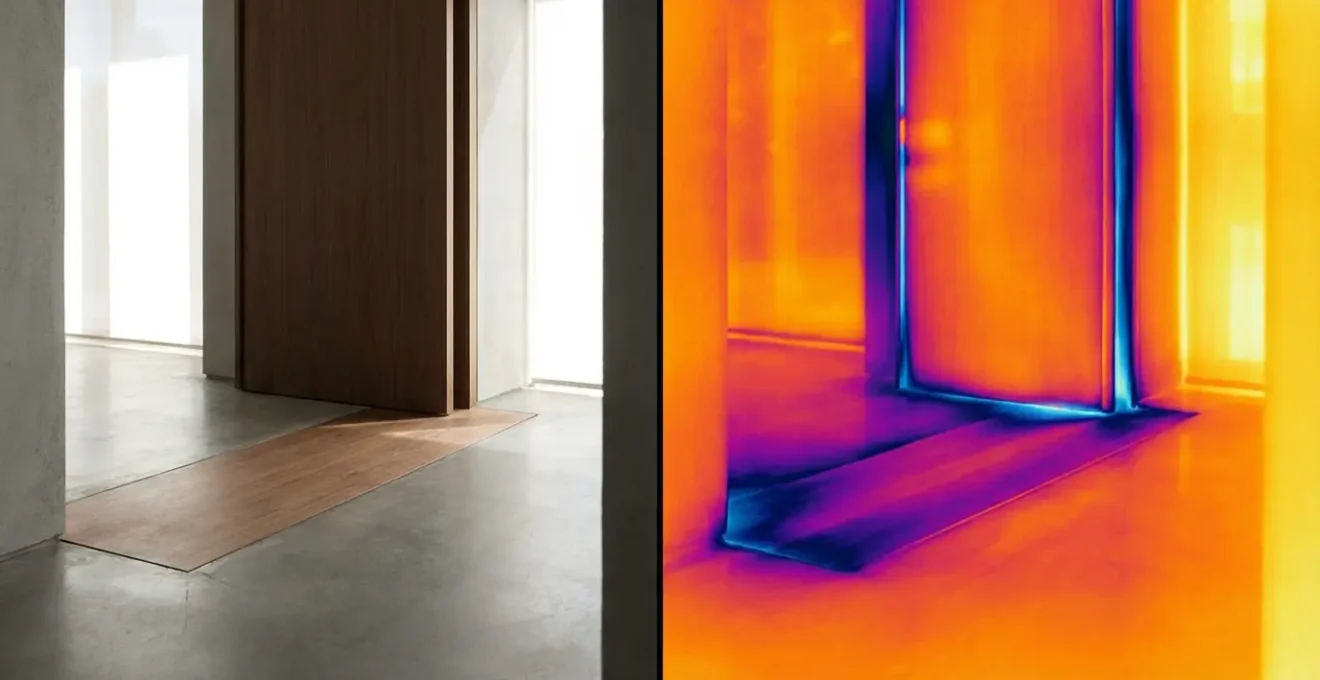
While homeowners are rightly focused on water ingress, there is an invisible enemy that can make a flush threshold a source of year-round discomfort: thermal bridging. A thermal bridge is a gap in a building’s insulation envelope that allows heat to escape in winter and enter in summer. A poorly designed threshold is a classic thermal bridge. Traditional door sills often sat on a timber frame or concrete plinth, creating a break, but a modern flush threshold often involves metal door frames and drains sitting in direct contact with the exterior slab, creating a super-highway for cold to travel into your home.
This results in a noticeable cold spot at the floor right by your beautiful new doors, causing persistent drafts and surprisingly high energy bills. Thermal imaging reveals this hidden problem starkly, showing a plume of blue (cold) bleeding into the warm orange and red of your insulated interior. The solution is to create a “thermal break.” This involves installing a layer of high-density, low-conductivity material (like rigid foam insulation) directly beneath the door frame and threshold assembly, effectively breaking the bridge and separating the indoor and outdoor temperatures.
Achieving a continuous thermal envelope is a precision task that must be planned at the architectural stage. It is not something that can be easily retrofitted. The following checklist outlines the critical steps a professional should take to eliminate this insulation gap and ensure your flush threshold is as thermally efficient as it is beautiful.
Your Action Plan: Sealing the Thermal Gap at the Threshold
- Map the Insulation Line: On the architectural drawings, trace the line of continuous insulation. If you have to lift your pen at the threshold, you’ve found a thermal bridge that needs to be addressed.
- Install a Thermal Break: Ensure a high-density foam thermal break (minimum R-5 value) is specified for installation directly beneath the entire threshold frame and drainage assembly.
- Connect the Air Barrier: The wall’s air and vapor control layer (AVCL) must be continuously sealed to the sub-floor membrane, wrapping around the thermal break without any punctures or gaps.
- Seal All Penetrations: Every screw, fixing, and joint must be sealed with a flexible, high-performance sealant that is rated to accommodate thermal expansion and contraction.
- Verify with Thermal Imaging: After installation, a thermal imaging scan on the first cold night is the ultimate quality control, confirming the integrity of the thermal break and the absence of cold spots.
When to Schedule Threshold Replacement to Avoid Monsoon Damage?
The timing of a threshold installation or replacement is a strategic decision, not an afterthought. Attempting this intricate work during a region’s rainy season or “monsoon” period is courting disaster. The entire process relies on creating a perfectly dry, clean environment to apply and cure waterproofing membranes, sealants, and adhesives. Even moderate humidity can compromise the bond of these materials, and a sudden downpour can wash away uncured products, leading to guaranteed future leaks.
Therefore, all threshold work should be scheduled for the driest, most stable part of the year. This provides the best possible conditions for the critical waterproofing layers to achieve their full design strength. Furthermore, designing for “monsoon damage” means engineering the system to handle the absolute peak rainfall events, not just average showers. This is where engineering standards provide crucial guidance. For example, robust UK engineering standards recommend designing threshold drainage systems based on a 75mm/hour rainfall intensity. This figure represents an extreme weather event and serves as a benchmark to ensure a system has enough capacity to avoid being overwhelmed.
Beyond drainage capacity, structural waterproofing details are also legally mandated in many regions for high-rainfall areas. Best practices derived from these standards, such as those required for new builds in the UK, provide a blueprint for resilience. One of the most critical details is the “upstand.” This means ensuring that all waterproofing membranes are turned up the wall by a minimum height before they meet the sill. A common best practice is to ensure all waterproofing has a minimum of 75mm upstand under the threshold. This detail creates a hidden, internal “dam” that acts as a secondary failsafe, preventing wind-driven rain from being forced over the drain and under the door frame. Designing to these robust standards is the only way to have true peace of mind.
How to Achieve a Flush Threshold Between Timber Floor and Exterior Decking?
Creating a seamless transition from an indoor timber floor to an exterior deck is perhaps the most challenging flush threshold scenario. Unlike stone or tile, wood is a dynamic material; it expands, contracts, and moves with changes in temperature and humidity. Ignoring this movement is a recipe for disaster, leading to buckled boards, broken seals, and inevitable water ingress. The key is to design a system that accommodates this natural movement while maintaining a waterproof seal.
This requires several critical considerations. First, adequate ventilation beneath the exterior decking is non-negotiable to prevent moisture buildup and rot. Second, flexible movement joints must be incorporated at the threshold and perimeters to give the wood space to breathe. Most importantly, the choice of wood treatment is not just aesthetic. Certain solvent-based sealers can degrade or damage the waterproofing membranes they come into contact with, creating a chemical-induced failure in your system. You must ensure the wood preservative and the waterproofing system are fully compatible.
This table highlights the crucial relationship between wood treatments and the underlying waterproofing membranes, a detail often overlooked by non-specialists.
| Wood Treatment Type | Membrane Compatibility | Longevity | Application Method |
|---|---|---|---|
| Water-Based Preservatives | Excellent – No degradation | 5-7 years | Brush/Spray |
| Oil-Based Stains | Good – Check manufacturer specs | 3-5 years | Brush only |
| Solvent-Based Sealers | Poor – May damage membranes | 7-10 years | Professional only |
| Natural Oils (Tung/Linseed) | Excellent – Fully compatible | 2-3 years | Multiple coats |
As the data shows, opting for a water-based preservative or a natural oil is the safest choice to ensure the longevity of your waterproof seal. Using a solvent-based product without explicit manufacturer approval for your specific membrane is a high-stakes gamble. This careful integration of material science is a perfect example of the holistic system at play, where even the flooring direction can have a functional impact.
Parallel or Perpendicular: Which Flooring Direction Makes a Narrow Hall Wider?
The direction you lay your flooring has a powerful psychological effect on the perception of space. The conventional wisdom is that laying boards parallel to the longest walls of a narrow hall or room makes it feel longer and narrower, while laying them perpendicularly makes the space feel wider and more expansive. For a seamless transition, this means running your floorboards or tiles across the threshold rather than towards it. This creates strong horizontal lines that draw the eye outwards, visually widening the entire area.
While this is a well-known interior design trick, in the context of a flush threshold, it also serves a surprisingly practical function. This aesthetic choice can be cleverly co-opted into your water management system. As one expert notes, this orientation can actively help guide water away from your home.
Laying boards perpendicular to the threshold creates natural micro-channels that guide water toward exterior drainage, combining aesthetic design with functional water management.
– James Mitchell, Architectural Drainage Solutions Handbook
This is a perfect example of the “holistic system” approach. The grout lines between tiles or the small gaps between deck boards, when oriented perpendicular to the door, act as tiny, secondary drainage channels. They catch any water that might splash over the primary linear drain and naturally guide it back towards the exterior. It’s a subtle but intelligent detail where form elegantly follows function. Instead of fighting against water, the design itself helps to manage it. This level of integrated thinking is what separates a merely beautiful threshold from one that is robustly and intelligently engineered for the long term.
Key Takeaways
- A flush threshold is a complex engineered system; success depends on the integration of all parts, not just one component like a drain.
- Safety is paramount. Exterior flooring in a transition zone must have a wet Pendulum Test Value (PTV) of 36+ to prevent slip hazards.
- Drainage capacity is critical and must be calculated based on local peak rainfall and the total surface area draining towards the threshold.
- A thermal break is essential to prevent cold spots, drafts, and energy loss, ensuring the threshold performs as well thermally as it does structurally.
Why Floor-to-Ceiling Glass Walls Transform Small Rooms into Open Spaces?
Floor-to-ceiling glass walls represent the pinnacle of indoor-outdoor living. They demolish the visual barrier of a conventional wall, flooding a space with natural light and offering panoramic views. This architectural move can completely transform a small, enclosed room, making it feel boundless and seamlessly connected to the landscape. When paired with a flush threshold, the effect is magnified, creating a truly uninterrupted plane that flows from the heart of the home directly into nature.
This grand architectural vision, however, places an immense responsibility on the small, often-overlooked detail of the threshold drain. A massive wall of glass acts as a giant funnel during a rainstorm, collecting a huge volume of water and directing it straight down to the threshold. The drainage system must be robust enough to handle this concentrated deluge instantly. A system that might be adequate for a standard patio door will be completely overwhelmed here. In fact, for these large-scale installations, it is not uncommon that modern flush threshold systems with floor-to-ceiling glass must handle up to 120 litres per minute of water flow.
This staggering figure underscores the central theme: the success of the most ambitious design dreams rests on the meticulous engineering of the smallest details. Achieving a minimalist, frameless look with hidden tracks and a level floor is only possible because of a high-capacity, purpose-built drainage and waterproofing system working invisibly beneath the surface. It is the ultimate expression of the cautious expert’s approach: enabling breathtaking innovation through rigorous, uncompromising technical execution. Without it, the dream of an open glass wall quickly becomes a nightmare of leaks and water damage.
To ensure your architectural vision becomes a durable, worry-free reality, the essential next step is to discuss these critical system points—drainage capacity, thermal breaks, and material compatibility—in detail with your architect and builder before a single plan is finalized.