The number one reason solar lights fail in winter isn’t brightness, but the poor quality of their internal “engine”—the battery and charging system.
- Prioritise lights with Lithium Iron Phosphate (LiFePO4) batteries; they drastically outperform older NiMH technology in cold weather.
- Look for models with remote, angle-adjustable solar panels to effectively capture the low winter sun.
Recommendation: Stop buying cheap, all-in-one, fixed-panel lights. Invest in engineered systems with separate panels and LiFePO4 batteries for reliable, year-round illumination.
There’s a familiar, sinking feeling that comes with investing in solar garden lights: the initial delight of a beautifully lit path gives way to the frustration of seeing them dim and die just hours after sunset, especially during the shorter days of winter. You’ve likely followed the standard advice; you’ve cleaned the panels, ensured they get what little sun is available, and perhaps you even sprung for the “super bright” model at the local DIY store. Yet, the problem persists, leaving your garden in premature darkness.
The truth that mass-market manufacturers often obscure is that the issue is rarely the brightness of the LED bulb itself. The real point of failure is the light’s internal engine: its battery technology and power management system. Most affordable, all-in-one solar lights are simply not engineered to handle the tight energy budget of winter. They are designed for fair-weather performance, not year-round reliability. This guide cuts through the marketing noise and acts as your personal renewable energy lighting consultant. We will dissect the technical specifications that truly matter, moving beyond simplistic lumen ratings to understand the system as a whole.
We’ll examine the critical role of battery chemistry, the physics of solar panel angling for winter sun, the trade-offs between different operating modes, and the often-misleading IP waterproof ratings. By understanding these core components, you can finally select solar lighting that performs not just as a decorative object, but as a reliable, functional tool that conquers the winter night.
To navigate this technical landscape, this article breaks down the essential knowledge into clear, actionable sections. Discover the key components that separate a dependable system from a disposable gadget, and learn how to make informed choices for a garden that remains safely and beautifully illuminated, whatever the season.
Summary: A Technical Guide to Reliable Winter Solar Lighting
- Why You Need Lithium-Ion Batteries for Reliable Winter Lighting?
- How to Angle Remote Solar Panels to Capture Low Winter Sun?
- Motion Sensor vs Dusk-to-Dawn: Which Preserves Battery Life Better?
- The IP Rating Myth: Why IP44 Isn’t Enough for Garden Sprinklers?
- When to Replace Rechargeable Solar Batteries for Peak Performance?
- Why 10 Lumens is Decorative but You Need 100 Lumens for Safety?
- When to Install Outdoor Lighting: Before or After Hardscaping Completion?
- How to Space LED Bollards for Perfect Pathway Illumination Without Glare?
Why You Need Lithium-Ion Batteries for Reliable Winter Lighting?
The heart of any solar light, its “power engine,” is the rechargeable battery. This is the single most common point of failure in cheap units, especially in winter. Most budget lights rely on Nickel-Metal Hydride (NiMH) batteries, a technology that struggles profoundly in the cold. Their chemical reaction slows down, drastically reducing their ability to accept and hold a charge. In fact, industry testing shows that NiMH batteries can lose a significant portion of their capacity and charging efficiency as temperatures drop towards freezing.
This is where modern battery chemistry provides a clear solution: Lithium Iron Phosphate (LiFePO4). This specific subset of lithium-ion technology is engineered for safety and longevity, and its performance in cold weather is vastly superior to NiMH. While a NiMH battery might only retain 50% of its capacity at -20°C, a LiFePO4 battery will still deliver around 85% of its power. Furthermore, LiFePO4 batteries have a much lower self-discharge rate (1-2% per month vs. 20% for NiMH) and a significantly longer cycle life, often lasting 1000-2000 charge cycles compared to the 500-1000 of NiMH.
For homeowners seeking reliability, the choice is clear. A solar light is only as good as its battery, and a light equipped with a NiMH battery is fundamentally handicapped for winter use. Insisting on LiFePO4 technology is the first and most important step toward achieving dependable, all-night illumination during the coldest months. The following table, based on an in-depth battery technology comparison, highlights the critical differences.
| Feature | LiFePO4 | NiMH |
|---|---|---|
| Operating Temperature | -20°C to 60°C | -10°C to 45°C |
| Cycle Life | 1000-2000 cycles | 500-1000 cycles |
| Self-Discharge Rate | 1-2% per month | 20% per month |
| Cold Performance | 85% capacity at -20°C | 50% capacity at -20°C |
How to Angle Remote Solar Panels to Capture Low Winter Sun?
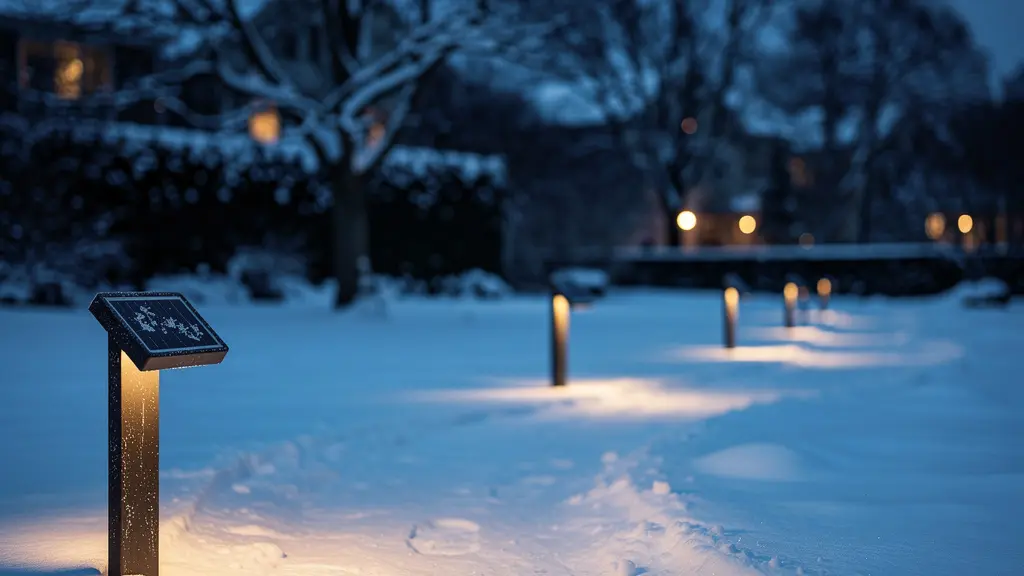
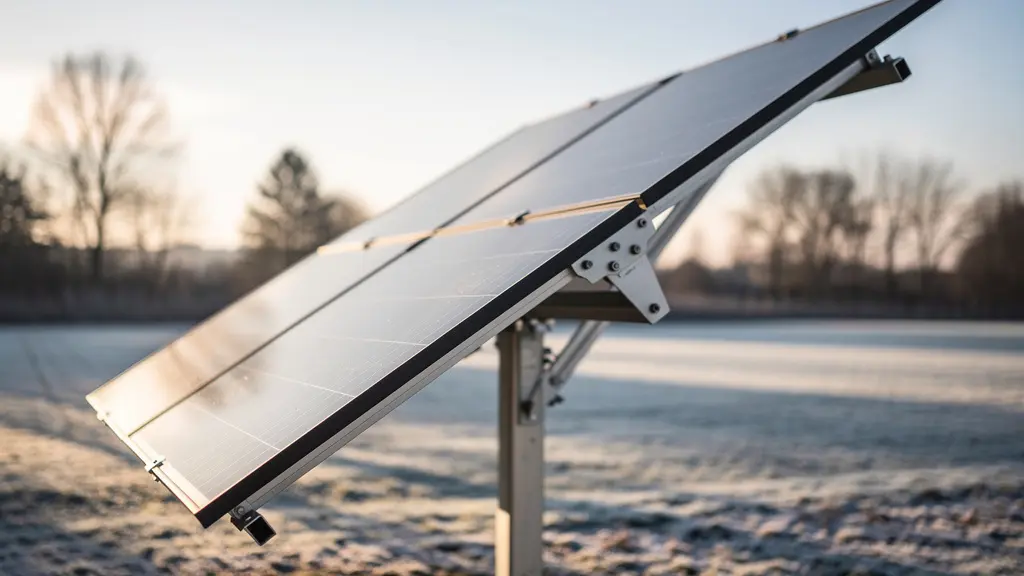
Even with the best battery, a solar light cannot function if its panel doesn’t collect enough energy. In winter, this becomes a significant challenge for two reasons: shorter daylight hours and a much lower sun trajectory. The sun arcs across the sky at a lower angle, meaning a flat or poorly angled panel receives only a fraction of its potential power. This is a fatal flaw in most cheap, all-in-one units where the panel is fixed horizontally on top of the light fixture.
The professional solution is to use lights with a remote solar panel connected by a cable. This decouples the panel’s position from the light’s, allowing you to place the light in a shady spot (like under a tree or on the north side of a path) while mounting the panel in a location with optimal, unobstructed southern exposure. Most importantly, it allows for seasonal angle adjustments.
To maximize winter charging, the panel should be tilted to face the low sun more directly. A general rule for northern hemisphere locations is to set the panel’s tilt angle to your latitude plus 15 degrees. For many northern regions, a tilt of around 45 degrees is a good winter starting point. This steeper angle not only improves energy capture but also helps snow and debris slide off more easily. The illustration below demonstrates this optimal winter positioning.
Achieving this ideal setup requires a methodical approach. It’s not just about pointing the panel “towards the sun” but about a precise alignment that accounts for seasonal changes. For consistent power, regular checks to clear any accumulated snow, leaves, or dirt are non-negotiable. Following a clear positioning protocol is key to building a resilient energy-gathering system.
- Calculate your ideal winter angle by adding 15 degrees to your geographical latitude.
- If a precise calculation isn’t possible, set the panel tilt to approximately 45 degrees in northern regions during winter.
- Ensure the panel faces directly south (in the northern hemisphere) for maximum daily exposure.
- Regularly clear the panel of snow, frost, and debris to maintain optimal charging efficiency.
- When using extension cables for remote panels, use a sufficiently thick wire (e.g., 18 AWG for runs over 10 feet) to prevent significant voltage drop.
Motion Sensor vs Dusk-to-Dawn: Which Preserves Battery Life Better?
With winter solar charging capacity experiencing a 30-50% performance reduction, managing the “energy budget” stored in the battery becomes paramount. A light that runs at full brightness all night (a “dusk-to-dawn” mode) may be desirable in summer, but it will quickly drain a winter-charged battery, leaving you in the dark before morning. This is where intelligent power management comes into play, creating an engineering trade-off between constant illumination and longevity.
The most common power-saving strategy is a motion sensor (PIR) mode. The light remains off or in a very low-power state until it detects movement, at which point it illuminates to full brightness for a set period (e.g., 30-60 seconds). This dramatically extends battery life by only using significant power when it’s actually needed for safety or security. This is the most efficient mode for preserving battery life, but it sacrifices ambient lighting.
However, a more sophisticated solution is emerging in higher-quality fixtures: a hybrid “Dim-to-Bright” mode. The light operates at a low, ambient level (e.g., 10-20 lumens) after dusk, providing a constant, decorative glow. When motion is detected, it instantly switches to full brightness (e.g., 100+ lumens) for security, then returns to the dim mode. This offers the best of both worlds: continuous, gentle pathway lighting and on-demand security brightness, all while conserving significant energy compared to a full-power dusk-to-dawn mode.
Case Study: EnkonnSolar’s Hybrid Mode Winter Test
In field tests conducted in the harsh conditions of Northern Canada, EnkonnSolar evaluated different power management strategies. Their findings demonstrated that solar lights operating in a hybrid ‘Dim-to-Bright’ mode maintained an impressive 85% efficiency throughout the winter. These lights consistently provided 6-8 hours of reliable illumination, even when contending with the 30-50% reduction in winter charging capacity. This performance significantly outmatched that of lights locked in either a pure motion-sensor or a full-power dusk-to-dawn mode, proving the effectiveness of intelligent, adaptive power usage.
The IP Rating Myth: Why IP44 Isn’t Enough for Garden Sprinklers?
Water ingress is a swift and certain death for outdoor electronics. To help consumers, manufacturers use the Ingress Protection (IP) rating system, denoted by “IP” followed by two numbers. The second number is the crucial one for water resistance. Many homeowners see “IP44” on a box and assume the light is “weatherproof.” This is a dangerous and costly myth, particularly in a well-irrigated garden.
An IP44 rating only protects against splashing water from any direction. It’s adequate for a light mounted under a sheltered eave, protected from direct rain. However, it offers no protection against the focused, pressurised streams of water from garden sprinklers, irrigation systems, or even a hose pipe. A direct hit from a sprinkler jet can easily force water past an IP44-rated seal, leading to corrosion and failure.
For any light installed at ground level in a garden, a minimum rating of IP65 is essential. An IP65 rating ensures the fixture is sealed against “water jets from any direction.” This is the standard that can withstand sprinklers and heavy, driving rain. For lights in low-lying areas prone to puddles or temporary flooding, you must step up to IP67 (protection against temporary immersion). As an expert in the field affirms, choosing the right rating for the location is not optional.
IP65-rated fixtures withstand heavy rain and dust exposure, while IP67 units can handle temporary submersion. For most climates, IP65 provides adequate protection.
– Linkind Solar Lighting, Best Solar Pathway Lights Guide 2025
The table below, based on standard outdoor lighting installation guidelines, clarifies the minimum requirement for each zone in your garden.
| Location | Minimum IP Rating | Protection Level |
|---|---|---|
| Sheltered Areas (e.g., under eaves) | IP44 | Protected against splashing water |
| Garden/Sprinkler Zones | IP65 | Protected against water jets |
| Low-lying/Puddle Areas | IP67 | Protected against temporary immersion |
| Pool/Fountain Areas | IP68 | Protected against continuous immersion |
When to Replace Rechargeable Solar Batteries for Peak Performance?
Even the best rechargeable batteries have a finite lifespan. After several hundred charge and discharge cycles, their ability to hold a full charge degrades. For a solar light, this manifests as progressively shorter run times, especially in winter when the charging cycle is already compromised. Rather than throwing away the entire light fixture—a common and wasteful practice—proactive battery replacement can restore a quality light to its original performance for a fraction of the cost.
The replacement schedule depends on the battery chemistry. As a rule of thumb, the lower-quality NiMH batteries should be replaced every 2-3 years as a matter of preventive maintenance. The superior LiFePO4 batteries have a much longer service life, typically requiring replacement every 5-7 years. Waiting for a battery to fail completely is not an effective strategy; performance will degrade long before total failure occurs.
When you notice a significant drop in runtime, the first step is to perform an isolation test to confirm the battery is the culprit and not a dirty or poorly positioned panel. Remove the battery from the fixture and charge it fully indoors using a compatible battery charger or by placing it in a known-good indoor light under a strong lamp for 24 hours. If the light’s performance is not restored with the fully-charged battery, it’s time for a replacement. When replacing, you can often upgrade. For instance, if your light came with a 2000mAh battery, upgrading to a 2500mAh battery of the same chemistry and voltage will provide a longer runtime.
Your 5-Step Battery Health Audit
- Isolation Test: Remove the battery and charge it fully indoors for 24 hours under a strong lamp to ensure it reaches maximum capacity, isolating it from panel issues.
- Performance Check: Re-install the fully charged battery. If the light still underperforms or dies quickly, the battery’s health is compromised and it needs replacement.
- Preventive Replacement Schedule (NiMH): If your lights use NiMH batteries, plan to replace them every 2-3 years, regardless of performance, to avoid winter failures.
- Preventive Replacement Schedule (LiFePO4): For higher-quality LiFePO4 batteries, schedule a replacement every 5-7 years to maintain optimal, peak performance.
- Capacity Upgrade: When replacing, consider upgrading to a slightly higher capacity (e.g., from 2000mAh to 2500mAh) for an easy performance boost, ensuring the voltage and physical size are identical.
Why 10 Lumens is Decorative but You Need 100 Lumens for Safety?
Lumens, the measure of light output, are the most heavily marketed specification for solar lights, but the numbers are often presented without context. A 10-lumen light can create a beautiful, subtle glow—perfect for marking the edge of a flowerbed. However, relying on this level of brightness to navigate a dark pathway or flight of stairs is inadequate and unsafe. For functional lighting, the conversation must shift from decoration to safety.
For tasks like identifying potential trip hazards, finding keys, or navigating uneven ground, you need significantly more light. Industry and commercial lighting standards specify a range of 100-400 lumens for safe pedestrian pathways. Within this range, 100 lumens is generally considered the minimum threshold for effective residential safety lighting along a path or driveway. This level of brightness is sufficient to clearly illuminate the ground, define edges, and reveal obstacles without causing uncomfortable glare.
However, lumen output is only half the story. The effectiveness of safety lighting also depends on the proper spacing of the light fixtures. A very bright light can create deep shadows between fixtures if they are too far apart, which can be more dangerous than uniform, lower-level lighting. Field studies have shown that the sweet spot for residential pathways is often found with lights in the 100-200 lumen range.
Case Study: HomElectrical’s Pathway Safety Analysis
A 2024 field study by HomElectrical focused on the relationship between lumen output, spacing, and safety. Their tests concluded that pathway lights producing between 100 and 200 lumens achieved optimal safety ratings without introducing hazardous glare. Their analysis highlighted that while 80 lumens was a functional minimum for commercial walkways, residential applications performed exceptionally well with 100-lumen fixtures when combined with proper 8-10 foot spacing between each light. This confirms that safety is a product of both brightness and system design.
When to Install Outdoor Lighting: Before or After Hardscaping Completion?
Integrating lighting, especially systems with remote solar panels or low-voltage wiring, requires forethought. The decision of when to install—before, during, or after hardscaping projects like patios, paths, and retaining walls—can have a massive impact on both aesthetics and future serviceability. The expert approach always favors planning ahead.
The ideal time to plan for lighting is during the design phase of your hardscaping. The most robust and professional strategy is the “conduit-first” approach. This involves laying 1-inch PVC conduit underneath paths and patios before the final materials (pavers, concrete, etc.) are installed. This creates a protected channel for running wires later. It’s a small upfront cost that provides immense future flexibility, allowing for easy installation, replacement, or addition of wiring without destructive and costly trenching through your beautiful new hardscape.
As one leading commercial installer notes, this foresight is the hallmark of a professional job:
The conduit-first strategy allows for easy installation, replacement, or addition of low-voltage or solar-remote cables later without destructive trenching.
– SEPCO Solar Lighting, Commercial Solar Installation Guide
If you’re retrofitting lighting into an existing landscape, all is not lost, but your options are more limited. You can use shallow trenching techniques along the edges of paths or garden beds. For solar lights, this is less of an issue, but for systems with remote panels, you still need to route the cable from the panel’s sunny spot to the light’s desired location. The final placement of solar panels should always happen after major landscaping is complete, to ensure that new trees or mature shrubs won’t cast unexpected shadows on the panel and cripple its performance.
- During Construction: Install 1-inch PVC conduit under any planned paths, driveways, or patios. This is the single most important step for future-proofing your landscape lighting.
- Pre-Hardscaping: Once the layout is defined but before materials are laid, mark the intended positions for light fixtures and run any necessary underground cables through the conduit.
- During Hardscaping: This is the time to install integrated fixtures, such as lights built into retaining wall blocks or paver lights that sit flush with your steps or patio.
- Post-Hardscaping (Retrofit): If installing on an existing landscape, use a spade to create shallow trenches along path edges to bury wires or place standalone solar fixtures.
- Final Step: Position and mount your solar panels last, after all other landscaping work is done, to get a final, accurate assessment of sun exposure and avoid shade from new plantings.
Key Takeaways
- Battery is King: The single most critical component for winter performance is the battery. Insist on Lithium Iron Phosphate (LiFePO4) technology; it is non-negotiable for cold climates.
- Panel Position is Power: A fixed, horizontal panel is a design flaw for winter use. Choose systems with separate, angle-adjustable solar panels to maximize energy capture from the low winter sun.
- Waterproofing is Specific: IP44 is not enough for garden use. Demand a minimum of IP65 to protect your investment from sprinklers, irrigation, and heavy rain.
How to Space LED Bollards for Perfect Pathway Illumination Without Glare?
You’ve selected a high-quality solar light with the right battery, an adjustable panel, and a proper IP rating. The final piece of the puzzle is system design: how to space the lights to create a functional, beautiful, and safe environment. The goal is to produce uniform illumination along a path without creating pools of bright light and deep, hazardous shadows. This is particularly important with bollard-style lights, which are a popular choice for defining walkways.
The key is to achieve a “scallop” effect, where the light cast from one fixture slightly overlaps with the light from the next. The spacing depends on the light’s brightness (lumens) and its beam angle (how wide the light is cast). A common mistake is spacing lights too far apart to save money, which results in dangerous dark spots. Conversely, placing them too close together can create excessive brightness and glare.
For residential pathways, a good rule of thumb is to use lights that provide around 80-100 lumens of brightness and maintain a spacing of 8-10 feet between each fixture. This typically provides enough overlap to create a continuous and safe walkway. However, this is just a guideline. The height of the bollard and the specific optics of the lens will affect the light distribution.
The ultimate method for determining perfect spacing is not a formula, but a practical field test. The “Walking Test” is a simple but highly effective methodology used by professional installers. Before permanently installing the fixtures, place them along the path at the recommended 8-10 foot spacing. Wait for nightfall and walk the path in both directions. Pay close attention to your feet. Do your own legs cast shadows that obscure the ground ahead of you? Are there any dark spots between the lights where you lose sight of the path’s surface? Adjust the spacing—moving the lights closer together—until you can walk the entire length of the path without ever stepping into a significant shadow. This hands-on approach guarantees a result that is both safe and visually pleasing.
Now that you are equipped with the technical knowledge to dissect and evaluate any solar light, the next step is to apply this critical thinking to your own property. Assess your pathways, identify your power needs, and begin designing a lighting system that is engineered for resilience, not just for a pretty picture on a box.