The belief that a single “minimum pitch” number guarantees a leak-proof lean-to roof is a critical misunderstanding. True long-term weatherproofing is not about one angle, but about designing a complete system integrity. This guide demonstrates that the roof’s pitch, materials, flashing details, and structural connections must be engineered as an integrated whole to effectively manage water and load, preventing the common failure points that plague poorly planned extensions.
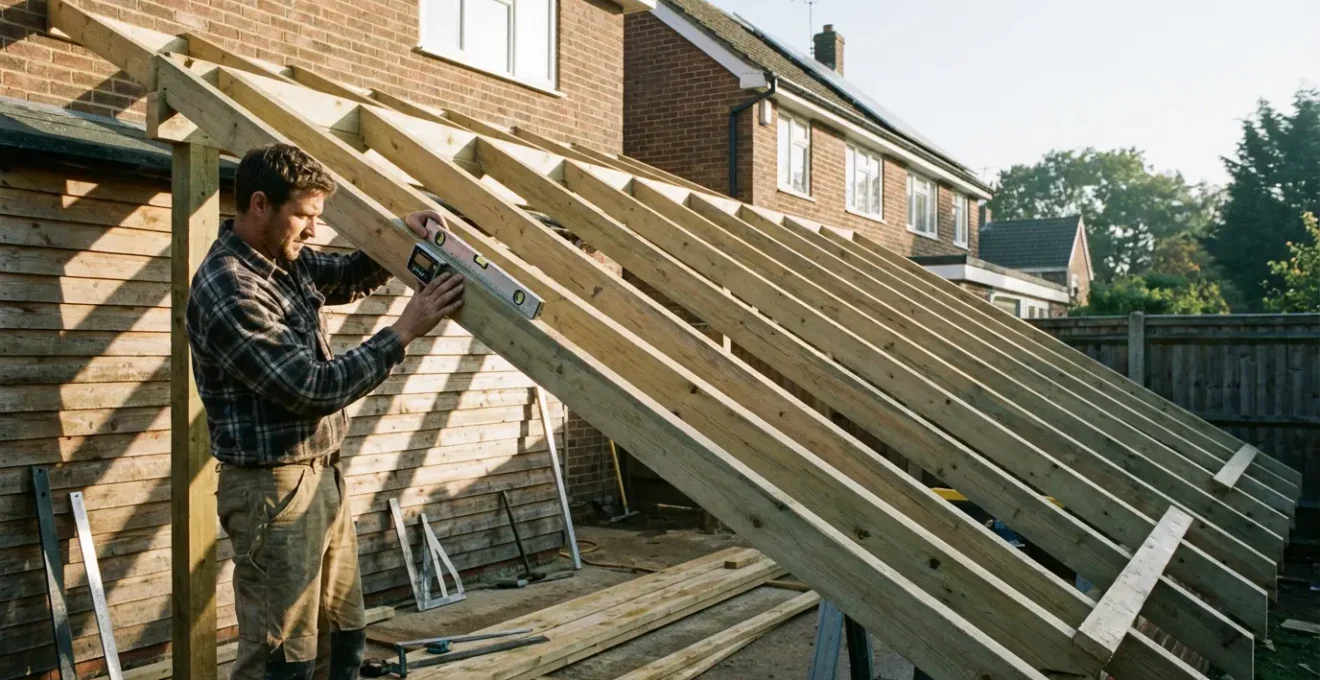
For any DIYer or planner designing a lean-to extension, the question of minimum roof pitch seems fundamental. The desire is for a single, safe number—an angle that promises a life free from drips and damp. Many sources will offer a simple rule of thumb, often around 10 degrees, and leave it at that. This approach, however, overlooks the complex interplay of forces and materials that defines a successful roof. It treats the pitch as an isolated variable when, in reality, it’s a critical component of a much larger performance envelope.
Focusing solely on the pitch is the most common path to failure. A low-pitch roof is an unforgiving environment. It holds water longer, is more susceptible to wind-driven rain, and bears snow load more directly. The real key to a durable, weathertight lean-to lies not in a magic number, but in a holistic understanding of the water management pathway. This involves meticulously planning how water arrives, how it’s channelled off the primary surface, and, most importantly, how it’s handled at the most vulnerable junction: the connection to the host wall.
This guide reframes the question. Instead of just asking for a minimum angle, we will explore the interdependent decisions that lead to a correctly specified pitch. We will analyze how cost, materials, structural integrity, and waterproofing details all influence the final design. By understanding these factors as a complete system, you can build an extension that is not only minimalist and space-efficient but also engineered for decades of reliable performance.
This article provides a detailed breakdown of all the critical considerations for your lean-to project, from initial cost comparisons to the final waterproofing details that ensure its longevity. Explore the sections below to build a complete understanding.
Summary: A System-Based Guide to Lean-To Roof Construction
- Why a Lean-To Is 30% Cheaper to Build Than a Gable Conservatory?
- How to Install Step Flashing on a Brick Wall for a Lean-To?
- Polycarbonate vs Glass: Which Roof Material Reduces Glare for Home Offices?
- The Structural Mistake That Can Collapse Your Low-Pitch Roof in Winter
- How to Get a Weathertight Lean-To Shell Up in Just 48 Hours?
- Building Up vs Building Out: Which Is Less Disruptive to Daily Life?
- Polycarbonate vs Solid Roof Insulation: Which Offers Better Soundproofing?
- How to Waterproof a Flat-Roof Orangery to Guarantee a 20-Year Lifespan?
Why a Lean-To Is 30% Cheaper to Build Than a Gable Conservatory?
The primary driver behind the lean-to’s cost-effectiveness is its structural simplicity. Unlike a gable conservatory, which requires a complex dual-pitch roof with a central ridge, valleys, and intricate hip rafters, a lean-to employs a single, monolithic roof plane. This design drastically reduces material requirements, labour hours, and engineering complexity. The savings are not marginal; they are substantial across every phase of the build, from the foundation to the final flashing.
A comparative analysis of cost factors reveals the specific areas where a lean-to provides significant financial advantages. The simplicity of the structure translates directly into quantifiable savings, making it an attractive option for budget-conscious projects.
| Cost Factor | Lean-To | Gable | Savings |
|---|---|---|---|
| Foundation Requirements | Simple slab (£1,500) | Complex footings (£2,500) | 40% |
| Roof Structure | Single slope (£2,000) | Dual pitch with ridge (£3,500) | 43% |
| Labor Hours | 40-60 hours | 80-120 hours | 50% |
| Flashing Work | Single line (£500) | Valley & ridge (£900) | 44% |
These individual savings accumulate to create a significant difference in the overall project cost. While material choices and finishes will affect the final price, the fundamental structural economy remains. For example, according to recent UK market data, lean-to conservatory prices range from £8,100 to over £26,400, often coming in around 30% less than a gable-end conservatory of a similar size and specification. This cost efficiency allows for a greater portion of the budget to be allocated to high-performance glazing or premium interior finishes.
Ultimately, the lean-to design offers an unmatched balance of spatial gain and financial prudence, provided the simplified structure is executed with technical precision.
How to Install Step Flashing on a Brick Wall for a Lean-To?
The single most critical detail in preventing leaks on a lean-to roof is the correct installation of step flashing at the abutment wall. This is a non-negotiable element of the water management pathway. Step flashing works by creating a series of overlapping metal sections that integrate with both the roof covering and the wall, directing water down the slope and away from the joint. Failure to execute this detail correctly guarantees water ingress over time.
The process involves more than simply inserting metal into mortar joints. It requires a layered approach to waterproofing that begins before any flashing is even installed. This detailed visual shows the precise layering and insertion required for a fully weathertight seal against a brick facade.
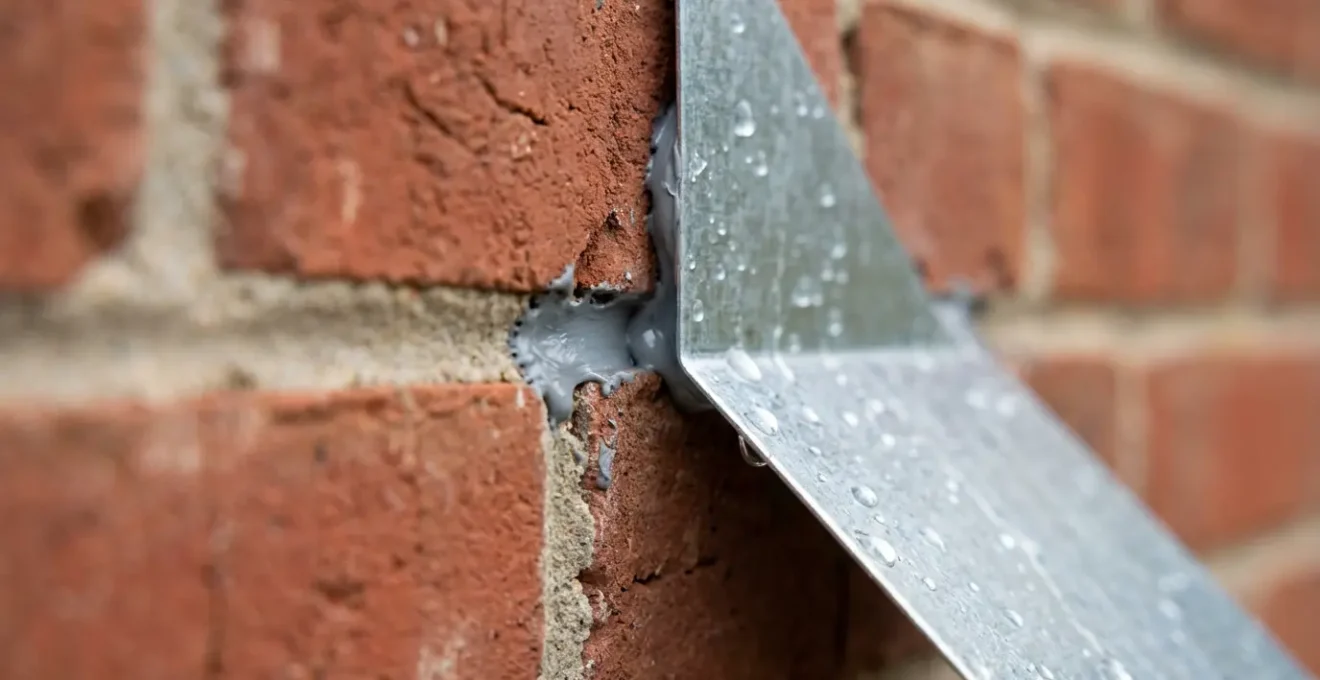
As seen in the image, each piece of flashing is individually cut into the brickwork’s mortar joints and overlaps the piece below it, shingle-style. This ensures that any water that penetrates the primary seal is caught and directed back onto the roof surface. However, the metal flashing is only the final layer of a multi-part system. Proper wall preparation is paramount.
Action Plan: Pre-Flashing Wall Preparation
- Locate Support: Identify and mark support blocks at least 4 inches above the roof deck to ensure clearance for the step flashing’s vertical leg.
- Primary Waterproofing: Apply a peel-and-stick membrane to the gap between the roof and wall, extending it onto both surfaces to create a continuous waterproof barrier.
- Integrate Weather Barrier: Install house wrap to overlap all vertical legs of the metal flashing and underlying membranes, managing any water that gets behind the brick.
- Install Bond Break: Add a bond break layer over the house wrap to protect it from being damaged by mortar dams during the bricklaying process.
- Ensure Drainage: Include weep vents in the brick course above the flashing line in each pan section to allow any trapped moisture to escape.
This methodical, multi-layered approach transforms the wall-to-roof abutment from the weakest point into a robust, redundant, and durable seal that is fundamental to the lean-to’s long-term performance.
Polycarbonate vs Glass: Which Roof Material Reduces Glare for Home Offices?
When a lean-to extension is intended as a home office, managing light quality becomes as important as managing water. Excessive glare on screens can render a space unusable for large parts of the day. While glass offers unparalleled clarity, standard clear glass is often the worst offender for creating harsh glare. This is where modern polycarbonate materials offer a distinct performance advantage.
Specialised polycarbonate sheets are engineered with coatings or tints designed specifically to mitigate glare without plunging the room into darkness. These materials selectively filter light, reducing the harsh, direct rays that cause eyestrain and reflections. The performance can be significant, as studies show that specific coatings provide a measurable and impactful reduction in glare. For instance, data indicates that anti-glare polycarbonate coatings can achieve up to 76% glare reduction compared to standard transparent materials. This makes it a superior technical choice for working environments.
Case Study: Bronze Polycarbonate for a South-Facing Home Office
Fleming Verandas, a specialist installer, has found that bronze-tinted polycarbonate sheets provide the optimal balance for south-facing home office verandas. The bronze tint effectively cuts glare from direct high-angle sun while still allowing a high level of natural light transmission. This creates a comfortable and productive workspace free from the harsh shadows and screen reflections common with clear glass. Their 16mm triple-wall polycarbonate with this tint is now a preferred specification for clients working from home, delivering both superior glare control and thermal insulation.
For a home office application, the technical specification should prioritize the quality of the working light. In this context, a high-performance tinted or coated polycarbonate often provides a more functional and comfortable solution than a standard glass roof.
The Structural Mistake That Can Collapse Your Low-Pitch Roof in Winter
While leaks are a primary concern, the most catastrophic failure on a low-pitch lean-to roof is structural collapse, typically under unexpected winter load from heavy, wet snow. The common mistake is to assume the roof’s rafters are the weak point. In a properly designed system, the true point of failure is almost always the connection between the roof structure and the host building’s wall—the ledger board.
A low-pitch roof does not shed snow as effectively as a steeper one. This means it must be designed to bear the full weight of potential snow accumulation, a concept known as load path dynamics. The entire weight of the snow, the roofing materials, and the structure itself is transferred through the rafters to the ledger board, which then must transmit that immense force to the house wall. As a leading expert from the International Institute of Building Enclosure Consultants (IIBEC) notes, this connection is the critical link.
The true weak point is not always the roof rafters, but the ledger board connection to the host wall. Under-specced bolts or chemical anchors are the single most critical point of failure under unexpected load.
– Building Envelope Specialist, IIBEC Counterflashing Guidelines
The pitch of the roof is directly related to its ability to shed this load. While a steeper pitch helps, even a roof at the minimum allowable angle must be structurally sound. In many regions, building codes typically require at least a 3/12 minimum pitch (approximately 14 degrees) specifically for snow load management. Going below this without compensatory structural engineering and a full understanding of local snow load requirements is a significant risk. Using undersized bolts, incorrect spacing, or fasteners not rated for shear load on the ledger board is a recipe for disaster.
Therefore, calculating the minimum pitch is not just about water runoff; it is an integral part of a structural calculation that ensures the entire performance envelope can withstand the worst-case environmental loads it will face.
How to Get a Weathertight Lean-To Shell Up in Just 48 Hours?
For a DIYer, minimizing the time the house is exposed to the elements is a primary concern. The perceived complexity of construction can be a major barrier. However, with meticulous planning and the use of modern building systems, achieving a fully weathertight lean-to shell—defined as structurally complete, roofed, and sealed from rain—in a single weekend is an achievable goal. This rapid assembly minimizes disruption and risk.
The key to this speed is pre-fabrication and a highly disciplined work schedule. The use of systems like pre-cut timber frames or Structural Insulated Panels (SIPs) dramatically accelerates the erection process, turning the project from a conventional build into an assembly task. This approach has been proven effective in real-world projects.
Rapid Assembly Using Pre-Fabricated Systems
Civil Jungle, an engineering resource, documents that lean-to structures built with SIPs or modular kits can reach weathertight status in under 48 hours. One documented project showed a two-person crew assembling a 3m x 4m lean-to shell in just 44 hours. This included foundation work, as all wall and roof components were pre-cut and manufactured off-site, allowing for a rapid, predictable assembly sequence on-site.
Achieving this speed requires a precise plan of action, where each phase is allocated a strict timeframe. The following “battle plan” outlines a feasible schedule for a standard-sized lean-to:
- Hours 0-6: Prepare the site and pour the concrete base or floor slab, ensuring the correct drainage slope is established from the outset.
- Hours 7-18: Erect the walls and main frame. If using pre-cut timber or SIPs, this phase can be completed rapidly.
- Hours 19-30: Install the roof joists at the calculated pitch and lay the plywood or OSB roof deck.
- Hours 31-42: Apply the primary waterproof membrane, such as a single-ply EPDM sheet, ensuring all overlaps and edge details are correctly executed.
- Hours 43-48: Install all flashing connections to the host wall and apply temporary seals to any window or door openings to complete the weathertight shell.
This approach transforms a potentially lengthy and disruptive building project into a swift and efficient operation, securing the structure against the weather in a minimal timeframe.
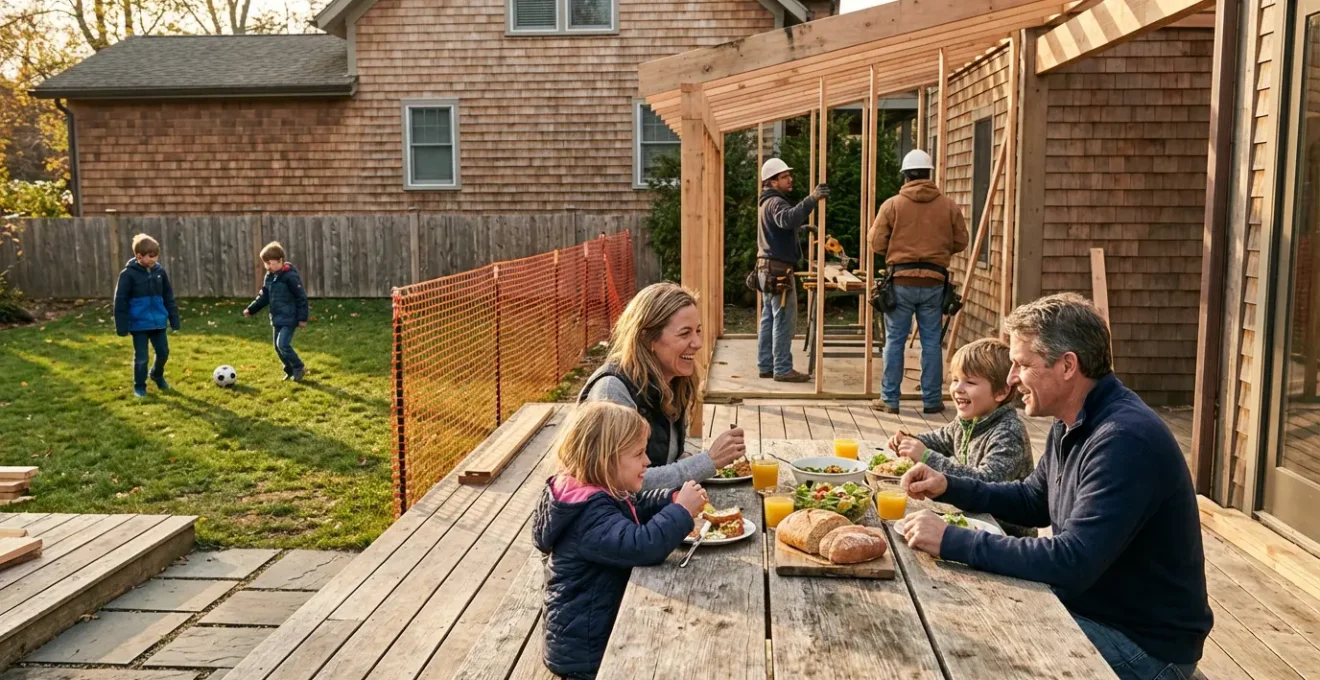
Building Up vs Building Out: Which Is Less Disruptive to Daily Life?
When considering adding space to a home, the choice often comes down to building up (e.g., a loft conversion) or building out (e.g., a lean-to extension). While both add value, their impact on daily life during construction is vastly different. A lean-to extension is, by a significant margin, the less disruptive option, primarily because the majority of the work occurs outside the existing home’s living envelope.
Building up requires workers to be inside the home from day one. It involves structural work, dust, and noise directly within the main house, and often compromises the home’s weather protection when the roof is opened up. In contrast, a lean-to is constructed against an exterior wall, with intrusion into the home only required in the final stages to create the opening. This fundamental difference preserves the sanctity and security of the family’s living space for the bulk of the project.
A direct comparison of disruption factors highlights the clear advantages of building out with a lean-to structure. The containment of the work zone is the single biggest factor in maintaining a normal household routine during construction.
| Disruption Factor | Building Up | Building Out (Lean-To) |
|---|---|---|
| Internal Access Required | Daily for 8-12 weeks | Final week only |
| Noise Level Inside Home | High (structural work) | Low to moderate |
| Garden/Outdoor Access | Maintained | Partially restricted |
| Weather Protection | Critical (open roof) | Less critical |
| Security Risk | High (scaffolding access) | Lower |
The ability to continue daily life with minimal interference is a powerful, if often overlooked, benefit of the lean-to extension, making it an ideal choice for families who need to remain in the property during the work.
Polycarbonate vs Solid Roof Insulation: Which Offers Better Soundproofing?
While polycarbonate roofing excels in light transmission and glare control, its primary weakness is acoustic performance. The light weight and thin structure of standard multiwall polycarbonate sheets do little to dampen impact noise, particularly from heavy rain, which can create a loud drumming effect that is distracting in a home office or living space. A solid, insulated roof offers superior soundproofing but sacrifices all natural light. This presents a trade-off between light and quiet.
However, advancements in polycarbonate technology are closing this gap. Thicker, more complex multiwall sheets and solid polycarbonate options offer significantly improved acoustic dampening. For example, specific tests on solid polycarbonate show its effectiveness in blocking airborne noise, with reports indicating that solid polycarbonate sheets can reduce highway noise by up to 32 dB. While impact noise from rain is a different challenge, hybrid systems are being developed to address it directly.
Hybrid Solution for Rain Noise Reduction
Roofing4US, a materials supplier, reports significant success in soundproofing applications using advanced multiwall polycarbonate systems. Their 35mm multiwall sheets provide substantially better acoustic dampening against impact noise compared to standard 16mm options. When these thicker sheets are combined with anti-vibration tapes applied to the top of the roof rafters before installation, the system creates an effective barrier against the drumming noise of rain and hail. This hybrid approach tackles polycarbonate’s main acoustic weakness while retaining its lightweight and light-transmitting benefits.
For spaces where acoustic comfort is a priority, specifying a thicker-gauge (35mm) multiwall polycarbonate or a solid polycarbonate system with anti-vibration measures is a critical design decision that balances the desire for natural light with the need for a quiet environment.
Key Takeaways
- System Over Angle: A leak-proof roof depends on the entire system (pitch, materials, flashing, structure), not just the pitch angle.
- Ledger Board is Critical: The connection to the house wall is the most common point of structural failure under snow load, not the rafters.
- Flashing is Non-Negotiable: A multi-layered step flashing installation is the only way to guarantee a weathertight seal at the wall abutment.
How to Waterproof a Flat-Roof Orangery to Guarantee a 20-Year Lifespan?
The principles of durable waterproofing are universal, whether for a lean-to, a flat roof, or an orangery. Guaranteeing a 20-year lifespan is not about a single miracle product, but about meticulous attention to detail at every stage, especially at junctions, perimeters, and penetrations. The goal is to create a monolithic, seamless barrier that eliminates any opportunity for water to pond or find an entry point. This requires adherence to a strict set of best practices.
Modern single-ply membranes like EPDM or TPO offer exceptional longevity, but only if they are installed correctly. The membrane itself rarely fails in the field; failures almost always occur at the seams, edges, or where the membrane terminates against a wall or corner. A failure point analysis reveals that these details, not the main roof area, are responsible for over 90% of leaks on low-slope roofs. Therefore, a checklist of critical details must be followed without deviation.
The following checklist outlines the essential waterproofing details that must be correctly executed to ensure long-term performance and validate a 20+ year warranty:
- Upstand Height: Ensure all upstands (the membrane turned up against a wall) extend a minimum of 150mm above the finished roof level and are properly terminated.
- Corner Detailing: Always use pre-formed, factory-made corner pieces for all internal and external angles. Never attempt to fold or crease a single sheet of membrane to form a corner.
- Positive Falls: The roof deck must be constructed with a minimum fall of 1:40 (a 1-unit drop for every 40 units of length) to ensure positive drainage and prevent any possibility of ponding water.
- Edge Termination: Use mechanically fixed termination bars with a continuous bead of compatible sealant and compression seal at all roof edges and upstands.
- Redundant Drainage: Install overflow scuppers or secondary drainage outlets positioned 50mm above the primary outlets to prevent catastrophic failure if the main drains become blocked.
- Inspection Schedule: Document and commit to an annual inspection schedule to check all sealants, clear outlets of debris, and inspect the membrane for any signs of blistering or damage.
By shifting focus from the broad roof surface to the minute details of its edges and corners, you can engineer a waterproofing system that delivers guaranteed long-term performance and peace of mind.