The “maintenance-free” promise of a deck doesn’t come from the surface boards, but from the integrity of the entire decking system.
- Composite and hardwood both fail prematurely if the hidden components—substructure, fasteners, and water management—are neglected.
- A small investment in substructure protection, like joist tape, can double the frame’s lifespan, aligning it with the 25+ year warranty of modern decking.
Recommendation: Prioritize the design and protection of your deck’s substructure and fastening system; it’s the true foundation of long-term, low-maintenance outdoor living.
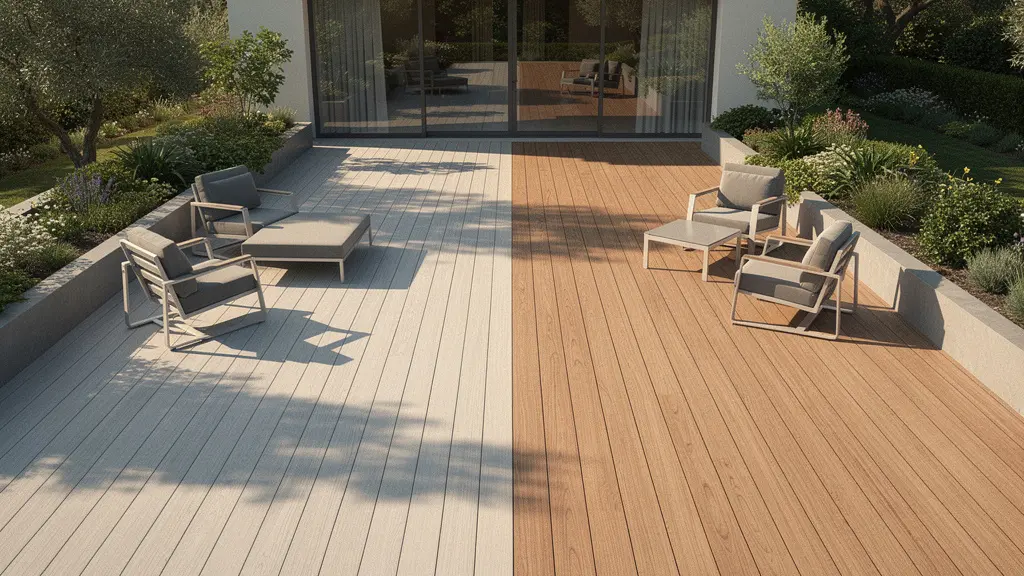
For any homeowner weary of the annual ritual of sanding, staining, and sealing a wooden deck, the term “maintenance-free” sounds like a dream. The market typically presents a simple choice: the natural charm of hardwood versus the engineered resilience of composite. This debate often revolves around upfront cost and surface aesthetics. While these are valid points, they dangerously oversimplify the reality of building a durable outdoor platform. The truth is, the promise of a deck that will look good and remain structurally sound for a decade or more has very little to do with this surface-level choice alone.
The real secret to longevity isn’t in the single board you choose, but in the quality of the entire decking system. This includes the unseen foundation, the method of fastening, the management of moisture, and how the material behaves in its specific environment. A premium composite deck installed on a standard, unprotected wood frame is a ticking clock; the beautiful, warrantied surface will long outlast its rotting foundation. Conversely, a meticulously installed and maintained hardwood deck can offer decades of service. The key failure points are almost always hidden from view.
This guide moves beyond the generic “composite vs. wood” argument. We will deconstruct the decking system to reveal the critical components that truly deliver on the “low-maintenance” promise. We will explore how hidden mechanics create a premium finish, why the core of a composite board matters as much as its surface, and how a simple roll of tape can be the most important investment you make. The goal is to empower you to think like an expert, focusing not just on the deck you see, but on the robust engineering that makes it last.
To navigate this in-depth analysis, this article is structured to guide you from the value proposition of a quality deck to the specific technical details that ensure its longevity and usability. The following summary outlines the key areas we will explore.
Summary: A Deep Dive into Decking System Longevity
- Why a Quality Deck Adds More Value per m² Than an Extra Bedroom?
- How to Install Decking Without Visible Screw Heads for a Premium Look?
- Hollow vs Solid Core Composite: Which Feels More Solid Underfoot?
- The Tape Solution That Stops Your Sub-Structure Rotting Before the Decking?
- When to Oil Your New Hardwood Deck: Immediately or After Weathering?
- Natural Stone vs Porcelain: Which Stays Cooler Under Direct Summer Sun?
- How to Achieve a Flush Threshold Between Timber Floor and Exterior Decking?
- 3m vs 4m Projection: Which Depth is Necessary for a 6-Person Dining Table?
Why a Quality Deck Adds More Value per m² Than an Extra Bedroom?
When considering home improvements, homeowners often focus on interior additions like extra bedrooms or bathroom remodels. However, the financial and emotional return on a well-executed outdoor living space can be surprisingly superior. It’s not just about adding square footage; it’s about adding functional, desirable living space that enhances lifestyle. In fact, the National Association of Realtors’ 2024 Remodeling Impact Report highlights this, giving decks a “joy” score of 9.8 out of 10, with 74% of homeowners feeling more relaxed and enjoying their homes more after the addition.
From a purely financial perspective, the return on investment (ROI) is compelling. While national averages fluctuate, regional data tells a powerful story. For instance, the 2024 Cost vs. Value Report shows a composite deck addition can recoup an impressive 88% ROI in the Pacific region. This high return is driven by the modern buyer’s desire for seamless indoor-outdoor living. A deck effectively extends the home’s footprint for entertaining, dining, and relaxation at a fraction of the cost of a full structural addition.
Interestingly, the debate between wood and composite shows a nuanced financial picture. An analysis comparing the two reveals that while wood decks can have a slightly higher percentage ROI, composite decks often add more absolute dollar value to the home. According to TimberTech’s research, a typical wood deck might add around $8,559 in value, whereas a composite deck adds $9,325 on average. This is because the higher initial cost of composite is perceived by buyers as a long-term investment in durability and low maintenance, a highly sought-after feature. Ultimately, a quality deck isn’t just an expense; it’s a value-add that pays dividends in both enjoyment and resale price.
How to Install Decking Without Visible Screw Heads for a Premium Look?
Nothing separates a standard deck from a high-end, architectural one more than the method of fastening. Traditional face-screwing, while functional, leaves a surface peppered with screw heads that collect dirt, disrupt the visual flow of the grain, and create potential entry points for moisture. For a truly premium, seamless look, hidden fastener systems are the undisputed choice. These systems utilize clips or plugs that secure the boards from the side or below, leaving the deck surface smooth and unblemished.
Modern composite decking is specifically designed to accommodate these systems. The boards often feature grooved edges that perfectly match with metal or plastic clips. These clips slide into the grooves and are then screwed into the joists below, making the fasteners completely invisible from above. This not only looks better but also allows the boards to expand and contract naturally with temperature changes, reducing stress on the material. A popular high-end technique, especially with composite, is “picture framing”—running a border of boards around the perimeter to neatly hide the unnatural-looking cut ends of the main deck boards, completing the bespoke look.
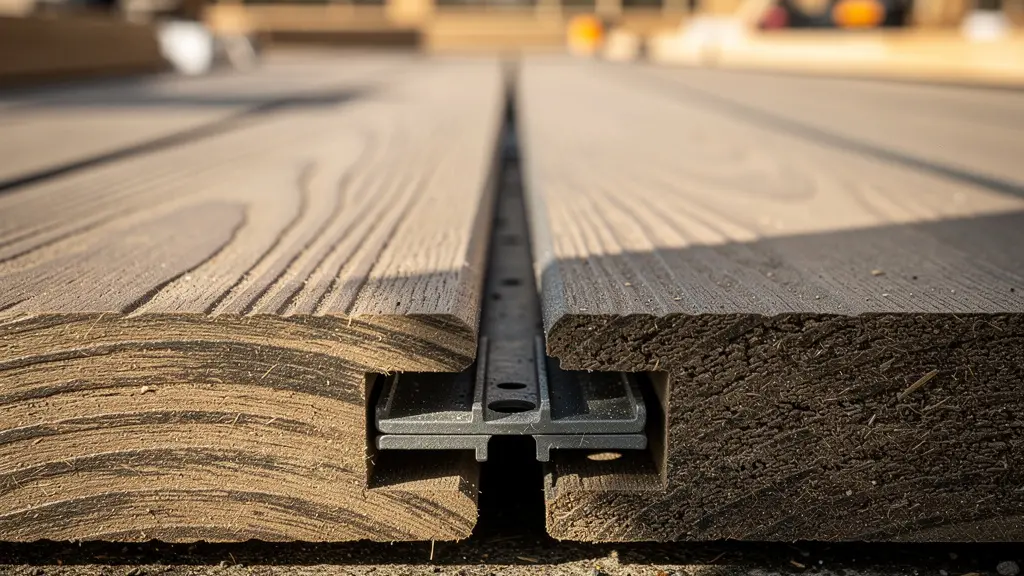
However, achieving this flawless finish requires meticulous preparation. The substructure must be perfectly level; any imperfections in the joists will be magnified on the finished surface, creating a wavy effect. It’s also critical to plan for the future. Before installation, you must understand how your chosen fastener system allows for the replacement of a single damaged board. Some systems make this easy, while others may require significant deconstruction. The clean aesthetic of a hidden fastener system is a hallmark of quality, but it’s a result of careful planning and precise execution of the underlying decking system.
Hollow vs Solid Core Composite: Which Feels More Solid Underfoot?
Not all composite decking is created equal. Once you move past the surface color and texture, the most important structural difference lies in the board’s core: hollow or solid. This choice significantly impacts the deck’s feel, durability, and long-term performance. Hollow core boards are lighter and often less expensive, making them easier to handle during installation. However, their scalloped or channelled underside can sometimes produce a “drum effect” when walked on, feeling less substantial and sounding louder.
Solid core boards, by contrast, are heavier and denser. This mass gives them a feel underfoot that is much closer to traditional hardwood. They absorb sound and vibration better, providing a quieter and more solid-feeling surface. This structural integrity also translates to superior impact resistance. A dropped grill tool or heavy patio furniture is less likely to dent a solid core board. Furthermore, the solid profile offers greater point-load strength, which is critical for supporting heavy items like large planters or hot tubs.
The difference is also felt in the deck’s framing requirements. To achieve a solid feel, hollow core boards often require joists to be spaced closer together (typically 12 inches on center), increasing the cost and complexity of the substructure. Solid core boards generally perform well with standard 16-inch joist spacing, feeling firm and stable without extra support. The following table breaks down the key performance differences:
| Feature | Hollow Core | Solid Core |
|---|---|---|
| Weight | Lighter (easier to handle) | Heavier (more substantial feel) |
| Sound/Vibration | Can create ‘drum effect’ | Absorbs vibrations better |
| Thermal Mass | Dissipates heat quickly | Retains heat longer |
| Point-Load Strength | More prone to denting | Greater resistance to impacts |
| Joist Spacing Impact | Needs 12″ spacing for solid feel | Feels solid at standard 16″ spacing |
While hollow boards have their place in budget-conscious projects, for a homeowner seeking the feel of premium quality and long-term durability, a solid core board is almost always the superior investment in the overall decking system.
The Tape Solution That Stops Your Sub-Structure Rotting Before the Decking?
Here lies the most common and costly failure point in modern decking systems: the substructure. Most decks, whether topped with wood or composite, are built on a frame of pressure-treated (PT) wood. While the composite boards above may come with a 25- or even 50-year warranty against rot and decay, the PT lumber beneath has a much shorter effective lifespan, often failing in as little as 10-15 years. This creates a scenario where you have a perfectly good deck surface sitting on a dangerously compromised foundation.
The primary culprit is moisture. Every time it rains, water seeps through the tiny gaps between deck boards and sits on top of the joists. The screws used to fasten the deck boards create punctures in the wood, wicking moisture deep inside. This creates a “perched water table” effect, where the joists are kept perpetually damp, providing the perfect breeding ground for rot. The solution is remarkably simple and cost-effective: joist protection tape. This is a self-adhering, butyl-based tape that is applied to the top of the joists and beams before the deck boards are installed.
This tape creates an impermeable barrier, preventing water from ever coming into contact with the wood. When a screw penetrates the tape, the flexible butyl material seals tightly around the screw shank, blocking this critical water-ingress point. As professional builders and manufacturers like Trex have noted, this simple addition can effectively double the lifespan of the pressure-treated substructure. This synchronizes the lifespan of the foundation with the warranty period of the decking it supports. Considering that joist tape typically represents only 1-3% of the total project budget, skipping this step is a classic case of being “penny wise and pound foolish.” It’s the single most important thing you can do to ensure your deck’s true, long-term stability.
When to Oil Your New Hardwood Deck: Immediately or After Weathering?
For those who choose the timeless beauty of natural hardwood like Ipe or Cumaru, the “maintenance” question isn’t about *if*, but *when* and *how*. The initial treatment of a new hardwood deck is a critical step that determines its long-term health and appearance. A common mistake is to either oil the deck immediately upon completion or to leave it untreated for too long. The expert approach is a patient, methodical process that works with the wood’s natural properties.
New hardwood decking often has a “mill glaze,” a glossy surface created by the planer blades during manufacturing. This glaze prevents oil from penetrating properly. Therefore, the deck needs to “weather” for a period of 4-6 weeks. Exposure to sun and rain opens up the wood’s pores, allowing it to accept the protective oil deeply. The single most important step during installation, however, is to seal all cut ends immediately with a wax or oil-based sealant. An estimated 90% of moisture enters a board through its end grain, so sealing these cuts prevents checking and splitting before the main surface is even ready for treatment.

After the weathering period, you can perform a simple “water droplet test”: if a drop of water beads up on the surface, the mill glaze is still present and you need to wait longer. If it soaks in within a minute, the wood is ready to be oiled. For those who can’t wait, the surface can be lightly sanded with an 80-grit abrasive to manually remove the glaze. This initial, correctly-timed oiling is the foundation for a simple annual maintenance routine that will keep the hardwood rich and protected for decades, especially in climates with freeze-thaw cycles.
Your Hardwood Oiling Action Plan
- Week 0 (Installation): Immediately seal all cut end-grains with a dedicated wax or oil sealant to block the primary path of moisture entry.
- Weeks 1-4 (Weathering): Allow the installed deck surface to be exposed to sun and rain. This process naturally opens the wood pores by breaking down the mill glaze.
- Weeks 4-6 (The Test): Perform the “water droplet test” on a small area. If water soaks in quickly, the deck is ready. If it beads up, allow more weathering time.
- Ready for Oiling: Clean the deck thoroughly and apply a high-quality penetrating oil according to the manufacturer’s instructions.
- Ongoing Care: Re-oil annually or as needed to maintain protection and color, particularly in harsh climates where moisture can freeze in surface checks.
Natural Stone vs Porcelain: Which Stays Cooler Under Direct Summer Sun?
A deck’s usability in peak summer is often dictated by a factor many homeowners overlook: surface temperature. Certain materials can become uncomfortably, or even dangerously, hot to the touch under direct sun. This is a particularly important consideration for composite decking, which has historically been known to retain more heat than traditional wood. However, significant innovations in material science have addressed this issue, particularly in the realm of capped PVC and advanced composite decking.
The key differentiator is the material composition. Traditional wood-plastic composite (WPC) contains wood flour, which absorbs and retains thermal energy. Newer generations of capped PVC decking, on the other hand, contain no organic material. This composition, combined with lighter color options, allows them to stay significantly cooler. An analysis by Fiberon showed that their light-colored PVC decking could be up to 15°F cooler than dark composite boards after just two hours in the sun. This is because proprietary cap layers, like their PermaTech technology, are engineered not only for stain and fade resistance but also to reflect more solar radiation.
When comparing paving options like natural stone and porcelain tiles, a similar principle applies. Darker, denser materials like slate or bluestone will absorb a great deal of heat. Lighter-colored stones like travertine are naturally cooler. However, high-quality, light-colored porcelain pavers often have the edge. Their manufacturing process can be controlled to create a less dense body with a more reflective surface glaze, helping them dissipate heat more effectively than many natural stones. For homeowners in hot climates, prioritizing materials with proven low heat absorption is not a luxury—it’s essential for creating a comfortable and usable outdoor space during the hottest months of the year.
How to Achieve a Flush Threshold Between Timber Floor and Exterior Decking?
The ultimate goal of a modern outdoor living space is to create a seamless extension of the interior. A critical element in achieving this is the flush threshold, where the interior flooring flows directly onto the exterior deck without a step-down. While visually stunning, this design detail is technically challenging and carries a high risk of water ingress if not executed perfectly. It is a prime example of where the “decking system” must be flawlessly integrated with the home’s structure.
The number one risk is water management. To create a flush transition, the deck’s surface must be built up to the level of the interior floor, which often places it at or above the home’s foundation line and weatherproofing layers. To mitigate this, a multi-layered drainage solution is not optional, it is mandatory. This typically involves installing a recessed channel drain right at the door line, sitting atop a robust sub-sill flashing system. This captures any water that hits the threshold and directs it away from the building’s structure.
Achieving the correct height also requires creative framing solutions. The deck’s substructure must be set lower than usual. This can be accomplished by using lower-profile steel joists or by notching the wooden deck joists so they sit lower on the ledger board attached to the house. Regardless of the threshold height, the substructure must maintain a positive slope away from the house to ensure water always drains away. The choice of door is also critical; bifold or lift-and-slide door systems are often designed specifically for flush thresholds and have integrated drainage channels that work in concert with the exterior drainage system. This level of integration requires expert planning and is not a DIY-friendly project.
Key Takeaways
- The longevity of a deck is defined by its entire system (substructure, fasteners, drainage), not just the surface material.
- Protecting the pressure-treated substructure with joist tape is the highest-return investment for preventing premature rot and failure.
- Hidden fasteners and proper material selection (like solid core composite) contribute significantly to both the premium feel and long-term durability of the deck.
3m vs 4m Projection: Which Depth is Necessary for a 6-Person Dining Table?
Beyond the materials and construction techniques, the ultimate success of a deck lies in its functionality. A beautiful deck that is too small to be used as intended is a design failure. One of the most common uses for a deck is outdoor dining, and planning for this requires a clear understanding of space requirements. The projection, or depth, of the deck is the most critical dimension for determining its usability as an “outdoor room.”
A common rule of thumb suggests planning for 20-40 square feet of deck per person, but for specific functions like dining, a more detailed breakdown is needed. The minimum depth for a dining area can be calculated with a simple formula: Table Depth + Chair Push-Back Zone + Circulation Path. A standard 6-person dining table is about 1m deep. A person needs about 1m of space to push their chair back and stand up comfortably. Finally, you need at least 1m of clear space for a circulation path to walk around the table. This brings the absolute minimum functional depth to 3 meters.
However, “minimum” is often synonymous with “cramped.” A 3m deep deck allows for dining, but little else. There is no room for a grill, a separate seating area, or comfortable circulation. Increasing the depth to 4 meters transforms the space entirely. That extra meter provides generous circulation and allows for the creation of a second “zone,” such as a small conversation area with a couple of chairs or a designated spot for the barbecue. This multi-zone functionality is what truly turns a simple platform into a versatile outdoor room.
| Deck Depth | Functionality | Comfort Level |
|---|---|---|
| 3m | Table + minimal circulation | Cramped, single-zone only |
| 3.5m | Table + basic chair movement | Adequate for dining only |
| 4m | Table + circulation + second zone | Comfortable multi-zone outdoor room |
| Formula | Table Depth (1m) + Chair Push-Back Zone (1m) + Circulation Path (1m) = 3m minimum | |
When investing in a deck, compromising on a meter of depth to save a small percentage on the total cost can reduce the usability of the entire space by 50%. Planning the dimensions around your intended lifestyle is the final, crucial step in designing a successful decking system.
By focusing on the integrity of the entire system—from the substructure to the fasteners to the final dimensions—you can build a deck that not only looks beautiful on day one but truly delivers on the promise of low-maintenance enjoyment for years to come. The choice between composite and hardwood becomes just one component in a much larger equation for success. The next logical step is to translate this knowledge into a concrete plan for your own project.